Introduction
This is a fun way to work on the clarity of our voice, touch, and gesture signals for walk on, halt, and back up. If we have a tall horse (or we are short) it can make grooming the upper parts of the horse much easier.
Having our feet ‘planted’ in one place means we have to refine our signals to make them super clear for the horse.
Aim
To groom the upper areas of both sides of our horse while standing on a raised platform (or keeping our feet on a mark on the ground if we have small equines).
Prerequisites
- Horse confidently comes to a mounting block or similar structure without the need for a mat. #240 HorseGym with Boots: Wait and Recall. Click here.
- Horse confidently targets his cheek to a brush. #242 HorseGym with Boots: Target Cheek to Brush. Click here.
- Horse understands a ‘move forward please’ signal paired with a ‘whoa’ signal while the handler remains in one spot. #213 HorseGym with Boots: Send & Halt. Click here.
- Horse is familiar with backing up one step at a time and moving forward one step at a time. Number 37 in my Blog Contents List. One Step at a Time. Click here.
- Horse understands hand and voice signals for backing up when the handler is beside the withers. #173 HorseGym with Boots: Balancera Clip 1 of 2. Click here.
- Horse and handler agree on signals the horse gives when he is ready to do something again. Seeking the Horse’s Consent Signals: Click here.
- Number 46 in my Blog Contents List: Rule of Three: Click here.
Video
#194 HorseGym with Boots:
Materials and Environment
- A venue where the horse is able to relax. Ideally he can see his buddies but they can’t interfere.
- Horse and Handler are clicker-savvy.
- Horse is not hungry.
- A mounting block or anything safe for the handler to stand on. If you have a small pony, stand on a marker of some sort, so you are not tempted to move your feet other than turning as necessary.
- A safe fence or similar barrier.
- Grooming gear.
- To start with guided shaping, use a target that’s easy to handle and take out of play (tuck into a belt or pocket), or a halter and lead.
Notes
- Short sessions of Slice 1 can be done alongside the other slices. But stay with each of the other slices until you are both confident with it. Better to go a bit too slow than to go too fast.
- Have each task working smoothly on the ground before putting them together and eventually adding the platform to stand on.
- The timing of the click is the only thing that tells the horse how to earn the treat, so strive to get your timing as accurate as you can.
- When the horse moves ahead of you, or backs up so he is behind you, we want him to halt and wait ‘on the spot’ when he hears the click. You go to him to deliver the treat.
- Remember to celebrate each approximation toward the final goal. Start with a high rate of reinforcement. As the horse gets to understand each task, ask for a bit more before each click&treat.
- But always be prepared to slow down and increase the rate of reinforcement if the horse (or the handler) gets lost. I always do this task with a high rate of reinforcement because Boots has never been keen on grooming.
Slices
- Ensure that your horse willingly comes to you when you call him while you stand on a pedestal, mounting block or marker. Usually this includes have taught a ‘wait’ so that you can move easily between your standing places (Prerequisite 1).
- On the ground, ensure that your horse willingly targets a brush in your hand, both with his nose and with his cheek (Prerequisite 2). This is a great task to teach your horse about consent signals (Prerequisite 6) by doing a little bit often (Prerequisite 7). A consent signal for brushing by the horse might be touching his cheek to your brush. Do all this standing on the ground.
- On the ground, ensure that your horse understands a signal for moving forward one step and back one step while you are beside him (Prerequisites 3, 4, 5).
- On the ground, play with asking the horse to move forward one or two steps with an arm gesture or a touch signal just behind the withers. We can teach this by standing back from a nose target and using the gesture or touch signal to request the horse to move to the target and wait there for you to move to him to deliver the treat. (Prerequisite 3). Eventually phase out the nose target. Click for one or two steps forward away from you when you use your touch signal behind the withers.
- On the ground, play with asking the horse to back up a few steps while you are at or behind his withers (Prerequisite 5). Work alongside a fence in a corner or build a dead-end lane to make it easier for the horse to understand what you want.
- Once all the tasks above are in place on the ground, add the mounting block or pedestal.
- When 6 above is smooth on one side of the horse, ask the horse to back up far enough so you can ask him to walk forward on the other side of the mounting block so his other side is nearest you.
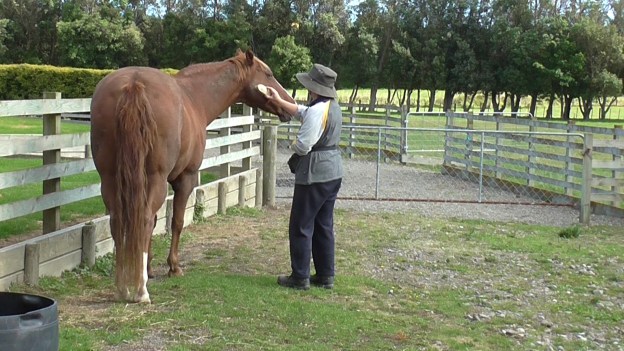
- Once you have your ‘ready to brush’ Consent Signal in place (Prerequisite 6), use it for drive-by grooming while you stand on the mounting block or pedestal. Boots’ consent signals are coming over to me on the mounting block or pedestal and touching the brush with her cheek when I hold it out.
Generalizations
- Move your mounting block to different locations.
- Vary whether you start grooming on the left side or right side.
- Stand on different pedestals to do drive-by grooming.
- Play with asking him to come to the mounting block from further and further away.
- Teach another person the signals so they can brush your horse.