Tag Archives: targeting

Consent Signals: Target Cheek to Brush for Grooming

Introduction

When we want to give a horse the option to take part in an activity or not, we can learn to wait for the horse to give us a consent signal that tells us when he is comfortable for us to go ahead.

This task looks at setting up a consent signal for grooming. Some horses love to be groomed. Others not so much.

There are a variety of reasons why a horse may not be relaxed about grooming.

  • A traumatic grooming experience, e.g. punishment for restless movement. ‘One Time’ trauma learning is a real thing.
  • Grooming while tied up if tying up itself causes anxiety. Being in cross-ties may feel a bit like a straightjacket – we have removed all options for movement.
  • Grooming before activities that the make the horse feel nervous, afraid, uncomfortable, in pain, and/or exhausted.
  • Grooming with tools the horse finds uncomfortable.
  • General inexperience or discomfort with being around people or a certain person.
  • A combination of any of the above.

Aim

To establish the horse targeting his cheek to a brush as a consent signal that he is okay for us to proceed with grooming.

Prerequisites

  1. Horse and handler are clicker savvy.
  2. Handler has developed a clear ‘Zero Intent’ signal so the horse knows when standing quietly is what is wanted. Number 10 in my Blog Contents List: ‘Zero Intent’ and ‘Intent’. Click here.
  3. Horse understands the concept of targeting body parts to our hand. Click here.
  4. Horse and handler agree on signals the horse gives when he is ready to do something again. Seeking the Horse’s Consent Signals: Click here.

Videos

#241 HorseGym with Boots: https://youtu.be/-TK4VqCnvL4

Materials and Environment

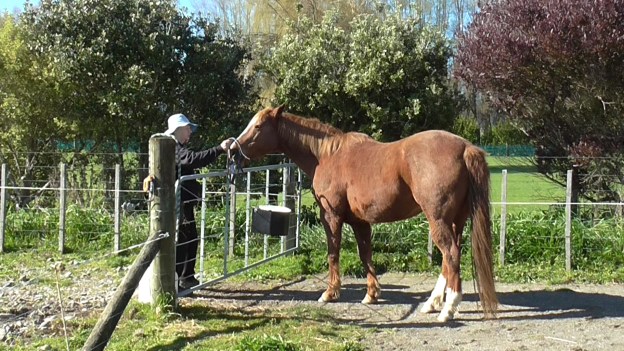
  • A venue where the horse is able to relax. Ideally he can see his buddies but they can’t interfere.
  • Horse is not hungry.
  • A soft brush.
  • Mat (optional).

Notes

  1. Your horse may develop more than one consent signal. You will note in the video that Boots uses two. One is turning toward me to let me know she is finished chewing and ready to repeat. The other is moving her lips in what we call a ‘smile’ but sometimes she does it very discretely and it is just a wiggle of her lips.
  2. Note that we are chaining two tasks. Consent for one (target cheek to brush) becomes the consent for the second task (grooming).
  3. Notice how her body language changes when I start grooming.
  4. If the horse is mat savvy (parks willingly on a mat) you can use a mat when you begin this exercise. But if the horse is worried about grooming, we may not want to make the mat part of a worrying process.

Slices

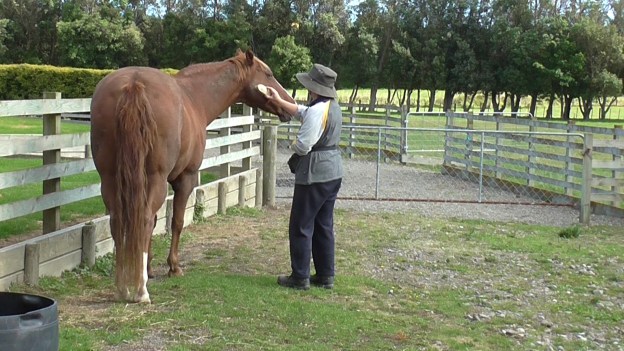
  1. Begin with asking the horse to target his chin to your hand as per Prerequisite 3. This lets him know which game you are about to play.
  2. Change to asking him to target his cheek to your hand, using the process outlined for the chin.
  3. Once 2 is ho-hum, hold a soft brush for him to target with his cheek.
  4. Once 3 is ho-hum, brush a few strokes after the click&treat for targeting cheek to brush. Sometimes I begin brushing while delivering the treat with my other hand, then click&treat again for accepting the brush strokes.
  5. Gradually brush a bit more before the second click&treat (the first is for touching cheek to brush). Be super aware of thresholds of discomfort. If the horse needs to move, he is over threshold and we’ve gone too fast.
  6. Depending on how the horse feels about brushing, it may take many short sessions for him to become more comfortable with brushing, or it might happen very quickly. Spring shedding time is often when grooming is appreciated most.
  7. Teach the whole process from the beginning on the horse’s other side.

Generalizations

  1. Practice in different places.
  2. Add a variety of brushes.
  3. Use a similar process to get the horse comfortable with cloths, ropes, sticks rubbed all over his body.

Counting with the Front Feet

Introduction

You may have heard the story about a horse called Clever Hans who could add, subtract, multiply and divide. I think it was eventually found that Hans responded to eyebrow signals from his person to let him know when he should start and stop lifting his foot.

My horse, Boots, and I won’t reach such a level of sophistication, but teaching ‘counting’ can be fun. It also forced me to refine and clarify the way I presented my signals, as well as improve the timing of my ‘click’.

Leg lifts without moving are a good way to play with mobilization. Viewing the video clips, I notice that lifting one leg engages her whole body.

‘Counting’ is a game we developed over many months with several starts and stops to focus on other things. It’s an engaging game for a few minutes at a time when the weather is too hot, wet, windy, or cold to be out and about.

The key, as for most of equine clicker training, is to have many short sessions, two or three minutes long, over many, days. By keeping it short, the horse begins to look forward to the new game as a relatively easy way to earn clicks&treats.

NOTE: Items with an asterisk {*} are described in the GLOSSARY which you can access at the top of the home page.

Developing Boots’ Individual Education Program* for ‘Counting’ helped me:

  • Be more aware of deciding and stabilizing my body orientation, which is a key part of any signal. Horses are super aware of body positioning.
  • Refine the nature and energy of my signal for this task. We do a lot of different things, so it is tricky to keep all my signals ‘clean’.
  • Improve the timing for when I turn the signal on and off.
  • Remember to take up my ‘zero intent*’ position to wait for the horse to tell me when she is ‘ready to repeat’ (Consent Signals*)
  • Relax when the horse attends to external distractions and wait for her to bring her attention back to me.

This exercise is an extension of tasks we developed to create confidence with standing on three legs for hoof care. Details of this are available in my book, Confident Foot Care using Reward Reinforcement.

Once Boots readily lifted a leg when I pointed to it, it was not a big leap to ask for two lifts in a row before the click&treat*. She is presently on her way to counting to ten. Which lets us have fun doing simple math questions when the grandchildren visit.

Aim

To have the horse understand a signal for lifting a front leg (either one) and able to repeat lifting the leg up to ten times on request (number is optional) before a click&treat.

Prerequisites

  1. Horse and handler are clicker-savvy.
  2. Handler uses clear body language to indicate ‘intent’ and ‘zero intent’. Click here.
  3. Horse is relaxed about foot care and willingly lifts his feet for cleaning/trimming. Or this task can also be part of improving balance on three legs.
  4. Horse has developed one or more ‘Consent Signals*’ to let the handler know when he is ready to go ahead with what we are doing. Click here.
  5. Horse understands touching a target with his nose, his knee, and his foot. #89 HorseGym with Boots: Balance on Three Legs looks at foot targeting. Click here.

Videos

MATERIALS AND ENVIRONMENT

  • Ideally, the horse can see his buddies, but they can’t interfere.
  • The horse is not hungry.
  • A space where the horse can stand relaxed and confident.
  • A safe fence (not electrified or wire) or similar barrier.
  • A target safe for foot targeting and easy to handle. I find a piece of cloth slipped into the leather end loop of an old riding crop makes a nice lightweight target. Bulky things like pool noodles are harder to hold and harder to remove from view to ‘take out of play’.
  • A rail on the ground may be helpful in some cases.

Notes

  1. Using props when we begin a new task makes it much easier for the horse to understand what to do to earn his next click&treat. Use of well-planned props takes us halfway to achieving our aim.
  2. Once the horse understands the task, we gradually fade out the props.
  3. Pawing is not the same as counting with a discreet signal from the handler for each ‘number’ counted. If pawing becomes an issue, repeated click&treat for ONE lift of the foot may (over many short sessions) may make it clearer for the horse.
  4. I start each session (once we can count more than ONE) with click&treat for ONE, and work up the numbers to our present limit.
  5. I like to encourage the horse to use both front feet for the counting. Boots sometimes uses both and sometimes mostly one foot. Using both gives better distribution of the muscle movement throughout the body.
  6. HANDLER SKILL: Your horse may begin to offer foot lifts once you’ve started this game. Boots does it in the video clips. This ‘offering’ is precious. It shows you that the horse understands the game and is volunteering to start. If I’m ready, I count such an ‘offer’ as ONE and begin to signal for TWO and so on.
  7. HANDLER SKILL: Click as the horse is in the act of lifting his foot. Good timing is not always easy and can always be improved. Don’t worry if you don’t get it exactly right each time. Focus on the upward movement of the foot. Once you are conscious of this, and with practice, your timing will improve.
  8. HANDLER SKILL: Carefully check your body orientation to keep it the same each time you begin to ask for ‘counting’. Horses are super aware of how our body is orientated. Consistent orientation is a large part of signal clarity.
  9. HANDLER SKILL: Ensure that you always use the hand closest to the horse to give the ‘lift foot’ signal. Which hand you use is highly significant to the horse. I use the hand furthest from the horse to give a signal for ‘shoulder away’.
  10. HANDLER SKILL: The signal for each ‘foot lift’ is an ON-OFF signal.
  11. HANDLER SKILL: As you click, remove the target (and later your hand/finger) to behind your body to consciously take it ‘out of play’ – the OFF part of the signal. When you present it again for the next ‘repeat’ it will catch the horse’s attention as your ON signal. Once you are using your finger, make your moving finger the ON signal and learn to tuck your finger way for the OFF signal.
  12. HANDLER SKILL: I begin the task by using a voice signal. I say, “Counting – Fronts” and quietly count each foot lift, exaggerating my voice for the number I will click. Boots has learned that while I say the number softly, she will need to do another one – in other words, she listens for my loud, happy final number plus click. I’m also teaching her to count with the back feet, where I start by saying, “Counting – Rear” and my body orientation is quite different.
  13. HANDLER SKILL: In the clips you will notice that occasionally Boots pauses. She is not being slow or stubborn, she is thinking. Be sure to give your horse ample thinking time and sometimes they like a bit of time to enjoy their last treat before resuming the game.
  14. HANDLER SKILL: Always click before you reach for the treat or the horse will learn to watch your hand rather than focus on what you are teaching. This is especially important for this task because your hand moving slightly forward with a finger wiggling will become the ON signal as you fade out the target prop.
  15. HANDLER SKILL: Feed the treat away from your body. Try to position your treat hand so the horse straightens his head to retrieve the treat.
  16. HANDLER SKILL: If the horse is distracted, wait with ‘zero intent*’ body language until the horse brings his attention back to you – hopefully using a ‘consent’ signal*. Sometimes the waiting feels like a long time, but it is usually only a few seconds. Pay attention to whatever has caught the horse’s attention by looking at it keenly, then breathe out deeply. This shows the horse that you have noticed his concern but are not worried about it.
  17. HANDLER SKILL: Teach everything on either side of the horse. One side may feel more difficult. The horse may be less comfortable with you on one side. We are usually less smooth giving signals when we use the non-dominant side of our body. I like to teach each slice of this task on both sides before moving on to the next slice. While the horse is learning, I am learning to be more particular about everything mentioned in these notes.
  18. HANDLER SKILL: Stay with X-number of leg lifts until it feels like the horse is ho-hum with that number, even if you stay at ONE or TWO for what feels like ages. Nothing derails our training as quickly as going faster than the horse is able to absorb each new slice and put it into deep memory.
  19. HANDLER SKILL: If you get a nice series of ‘counting’, resist the natural urge to ‘do it again to see if we can do it again’. Stop when it feels really nice and wait until your next session.

Slices

  1. If you already have a space where the horse stands comfortably relaxed, start with Slice 2. If not, we first need to establish a place we can use consistently for teaching this task. One way is to ensure your horse is comfortable standing between a safe fence and a rail on the ground. Walk him through the space in both directions. Then halt in the space; click&treat, in both directions. The fence and rail help show the horse that you don’t want him to move sideways. When he is relaxed in the space, start with Slice 2.
  2. Set the scene to let the horse know that ‘targeting’ is the game of the moment by asking him to target his nose, a knee, then the back of a front foot to your target.
  3. Repeat touching the foot to the target ONCE with a click&treat each time. Somewhere between three and five repeats is plenty at one time. (See The Rule of Three. Click here. )
  4. When the horse readily lifts his foot once, ask for twice before the click&treat.
  5. When the horse readily ‘counts’ to TWO, ask for THREE before the click and treat.
  6. And so on, to as high a number as you like, always staying within the horse’s ability and interest level.
  7. As you reach a higher number (over five), the horse may pause more often to think. He may be thinking about which foot to lift next.
  8. When it feels like the horse has a good understanding of the task, gradually introduce a finger wiggle with the hand holding the target. Horse peripheral vision is magic at picking up movement, so they will notice the finger wiggle easily.
  9. Gradually lessen the movement of the target stick toward the horse as you wiggle your finger. Eventually you’ll realize that you no longer need the target stick – that your hand/finger movement has become the signal.
  10. Remember, bringing your hand forward and the wiggling your finger is your ON signal. Put your hand ‘away’ and out of play is your OFF signal. Then when you bring your hand with wiggling finger forward again, the horse will notice it as your ON signal to do another ‘count’.

Generalizations

  1. When the horse is ho-hum about his ‘counting’ task in the familiar spot you have been using, move to different venues. You may want to begin with fence and rail props in a new venue. Horses let us know when the props are no longer needed.
  2. At some point you can begin to mix up the number you ask for – sometimes THREE, sometimes FIVE, occasionally SEVEN, and so on.

Alternative to Hand-Feeding Food Reinforcement

REASONS

There are several reasons why feeding the treat from our hand may not be the way forward with either a person or a horse new to clicker training.

For example:

  • The horse is new to people and has no idea about eating from a person’s hand.
  • The person is nervous about offering food from their hand.
  • The horse tends to mug the person once he realizes they have food in a pocket or pouch.
  • The horse is not gentle about taking the food from the hand.
  • Some horses are shy of people’s hands due to experience, or they don’t like taking food from a person’s hand.

In such situations, we can set up protected contact with a handy bucket or dish into which we toss the treat after the click.

We want the container situated so it’s easy to toss in the treats. We also want to use a container from which the horse can easily retrieve the treats.

In the video I’ve put a shallow round-bottomed bowl into the trough that sits on the gate. The depth and corners of the trough make it hard for the horse to retrieve a small strip of carrot or horse pellets.

In the video, I use the word CLICK (and clicker) to stand in for any marker sound you have chosen to use with your horse.

Charging the Clicker

‘Charging the Clicker’ is the first thing we must do when be begin clicker training. We want the horse to relate the sound of our ‘marker sound’ with the idea that a bit of food always follows that sound.

Some horses pick this up very quickly. Others need many short repeat sessions before they make the connection. For horses taught to wait to be told what to do next or get into trouble, the idea of offering a behavior may be a new idea.

This video clip demonstrates just one way of ‘Charging the Clicker’. It has the advantage of using protected contact – a barrier between horse and person. Until we start using food reinforcers with a horse, we don’t know how he will respond to the idea.

Protected contact keeps the person safe and some horses feel safer if a handler is on the other side of a fence. Using a hand-held target means the horse can easily find the YES answer that results in a click&treat.

To me, it feels more meaningful to the horse to ‘charge the clicker’ this way, rather than by waiting for the horse to move his head away from the handler. Using a target gives the horse a tangible destination for his behavior. Asking him to keep his head away from the treats goes totally against the nature of how horses find nourishment. It requires a ‘no’ answer rather than the ‘yes’ answer provided by touching nose to a target.

Once the horse understands the click&treat dynamic, we can work on keeping the head facing forward rather than seeking out the treat pouch.

We can also use this set-up when things are not going well. The horse may have developed the habit of mugging for the treats – pushing his nose into the person. It is totally normal horse foraging behavior – to follow their nose to a likely food source.

By using a bucket or dish, we separate the location of the retrievable food from the person’s body. That alone is a good reason to begin with this technique. Once the horse understands the concept and we understand how the horse is responding to the idea of working for food reinforcement, we can work toward offering the food in our outstretched hand. We can make the switch to hand-feeding while still in protected contact.

Video Clip