Introduction
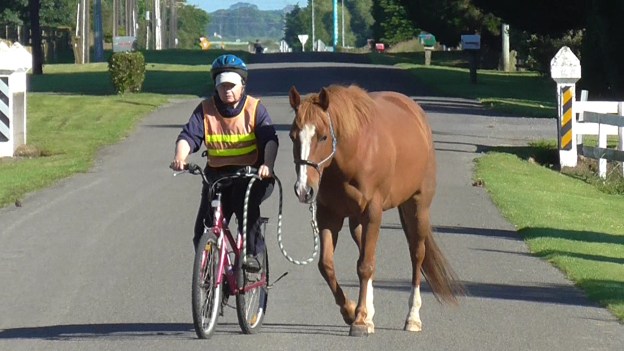
When my hips gave up riding horses but not riding my bike, it made sense to teach Boots to ‘pony’ from my bike. Usually people ‘pony’ a second horse while riding another horse.
It’s a skill developed for pack horses or to exercise two horses at the same time. When my son was very small we rode together with his pony on a lead. Leading a horse from a bike or scooter rather than another horse comes with its own hazards and challenges.
Aim
The horse walks/trots confidently and safely led by a person on a bike or a scooter.
Prerequisites
- Horse and handler are clicker savvy.
- Horse and handler agree on voice and breathing signals for ‘walk on’, ‘halt’ with the handler beside the horse. Number 16 in the Blog Contents List.
- Horse and handler agree on voice and gesture signals for ‘back up’ while the handler is beside the horse. Number 32 in the Blog Contents list.
- Horse and handler have a good command of prompt transitions upward and downward using voice signals.
- Horse is relaxed about a dragging rope. It’s inevitable that we will drop the rope at some point to stop being pulled off our bike. #60 HorseGym with Boots – specifically the second half of this clip. Click Here.
- Horse and handler agree on voice signals for ‘right turn’ and ‘left turn’. #137 HorseGym with Boots: Click here.
- Horse and handler agree on signals for ‘go around and turn’. This is important to have smooth because as much as possible, we want ourselves between the horse and anything ahead that he might find worrisome. If he needs more space, we want him to move away from us, not into us. # 250 HorseGym with Boots: https://youtu.be/3oqPs4LM5AM and video clip #251 below.
- If riding on public roads or tracks, we must ensure that the horse has been given the time and opportunity to be comfortable around cars, motorbikes, trucks, dogs, pushchairs, other people on bikes, tractors, hikers, and children while the handler is walking with the horse. We need to feel secure with other road users approaching from in front or from behind. Trailers with flapping plastic are an ultimate test. Essential to get used to flapping plastic at home.
Videos
#247 HorseGym with Boots: Boots and Bicycle. Older video – short.
#228 HorseGym with Boots: Intro to Bike. Recent video.
#230 HorseGym with Boots: Bike on the Road. Recent video.
#251 HorseGym with Boots: Changing Sides. Recent video.
#249 HorseGym with Boots: Scooter Outings. Recent video.
#248 HorseGym with Boots: Bob meets Bicycle. Click here. Older video featuring a young horse seeing a bike for the first time.
Materials and Environment
- We need a safe enclosed place where it’s possible to use free-shaping to introduce the horse to the bicycle and establish the basic protocols using a lead rope.
- A helper is great to have at the beginning.
- Horse is not hungry.
- Quiet tracks, trails or roads to expand confidence. For public roads, the key is usually choosing the quietest part of the day.
- Walk with the horse on the routes you will take, for many days, weeks, months, so the route is as familiar as possible. I’d walked or ridden our routes for a long time before ponying on my bike.
- Bicycle or mobility scooter or similar.
- Be especially sure the horse is not hungry before you set off. For some horses, a light mesh grazing muzzle can be a safety feature if the horse tends to dive for grass. Use it first walking out so it is not directly related to the bike. Munch-N-Go make a muzzle that is light and its easy to slip a treat into the side.
Notes
- It’s important to take the time to get all the prerequisites established. Although I put up monthly challenges, each challenge is just an idea that you may like to work toward. The real magic is in getting the prerequisites into good shape, which can take months or years, depending on many factors.
- Keep each session short. Three repeats is often plenty. Many short sessions keep the horse keen to ‘do it again’ next time.
- Click&treat often enough to keep the horse continually successful with what you are asking him to learn. Build duration gradually, but always be conscious of increasing duration as you can.
- Create a strong habit of using your voice signals all the time when they are appropriate, not just with the bike. Our “Whoa” response has saved my bacon numerous times. The “Back-up” with voice and gesture signals is essential. We don’t want the horse crossing in front of us unless we are inviting him to change sides.
- You may be fortunate enough to have tracks and trails where the horse can accompany you on your bike without the need for a lead rope. Some horses, like mine, will gravitate to the closest grass and stay there. If you are limited to public roads or tracks, safety with the lead rope is a must.
- When I take my horse out and about in the neighborhood, we have grazing destinations. If there is no grass, I take an ample supply of carrots and horse pellets which we stop to enjoy at the furthest point of our outing. In other words, I don’t expect the horse to randomly go with me. I give her a destination that makes sense to her. Horses who can move freely always know where they are going and why. We remove much of this self-determination from them when we want to do something with the horse. Working with destinations is a way to return it in a small way. See also Number 17 in my Blog Contents List: Destination Training.
Slices
- Have someone walk with your bike and you follow behind with your horse wearing halter and lead. Allow the horse to decide how close (or not) he will get to the bike. As soon as you see/feel interest or less tension (sighing, blowing out, lower head, softer body) – click&treat.
- Repeat 1 above until the horse is confident enough to walk right up close to the back of the bike, with click&treat for each sign of greater confidence.
- Ask the person wheeling the bike to slow gradually to a stop so the horse can touch his nose to the bike if he’s ready for that step; click&treat. Repeat a few times to consolidate.
- Have your helper ride the bike and repeat 1-3 above.
- At this point, if it feels safe, take off the lead rope so the horse makes his own decisions about approaching and/or following the bike.
- Without a helper: Walk with the bike yourself. Click&treat any movement of the horse toward you and the bike. The aim here is for him to want to come and target your hand or the bike to earn a click&treat.
- When 6 is smooth, ride the bike. Click&treat coming over plus any offer to move with you and the bike. At this point, it’s helpful to expect little but click&treat each tiny sign of increasing interest and confidence.
- Gradually work on duration of staying with you and the bike. Setting up a roomy reverse round pen is helpful at this stage – protected contact for you as the horse gains confidence. You bike inside the barrier while the horse follows outside the barrier. You can use foot targets in set places on the path of travel where you will always stop to click&treat, so the horse knows that there is a destination – a stop point if he stays with you. Eventually have just one foot target on the perimeter of the reverse pen.
- When the horse stays with you on the bike willingly and with confidence, see if you can speed it up so he trots. Sometimes transitioning to a higher gait brings out a spurt of excited energy. It’s good to test this out while you are in protected contact inside the reverse pen. It’s also a good place to work with upward and downward transitions using voice signals. Use your downward transition (trot-walk or walk-halt) voice signals as you approach the foot target when slowing down makes sense to the horse. Use your upward transition signal (halt-walk) as you leave the mat and your walk-trot signal a little while after you leave the foot target when the horse is anticipating reaching it again.
- Build duration without the reverse round pen by using foot or nose targets as destinations. Start with them close together and gradually put them further apart. If you used this method for teaching good leading behavior while walking with the horse, the horse will already be familiar with the concept.
- Introduce the lead rope into the situation. At first, walk the bike while leading the horse. When you introduce a new element to a situation, always go back to click&treat more often (in this case, anytime the horse is coming along smoothly for a few steps), then gradually less often as the horse gains confidence.
- When ponying from the bike at home in familiar places is smooth, venture out on the road first walking the bike. As mentioned in the prerequisites, ensure that you have walked with the horse many times on the public roads you plan to bike with your horse, so that dogs running out, horses or cattle galloping in adjoining paddocks, vehicles, children, and so on, have all been met before and worked through.
- When walking with the horse and bike is smooth, one day it will feel right to get on your bike. Keep the early sessions going away from home and returning home short – celebrate your safe return. It takes a long time to build confidence (yours and the horse’s) but it can be lost in a nanosecond.
- When you reach the farthest point of your day’s outing, allow the horse grazing time or stop for a generous jackpot of treats, before heading home again. This gives the horse a sense of ‘destination’ as outlined in NOTE 6.
- Slowly build up confidence with the types of landscapes you have for biking or scootering with your horse. Shorter distances done often are preferable to long distances less often.
- If you have graduated to a mobility scooter or similar, play with it at home first. Play with having the horse follow it with you while another person drives it. Walk the horse on the left side and the right side of the scooter, first with you nearest the scooter, then with the horse nearest the scooter. Practice the ‘walk on’, ‘halt’, ‘back-up’ transitions. Practice the ‘go around in front and turn to change sides’ maneuver (Prerequisite 7) from both sides until both sides feel smooth.
Generalizations
- Different venues.
- Electric bike.
- Four-wheeler – avoid horse having to breathe in exhaust.
- Golf cart.
- Introduce a rider to horse’s movement without having to ‘be in charge’.
- Ride one horse and lead a second horse.
