Leading Position 1 (LP1) has the handler in front of the horse, facing the same way as the horse.
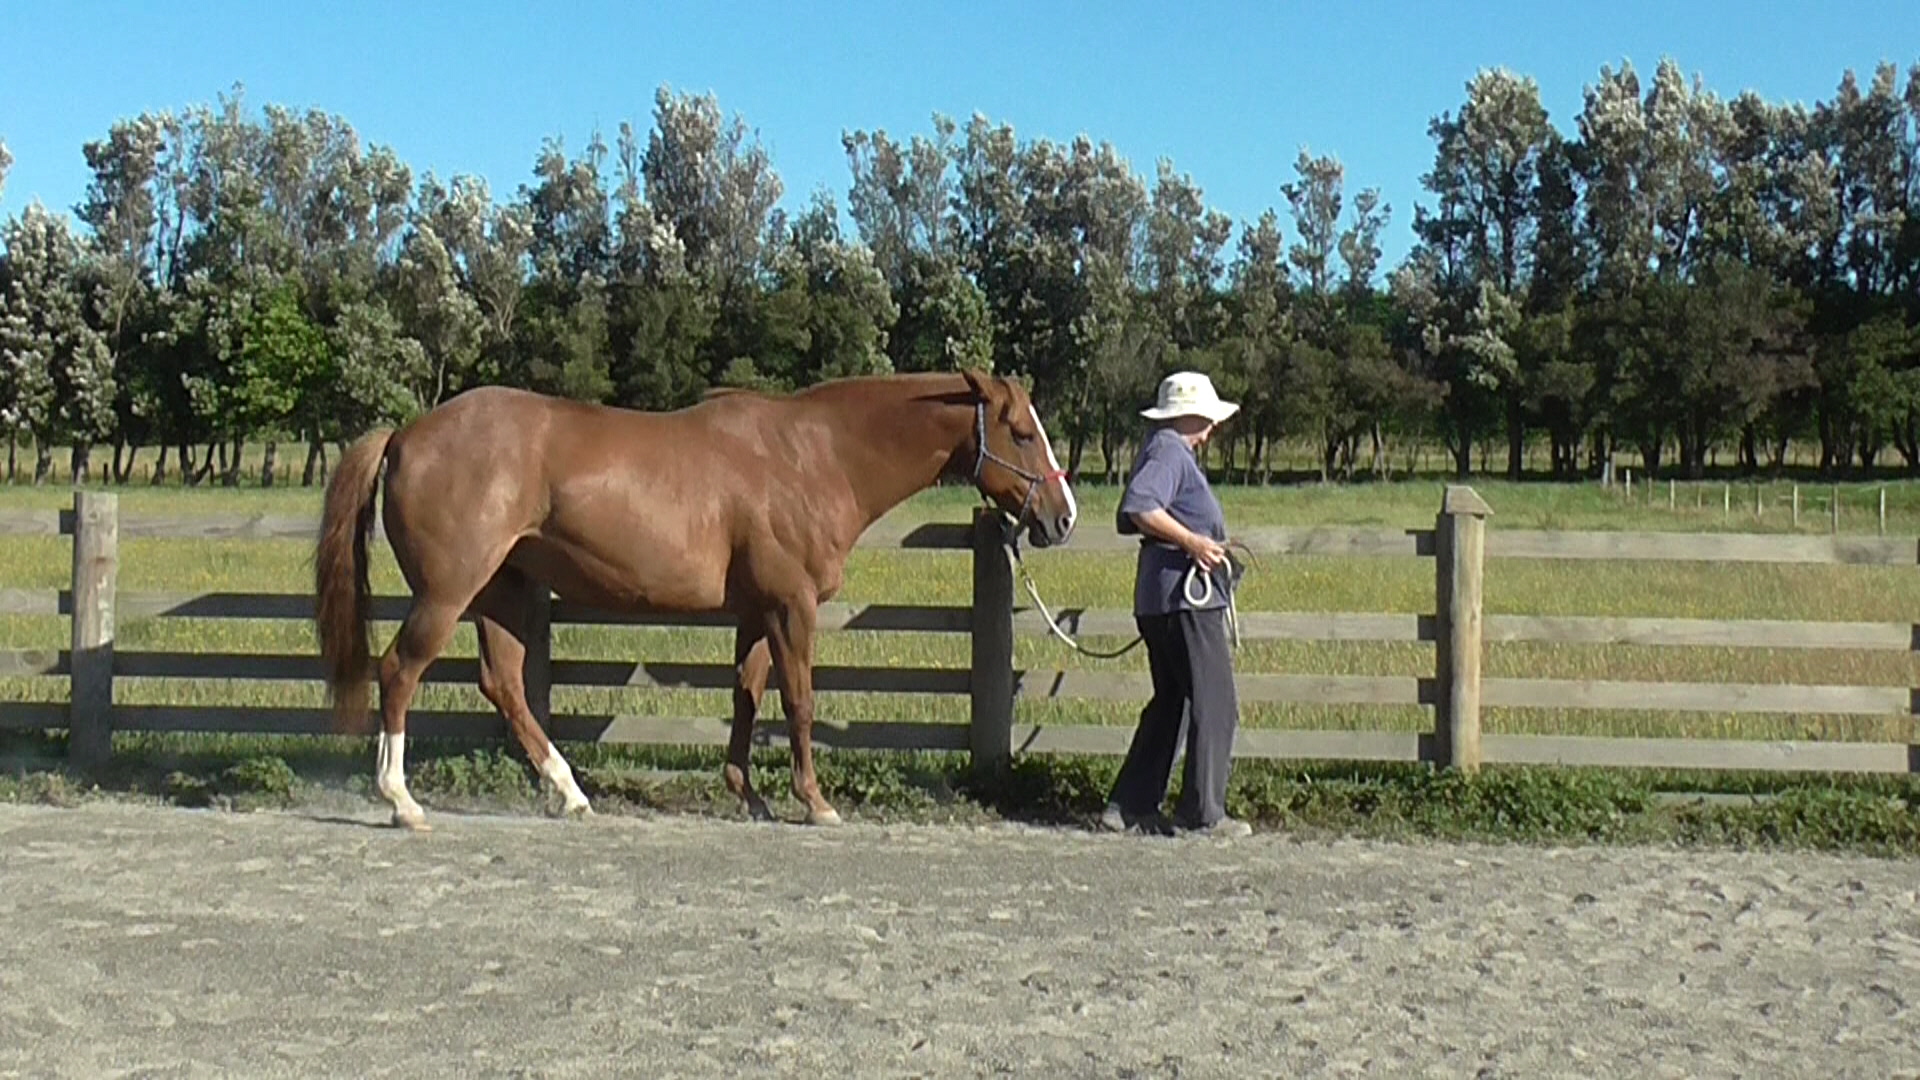
Bridget is walking right in front of Smokey with a nice loop or ‘smile’ in the lead rope.
This concept of ‘Walking Away’ can also be useful whenever we want to get our horse used to something new. Horses have a tendency to follow anything moving away, and move away from anything coming toward them.
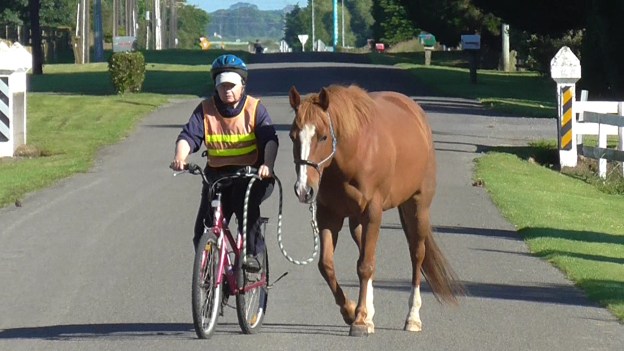
Leading a horse on a narrow track or road, spooky things can happen behind, so having the horse walk a meter or so behind you on a loose lead means the horse can spook right or left without running into you. For casual walking out, this can be a useful position.
However, Leading Position 1 is especially interesting because horses have two ways of looking at it.
Concept One: the horse is happy to mosey along behind.
We can cruise along together like horses following each other on their way to water or new grazing. The horse in front watches for snakes or other dangers, allowing the horse or horses filing behind to relax their guard a little bit.

Boots is happy to mosey along behind me knowing I will keep a lookout for dangers ahead.
Concept Two: The horse is ‘driving’ us from behind.
Horses higher in the social order do it to move a horse lower in the social order if it is in their way or being annoying – something that is very noticeable in domestic horse situations.
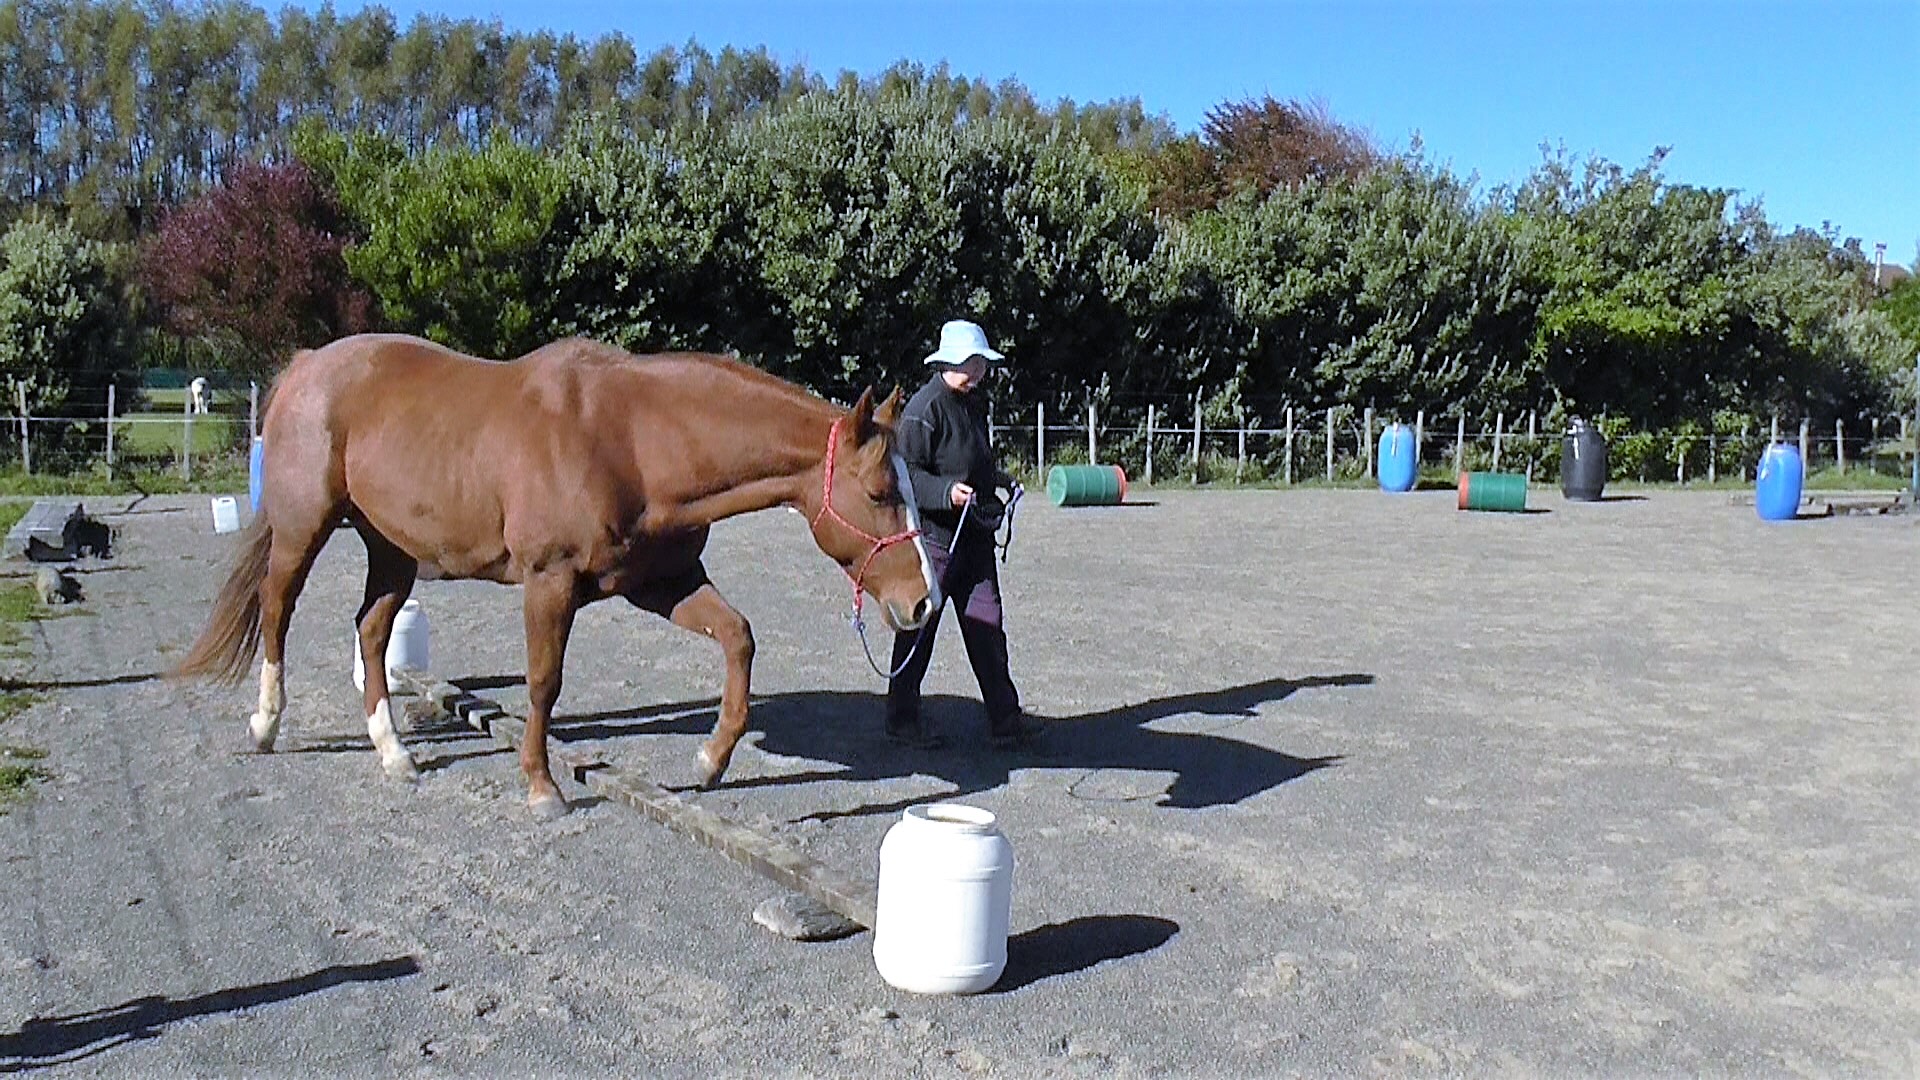
When we taught Smoky to walk behind us through the S-bend for Horse Agility, we had to be watchful because he loved to catch up with us and give us a solid nudge with his nose to ‘move us along’.
It’s definitely best if the horse is happy to work with the first concept – follow behind in a relaxed mode. We’d also like the horse to know signals for slowing down or stopping when we are walking in front of him. It’s quite different from when we ride or long-rein, and are guiding from behind.
So: We can teach the horse clear signals to indicate when we intend to walk out in front of him, and that we’d like him to maintain a polite distance behind us, slow when we slow, and stop when we stop.
The following Training Plan looks at a possible way of teaching clear boundaries with Leading Position 1.
TRAINING PLAN
Aims:
- To develop a signal that lets the horse know when we are going to move from LP3 (beside neck) into LP1 (in front facing away from him).
- To have the horse comfortable with us in front and moving in single file.
- To develop clear signals while in Leading Position 1, to let the horse know when we are slowing into a halt and when he needs to halt or back up.
Environment:
- Horse in an area where he is usually relaxed and confident.
- Herd buddies not able to interfere but in view if possible.
- Horse in a learning frame of mind.
- Body extension during the teaching/learning phase if we need to emphasize a signal.
- Halter and lead.
- Lane 10-12 feet long with one high side (e.g., a safe fence) and one side a rail on the ground which the handler can easily step over.
- If using destinations, set a mat or nose target destination several meters beyond each end of the lane.
- Prerequisite: horse is confident with various ways of backing up in a lane. https://youtu.be/XcKSrz8feN8,
- https://youtu.be/rMN5jWSn-HU
- Consciously look for signs which indicate that the horse is reaching the limit of his ability to keep trying. Aim to stop while he is still engaged and willing. You can stop at any time on any slice of the process.
Slices of the Plan:
For each slice, begin walking with the horse in LP3 – beside neck. Move on when each slice is smooth and ho-hum for the horse.
- Refresh the three basic lane tasks using LP3 – beside neck: a) walk through; b) walk in, halt and walk on out; c) walk in, halt and back out. Make sure these are all smooth when you are leading the horse on his left side and on his right side.
- Walk the horse into the beginning of the lane, halt, and step over the rail into the lane, pivoting into LP7 which is facing the horse. Give him an arm’s length of space. Turn off your body energy; relax (click&treat). Check for any signs of anxiety (looking away, shifting feet, backing away, stepping toward you, nudging you or stepping over the rail out of the lane). Stay with this slice until the horse can remain totally relaxed as you move into position and stand facing him (which is Leading Position 7), with your energy turned off, for a few seconds before the click&treat. Gradually work up to about ten seconds.
- When 2 is good, repeat but now step in front of the horse facing away from him after the halt. Give him a couple of feet of space behind you as you step into the lane to stand in front of him; relax (click&treat – turn to deliver the treat, then turn away again), pause.
- Ask the horse to walk forward out of the lane while you stay in the single file facing away position in front of him. You may need to create a new ‘walk on’ signal for this context. Hopefully you have already established a strong vocal ‘walk on’ cue. Walk to your destination; relax (click&treat). Walk a loop in LP3 (beside neck) to return to the lane.
- Repeat 3-4 until it is ho-hum for the horse.
- Repeat 3-4 but gradually stand in front of him (facing away) a bit longer before walking on. Increase the time in one second intervals. Ten seconds is a good time to aim for. When he can do ten seconds before a click&treat, vary how long you wait facing forward before walking out of the lane.
- Once the horse is cool about having you step in front of him into the lane, decide on a clear signal you can use in motion to let the horse know you are about to step in front of him. I used a raised outside arm because that seemed easiest for the horse to see. The signal Boots and I eventually developed is more like a half halt in my body, change in breathing and a small hand gesture. Each horse and handler will work out and refine something that makes sense to them.
- First use your new signal to let him know you are going to step in front of him when he is halted in the lane.
- Then walk alongside his neck/ears and step in front of him while he is still in motion, using the signal you worked out in 8. above. After stepping in front of the horse, keep walking along in LP1 (facing forward) all the way to your destination mat or nose target; relax (click&treat).
- When 9. is smooth, we can start to build in the back-up. Check that the back-up is in good shape by asking for it first while you remain outside the lane.
Building in the Back Up
Step into the lane into LP1, then gently turn and ask the horse to back-up. Ideally the horse will quietly step back as you make the request; relax (click&treat).
11. When 10. is smooth, you can begin to teach the horse to back up while you remain facing away in LP1. First, refresh 8 above: as you approach the lane, move from LP3 into LP1 and walk right through the lane in LP1 to the destination mat for a release plus (click&treat).
12. When 11. is smooth (over however many sessions, this is not something to rush) gently slow down your walking pace in the middle of the lane for a few steps, then pick up your original pace. This should give you feedback about whether your horse easily keeps a safe distance behind you, or might barge into you. You might need your body extension to wave behind you to remind him to keep a nice space between you when you slow down. Safety is always first.
If you are unsure, it is smart to carry a body extension in neutral. You may or may not need to activate it. Having it there allows you to be clear for the horse the first instance he needs clarification. You don’t want him to nudge you, push through you, step out of the lane or push past you.
13. The most straightforward body language signal I’ve found, to let the horse know I am slowing down, halting and backing up from LP1, is flapping my elbows sideways. It’s possible to flap elbows and wave a body extension toward the horse’s legs or chest at the same time. If we can be crystal clear right from the beginning, that he needs to keep space between us, the horse usually picks this up easily.
14. Introduce your flapping elbow signal as you slow down, then pick up pace and walk to your destination; relax (click&treat). Repeat until smooth and ho-hum.
15. When the horse easily keeps his distance during 14 above, slow down gradually into a halt in the middle of the lane. If the slices have been taught carefully, the horse will also slow down and halt; relax (click&treat – turn around to deliver the treat). Repeat until smooth and ho-hum. Also use your ‘whoa’ verbal cue.
16. Now that the horse knows that flapping elbows means ‘slow down’ and possibly halt, we want to add a back-up while remaining in LP1. As you approach the lane, step into LP1 (using your signal). Walk into the lane, slow down, halt, and then energetically flap your elbows to ask the horse to move back a step or two before you halt. Drop your elbows; relax (click&treat – turn to deliver the treat). In the beginning, reward any indication that the horse is thinking ‘back’. Then use your voice and body languate ‘walk on’ signals to walk on out to your treat destination.
17. When 16. is smooth, ask for a few more steps of back-up before you relax (click&treat).
18. When you are smoothly getting several steps of back-up, work up to a series of ‘walk forward, slow to halt, back-up’ sequences before you walk to your relaxation and click&treat destination.
By now you may not need the rail on the ground but it is a good idea to work along a fence for a bit longer, to put the ideas into deep memory.
Ideally you can now signal the horse that you would like him to ‘follow you’ and he will slot in behind you. He will stay in LP1, slow as you slow and step back when you step back.
Generalization
Generalization often requires us to go back to early slices in order to build the horse’s confidence in new situations.
A horse’s confidence is highly dependent on context. He may do something perfectly ‘at home’ or in his initial training environment but be totally thrown by the same request in a different environment.
For generalization of LP1 we can play with:
- Different safe fence lines
- Away from fences
- New places
- Following us through narrow spaces
- Following us over water and unusual surfaces
- Following us through a pattern such as a weave, a U-bend, Z-bend or S-bend
- Following us in a circle
- Following us at liberty
- Following us at trot
- Halt – walk – trot – walk – halt – back up transitions
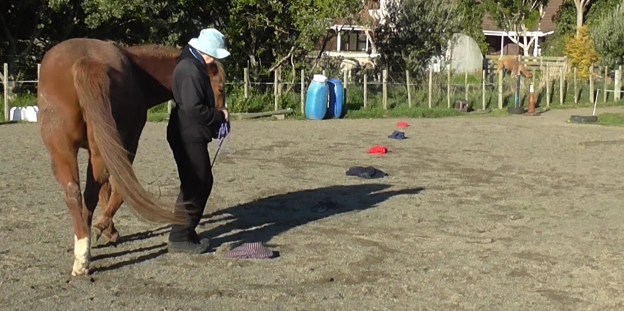
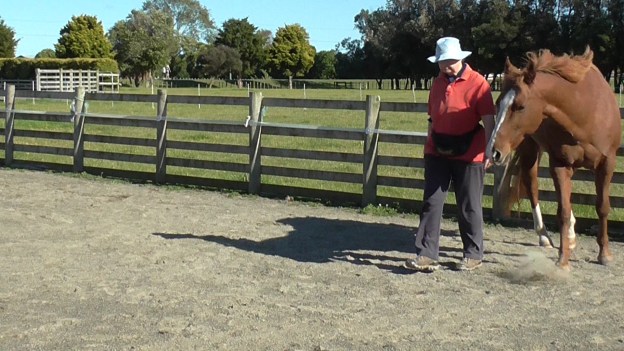
I’m flapping my elbows to indicate to Boots that I would like her to back up.
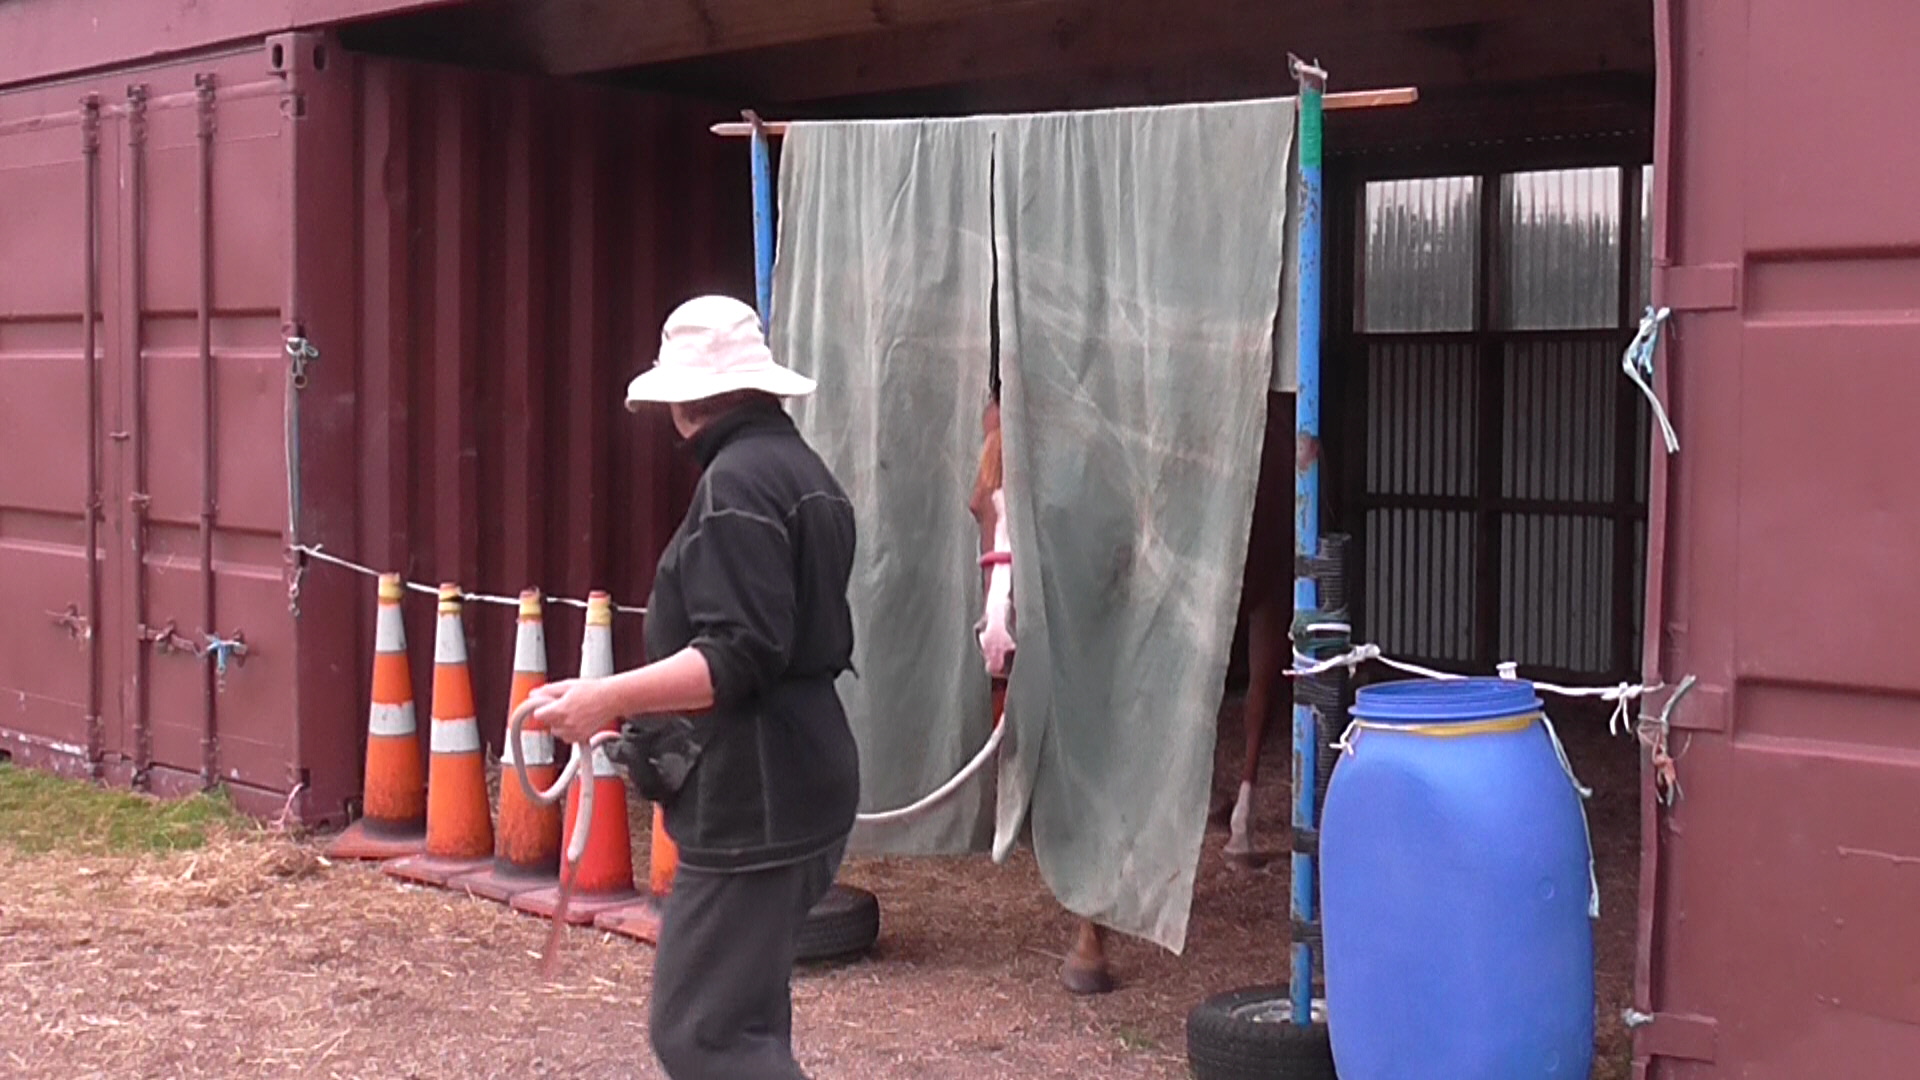
Using LP1 to teach a new skill. She learned this quickly when coming through the curtain earned a click&treat.
Do let me know if you decided to take up this big piece of training or have already trained something similar.