Tag Archives: PRT

Link

2 target 05-30-2015_215749

What is Equine Clicker Training?

Clicker training is also called Positive Reinforcement Training.  It is a way of establishing 2-way communication with a horse.

When the horse presents a behavior that we want to encourage, we use a special sound followed right away with a small food treat that the horse really likes.  Like all of us, horses will seek to re-create a behavior that gives them a positive result.

The special sound can be made mechanically with a ‘clicker’ or it can be a ‘tongue click’ or a special sound/word that we never use any other time.  Often a mechanical clicker is useful to first teach a new behavior.  Then it is easy to change to a tongue click or our chosen sound/word.  This makes it easier because working with horses we usually need our hands free to use ropes and body extensions.

Since horses are designed to eat much of the time, a food treat is usually appreciated as long as we make sure it is something they really like.  It’s important to keep each treat very small and to include the treats in the horse’s daily calorie intake.

A good way to learn clicker training skills is to start with the Target Game.  Before communication can start, the horse has to understand the connection between the marker sound and the treat that will follow.  Some people call this  ‘charging the clicker’.  It just means that the horse has learned that if he hears that particular sound, a treat will always follow.

Target Game:

It’s a good idea to first practice the mechanics of this with another person standing in as the horse.  Well-timed food delivery is a key to success with this way of training. It is easier for the horse if the handler had muddled through the learning of  the mechanics of treat delivery. At the beginning it can feel a bit like tapping ones head and rubbing ones belly at the same time.

Ideally have the horse in view of his friends, but separated from them.  He will learn best if he is not hungry or thirsty and if he is in a relaxed frame of mind. I always ensure that the horse has been grazing or had access to hay before I train.

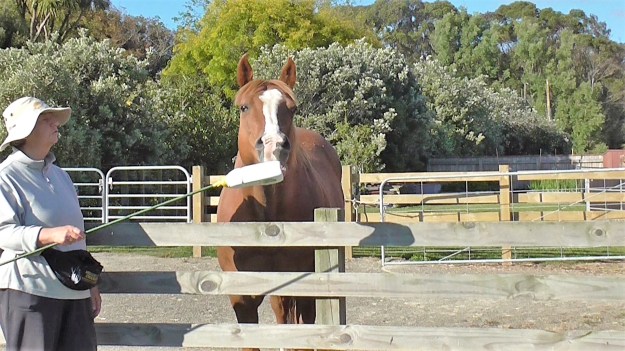
We’d like the horse to put his nose on a ‘target’ that we present near his nose.

The handler’s task is to:

  1. Have a hand ready on the clicker, if using one.
  2. Have a safe barrier between you and the horse.  Present the target – gently to one side of his nose, not thrust directly at him.  A plastic drink bottle or a safe object taped onto a stick is good to start with.
  3. Wait patiently until the horse touches the target with his nose or whisker at which point CLICK, move the target down out of the way
  4. And promptly reach into a pocket or pouch to get out a treat.  Use a pocket or pouch that allows the hand to smoothly slip in and out.  Be careful never to reach into the pocket or pound until after you’ve clicked.  This gets important later.
  5. Present the treat to the horse in a firm, totally flat hand so it is easy for him to retrieve the treat.  For some horses it may work better at first to toss the treat into a nearby familiar food bucket.  The skill of taking a treat politely from the hand can be learned later.  If he pushes your hand down, gently push upwards with equal pressure.
  6. When he’s eaten his treat, present the target again.

If we keep each targeting session short (3-4 minutes) and are able to repeat them 2 or 3 times in a day, the horse will learn quickly and look forward to each session.

The Target Game is a good one to start with because when you finish you simply put the target away.  Using the Target Game will let you decide whether Clicker Training (Training with Positive Reinforcement) is something you’d like to carry on with. It can be done alongside anything else you do with your horse.

The little clip below shows the beginnings and how it might develop over time.  The horses in the clip are already clicker-savvy. Be aware that at first we should always present the target in the same place.  When the horse consistently gets 10/10 for that, we can change to holding it higher up.  Then eventually lower down and to the side and requiring the horse to move to reach it.  But it’s important to get 10/10 for each of these, before we make a change.

Clip: Starting Equine Clicker Training


Parameters: Setting the Rules for the Games we Play

Parameters

Photo: I’m teaching my horse, Boots, to back up to a mounting block. My parameters include backing straight (hence the guide rails for this early lesson), backing for 6-8 steps (she started at the fence on the right) and halting with her withers just in front of the two tubs. This time she moved back an extra step, but it was a very good response for early in the training of this task. I’ve stepped off the black tub so I could deliver the treat while she stayed in the position I wanted.

Parameters: Setting the Rules for the Games we Play

Because of their role in the web of life —  to be a meal for predators — horses are so much more observant than we are.  They read our mood the moment we appear.  They read our body language with exquisite care.  When something in the environment is different from last time, they notice instantly.

If we want to become good at communicating with our horse, it helps to become more aware of what our mood, our body orientation and our body energy may be saying to the horse.  Horses get confused and worried when our body language does not agree with what we are asking them to do.  Or if we use a similar message to mean two different things.

As horsemen often say, “Nothing means nothing to a horse”.  So if everything means something, it is good to be aware of the parameters we are setting when we interact with a horse.  Here is a bit more detail about what parameters are, and things to remember to become better teachers for our horse.

A parameter is something we decide to keep the same or constant.

For example:

  • Walking on the horse’s left side would be a constant or parameter you have chosen.
  • If you then change to walking on his right side, that is a new parameter.
  • If you decide to walk beside the horse’s ribs (where you will be if you ride) rather than beside his neck, you have changed a parameter.
  • If you decide to walk behind the horse rather than beside him, you have changed a major parameter.
  • When you ask the horse to walk with you on the road rather than at home in his paddock or arena, you have changed a major parameter.
  • Walking on an unfamiliar road or track is changing a parameter.
  • If you are walking together toward a familiar destination, where he knows he will halt to earn a click&treat, the first time you ask him to halt before he reaches the destination, you have changed a parameter.
  • If you are walking and change to asking for a trot or jog, you are changing a parameter.

Whenever we change a parameter, it is important that we increase the rate of reinforcement (i.e. click&treat more often) and work our way forward again until we and the horse are both confident in the new situation, with one click&treat at the end of a task or a series of tasks. For example, relating to the photo above, once Boots confidently backed up in a straight line to stand between the two tubs, I removes the rails (one at a time) and ask her to back up for just a step or two, then work forward again to get 6-8 steps straight back.

Horses are super observant of all changes, large or small, and can often be ‘thrown’ by them if we proceed too fast or ask for too much too soon. They also immediately pick up if we are unsure about what we are doing.

This is why it’s important to have a written Individual Education Program suited to this horse in this environment before we delve into teaching our horse something new. If we are clear in our mind about what we are working on, that confidence will be picked up by the horse.

If you want to look at 20+ training sessions to achieve the objective outlined in the photo above, done at liberty with no extra props, here is the link to the very first session (lessons were mostly one a day, weather willing and lasted about three minutes each day). I can’t ride any more (dodgy hips & knees) so we did this as a just an interesting training project. The second video clip below takes you to the last clip in the series, in case you don’t want to see all the others in between!


Safety

smile while st&s 2 06-16-2016_155354

Photo: Sitting with the horse in a roomy, enclosed area, asking nothing of him except politeness. This is a superb way to build a new relationship with a new horse or to to build an improved relationship with a horse we have already.

Safety

It’s only when we feel safe with our horse and our horse feels safe with us that real teaching and learning can go on.  If our horse makes us feel worried or afraid, we need to take heed of the feeling and organize our environment so that we can be with the horse in a way that allows us to regain our safe, calm, centered core. Maybe we need to sit in our chair just outside the horse’s enclosure to start with.

It will be difficult for a horse to remain in his calm, centered core in our presence if we are sending out vibes that tell him we are uneasy and nervous.  A good first step is to spend undemanding time with the horse, in his home if we feel safe there, or on the other side of a fence or gate if we don’t.  We need to carry a swishy type body extension so that we can enlarge our bubble without offending the horse by striking out toward him.  Horses are very sensitive to the air movement of two swishy twigs or dressage whips, or the swishing of a string rotated like a helicopter blade.

Horses easily understand when we are merely enlarging our bubble of personal space.  If we strike out toward their personal bubble rather than just protect our own space, the horse will realize it instantly.  It is important to be aware of the difference between acting in an assertive way and acting in an aggressive way, and to be mindful of which one we are doing.

As we sit with our horse, we can read, meditate or just enjoy the quiet of being in the moment, looking and listening and breathing.  It’s nice if the horse can be in a roomy area where he is comfortable, able to see his companions but not where they can interfere with your special time together.

It works well to set a time limit.  It doesn’t matter what the horse does.  We are there as a companion, a paddock mate for the time we have set.  We expect nothing of the horse except politeness.  If he becomes overbearing, we move away with our chair or ask him to back off by swishing the air toward his feet to protect our personal bubble.

The PDF attached has a look at ways to ensure our safety.

Safety with Protected Contact and Body Extensions

HorseGym with Boots video clip series on YouTube

Over the last few years I have created a series of clicker training activities posted as clips on YouTube.  They can be reached by putting HorseGym with Boots or HerthaMuddyHorse into the YouTube search engine.

If you click on the HorseGym with Boots playlist in my channel, they should line up in number order as I’ve created them through the years.

There are a number of other playlists devoted to specific topics. Clips are kept short, usually under five minutes long, to make them easy to find and review. New clips are added each month. Many are being incorporated into my blog posts.

See the Books section for books available from Amazon as e-books or paperbacks. On Amazon you can ‘Look Inside’ each one. The notes mentioned at the end of the clips have been superseded by my books.

If you would like more information, email me at:  hertha.james@xtra.co.nz

Below is one of the “HorseGym with Boots” series. “Boots” is my horse’s name – ‘Nirvana Puss ‘n Boots‘. She is 3/4 Quarter Horse, born in 2002.

THE PLAN: Thin-Slicing the Tasks We Want to Teach

LP8 3 05-31-2015_225803

Bursting a balloon is not an every-day thing a horse does. Teaching it requires a careful plan of ‘thin slices’ that allows the horse to master the task being continually successful and so remaining motivated to try again.

What is Thin-Slicing?

When we want to teach our horse something, the first thing we need is a PLAN.  A plan written down has the advantage that we can look back on it.  As we get feedback from the horse and our own actions, we can go back and tweak our original plan.  Or we can throw it out and start again.

One way to create a plan is to:

  1. Visualize the finished task.
  2. Experiment gently to see what the horse can already offer in relation to the desired task.
  3. Brainstorm all the individual specific actions the horse needs to be able to do to complete the whole task.
  4. Put the actions from 2. above into an order that seems logical.  Each specific action will have one or more ‘click points’ where we click&treat.  This allows the horse to pro-actively seek the hot ‘click point’ of the moment and makes training fun for everyone involved.  This is the thin-slicing part.
  5. Decide how we might teach each specific action (by free-shaping, guided shaping, using a nose or foot target, or even modeling for the horse what we would like him to do).
  6. Organize environmental props that make each part of the task easier for the horse to learn (e.g., rails, markers, barriers, lane-ways, corners).
  7. Start with the first slice of your plan, watching for feedback to see what is working and what needs rethinking and tweaking [or starting over with a new idea  🙂 ].
  8. Gradually chain the slices of the task together until the horse knows the pattern and willingly carries out the whole task with one ‘click point’ at the end.

My book, How to Create Good Horse Training Plans covers this topic in great detail. (See the BOOKS link at the top.)

The video clip link below is a bit long (9 min) but it demonstrates all the parts of a PLAN and it uses various teaching methods to get to the final successful outcome.

Clip: Thin-slicing the Water Obstacle

http://youtu.be/ojOaYaq8ItQ?list=UUGMJ0ZTjACQ2Ok8civ_9IVQ