Tag Archives: Horse Agility

Line Dance Shoulder-to-Shoulder

INTRODUCTION

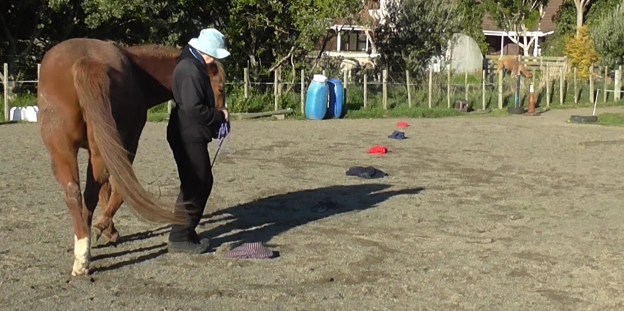
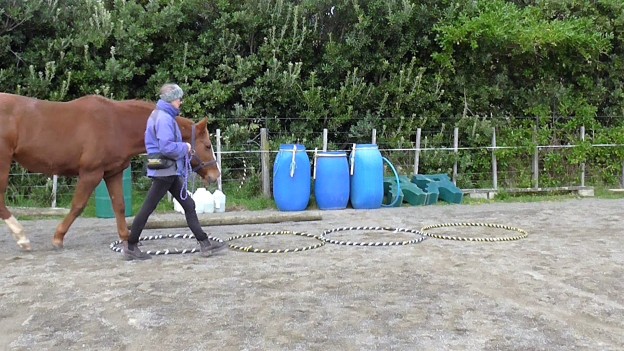
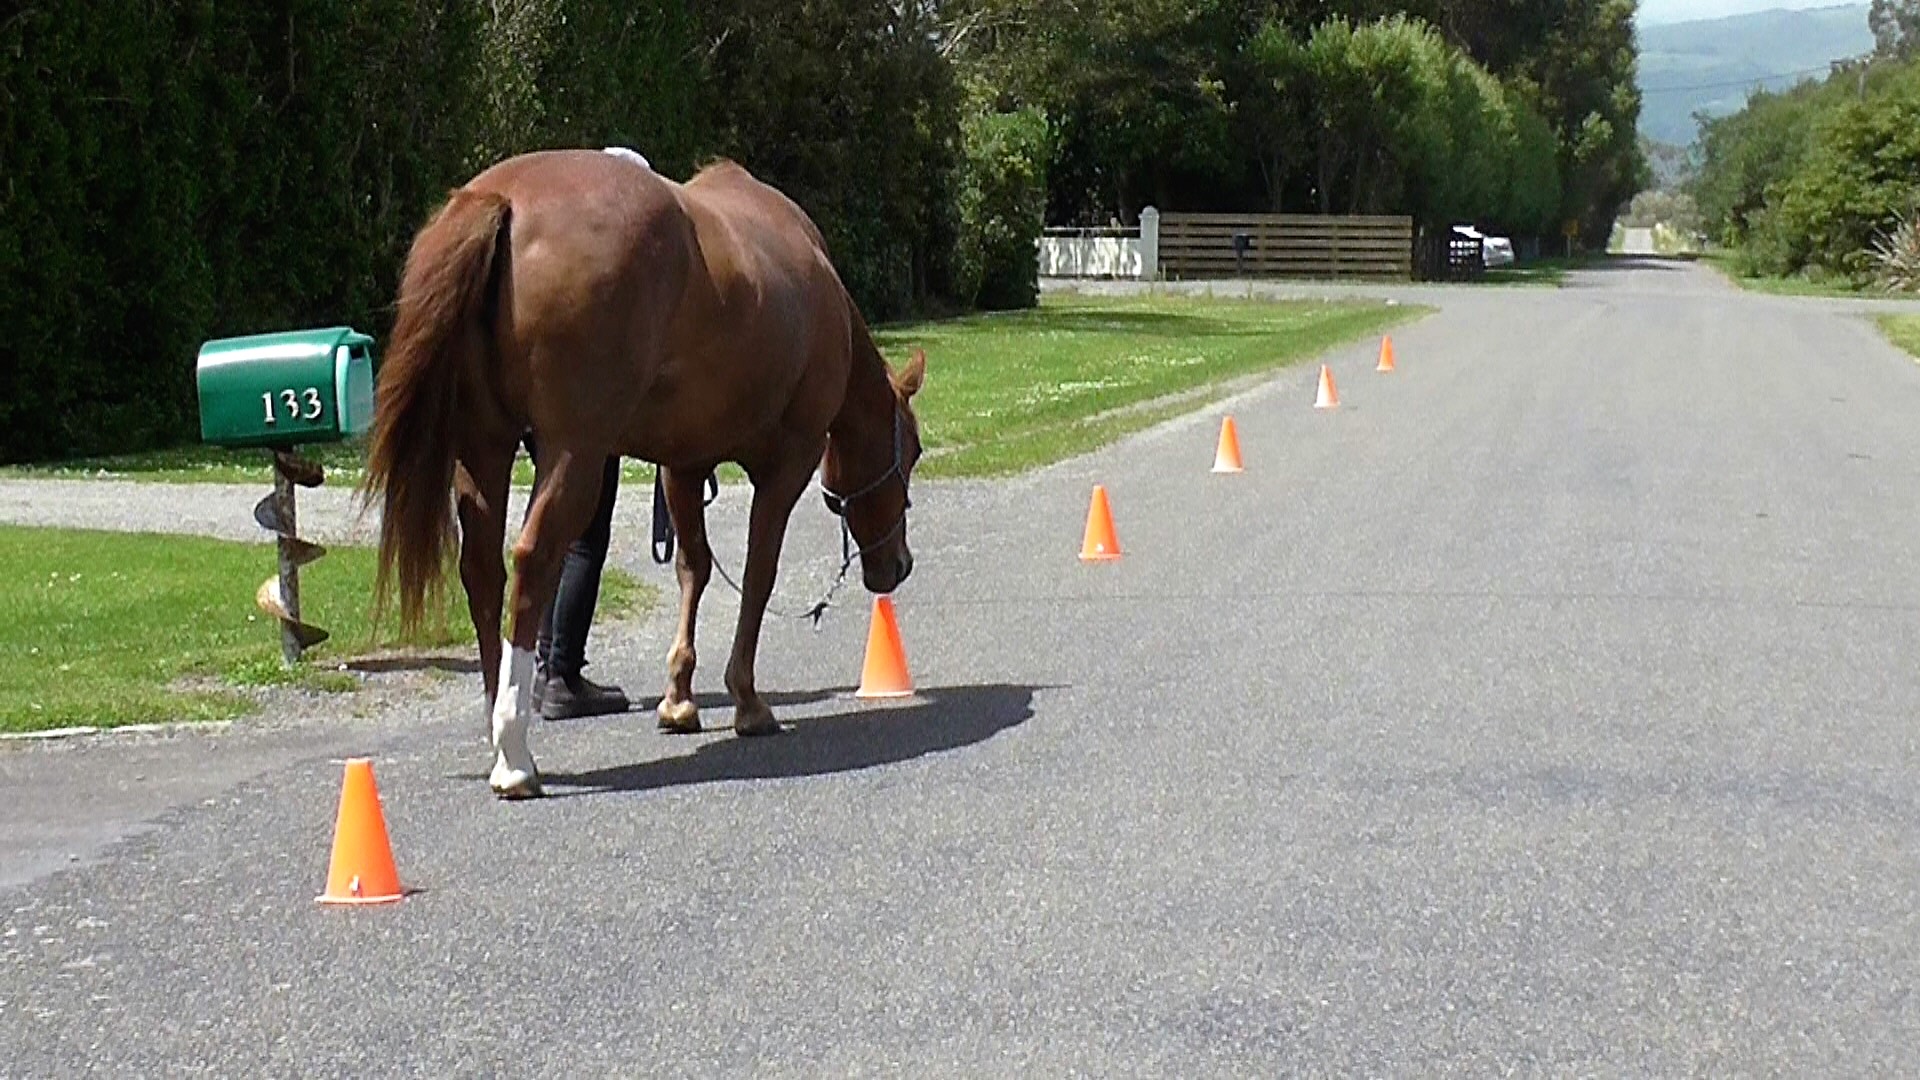
In the photo above we are using a rail to consolidate line-dancing shoulder-to-shoulder. Once past the rail, the horse earns a click&treat. The rail helps in that: a) I don’t ask for too much, b) the horse quickly realizes that a click&treat happens when he sidesteps past the rail, and c) it encourages straightness.

Try stepping sideways by stretching out your arms to the side while you cross your legs. Then cross your arms while stepping apart with your legs. This is how a horse organizes his body when he move sideways keeping his body relatively straight. Front legs apart while back legs cross over. Hind legs apart while front legs cross over.

If horses tried to cross both front and hind legs at the same time, it would be easy for them to lose balance and fall over.

As mentioned when discussing sidestepping face-to-face with the horse, moving sideways in rhythm is not something horses tend to do in their everyday life. It may therefore take the horse a while to get his legs organized when we first teach this movement. Our horse may have to think hard to get this sorted, so be especially patient and celebrate small successes.

AIMS

  1. The horse understands body language, voice and a gesture/touch signal at the girth to move sideways away from us as we sidestep toward him.
  2. The horse understands body language, gesture and voice signals to sidestep toward us.

PREREQUISITES

  1. In case you have not yet taught basic sidestepping, see Number 29 in my Blog Contents List: Sidestepping. There is a link to my Blog Contents List at the top of the page.
  2. Targeting shoulder to hand is the background needed to initiate movement toward us with a hand gesture signal. See Number 27 in my Blog Contents List: Target Shoulder to Hand.

The training plan for this can also be found in Chapter Twelve in my book: Horse Training: Fun with Flexion using Positive Reinforcement, in case you have that book.

  • Hip to hand is the other part we need. See Number 28 in my Blog Contents List: Targeting Hindquarters to our Hand. It is Chapter Thirteen in the book mentioned above.

Once we have shoulder to hand and hip to hand, we can introduce the idea of the whole horse moving sideways toward us.

VIDEO

#280 HorseGym with Boots: Line Dance in Motion.

MATERIALS AND ENVIRONMENT

  • A training area where the horse is relaxed and ideally can see his buddies, but they can’t interfere.
  • Horse is not hungry.
  • Horse and Handler are clicker savvy.
  • Horse in a learning frame of mind.
  • Handler in a relaxed frame of mind.
  • Halter and lead unless teaching at liberty.
  • A lane a few meters long with a barrier in front and behind. For example, a fence and raised rails, a fence and a line of barrels. We can use fencing tape between tall cones or jump stands, as long as the horse is comfortable working around fencing tape which is not electrified.

NOTES

  1. It’s important to warm the horse up with general activity before asking for yields like this. As we develop and maintain such exercises, our horse’s flexibility will gradually improve.
  2. Most horses find this easier on one side. At first, be happy if he can only sidestep with his body at a 45-degree angle to the barrier. With frequent short practices, he will develop the muscles and flexion to be straighter. Boots’ ability to sidestep has been built up over years.
  3. A horse with arthritis and/or past injuries may have restricted or severely limited movement for this type of work.
  4. Doing a little bit often gives reliable results and keeps the horse keen to seek out his next click&treat. As usual, we are teaching a habit in response to a signal, so we never want to make the horse sore or reluctant.
  5. For the slow-dancing routine, we only need a few steps away and a few steps toward us.

SLICES

Sidestepping Away

  1. Set up a lane with a barrier behind and in front of the horse so that moving sideways is an easy option for him to choose. Have it wide enough to be comfortable for the horse.
  2. Have a nose target or a barrier a few sidesteps away on each end of the lane so that the horse has a destination where he knows he will get his next click&treat. I used our shelter because it ensured that I did not ask for too many steps at once. The horse quickly realized that reaching the other side of the shelter resulted in a click&treat.
    • If the horse finds one side easier, start on that side. Using your orientation facing the horse’s side, ensure you have smooth yielding of shoulder and hindquarters, then consolidate a light touch/gesture signal at the girth to ask the whole horse to move over (Prerequisite 1).
    • Once 3 is smooth, begin to align yourself shoulder-to-shoulder with the horse. At first, you may need to face him for the original signal but strive to change to using a gesture or light touch while you stay shoulder-to-shoulder. Three-five sidesteps is plenty.
    • When 4 above is good, teach it again from the beginning on the horse’s other side.
    • When 5 above is good, remove either the front or rear barrier. Work on both sides.
    • When 6 above is good, work without the barrier props. Work on both sides. Be careful not to ask for too much. Celebrate small successes.

    Sidestepping Toward the Handler

    1. Set up as for 1 and 2 above.
    2. If the horse finds one side easier, start on that side.
    3. Using your orientation facing the horse’s side, ensure you have smooth targeting of shoulder and hindquarters in rhythm, then develop a gesture signal to ask the whole horse to sidestep toward you. (Prerequisites 2 and 3). At this point, don’t worry about your body’s orientation to the horse. Use whatever signals the horse finds easiest to understand. Celebrate hugely when you get the first sidestep toward you.
    4. When 3 is coming along nicely, teach it all again from the beginning on the horse’s other side.
    5. When 4 is good using the props, remove either the front or rear barrier. If the horse tends to back up, remove the front barrier first. If he tends to inch forward, remove the back barrier first.
    6. When 5 is smooth, remove both barriers.
    7. Now it’s time to focus more on your position so you can stay shoulder-to-shoulder with the horse as much as possible, but don’t make it a big deal.

    GENERALIZATIONS

    1. When the task is sound in a familiar training area, play in different places.
    2. Work on a slope horse facing uphill.
    3. Work on a slope horse facing downhill.
    4. Work with the horse parallel to a gentle slope.

    Movement Routine 8 – Rags as Focus

    Photo: The first task is to weave the rags together.

    INTRODUCTION

    Maintaining mobility is an important aspect of keeping horses in captivity. Usually they live without the freedom of movement over large areas with varied terrain. We can take a small step to encourage whole-body movement with short routines done often but never turned into a drill.

    AIM

    To combine weaving (serpentines) with sidestepping, backing up and recall using rags as markers.

    PREREQUISITES

    1. ‘Walk on’ and ‘halt’ transitions staying shoulder-to-shoulder. Smooth Walk and Halt transitions: https://wp.me/p4VYHH-5TT
    2. We have established clear mutual signals for weaving obstacles. https://youtu.be/mjBwyDsVX6Y. As well as this clip,there are several more in my playlist called Weave and Tight Turns.
    3. Horse understands a signal for sidestepping. Sidestepping: https://wp.me/p4VYHH-5RL
    4. Horse understands a ‘wait’ signal to stay parked while we move away so we can do a recall. Park & Wait: https://youtu.be/UvjKr9_U0ys
    5. Horse understands signal for backing up face-to-face with handler. March 2018 Challenge: Backing Up Part 1: https://youtu.be/6YYwoGgd_0Y
    6. Horse recalls after staying parked. https://youtu.be/XuBo07q8g24

    ENVIRONMENT AND MATERIALS

    • A work area where the horse is relaxed and confident.
    • Ideally, the horse can see his buddies, but they can’t interfere.
    • The horse is not hungry.
    • Halter and a lead long enough so we can keep a nice drape in the rope but not so long it gets in the way. 12′ (4m) is a useful length.
    • Six rags laid out in a straight line far enough apart to allow comfortable weaving of the rags walking the pattern together. As the horse becomes more supple, the rags can be put closer together.

    VIDEO CLIPS

    #203 HorseGym with Boots: Routine 8, Rags as Focus:  Click here.


    #204 HorseGym with Boots: Routine 8 at Liberty: Click here.

    NOTES

    1. It helps to memorize the sequence of tasks by walking the pattern without the horse. If you have a willing human friend, take turns being the horse or the handler. Usually, as handler precision improves, horse precision improves.
    2. The aim is to keep the rope with a nice drape or loop as much as possible, so the horse is getting his signals from our body language and signals rather than rope pressure. We want the horse to find his own balance rather than be pushed or held into a certain outline.
    3. Click&treat at a rate that keeps your horse being successful. As a horse learns a pattern through frequent short repetitions, we can gradually ask for a bit more before each click&treat.

    TASKS

    1. Handler on the horse’s left side, weave the rags together.
    2. Turn at the end of the rags and weave in the opposite direction.
    3. Walk a circle around the last rag to end up between the last two rags plus several steps beyond them.
    4. Halt, then ask the horse to back up between the rags. If he backs up on his own, go to the horse to deliver a click&treat.
    5. Ask the horse to sidestep to put him in line with the middle of the next two rags.
    6. Ask the horse to ‘wait’ while you walk between the rags to the end of the rope.
    7. Ask the horse to ‘recall’.
    8. Ask the horse to sidestep so he is in line with the middle of the next two rags.
    9. Halt, then ask the horse to back up between the rags. If he backs up on his own go to the horse to deliver a click&treat.
    10. Ask the horse to sidestep so he is in line with the middle of the next two rags.
    11. Ask the horse to ‘wait’ while you back away to the end of the rope.
    12. Ask the horse to ‘recall’.
    13. Ask the horse to do the final sideways so he is in line with the middle of the last two rags if you are using six rags.
    14. Ask the horse to back up.
    15. Do an established ‘end of routine’ celebration. I use a ‘Triple Treat’.

    GENERALIZATIONS

    • Repeat with the handler on the horse’s right side for the weaving.
    • Practice in different venues.
    • Use more rags.
    • Play at liberty.
    • Have only the horse weave – handler walks a straight line.
    • Practice on a slope.
    • Carry out the same sequence of tasks without marker rags.

    Movement Routine 7 – Fence as Focus

    Photo: Parking for up to 10 seconds with the handler standing behind. This is the seventh task of the routine.

    INTRODUCTION

    This routine refines 90-degree turns, stepping sideways, parking, and backing up with the handler in two different positions.

    AIMS

    1. To improve the precision of handler/horse communication by linking a series of tasks into a sequence.
    2. To do a series of gentle gymnastic moves to engage the horse’s mind and muscles.

    PREREQUISITES

    1. Smooth ‘walk on’ and ‘halt’ transitions staying shoulder-to-shoulder. Smooth Walk and Halt transitions: https://wp.me/p4VYHH-5TT
    2. Smooth 90-degree Turns: https://wp.me/p4VYHH-5VM
    3. Horse understands a signal for sidestepping. Sidestepping: https://wp.me/p4VYHH-5RL
    4. Backing up with handler shoulder beside withers and beside hindquarters. https://youtu.be/501PSnAA-po and https://youtu.be/MWAH_Csr960
    5. Horse understands a ‘wait’ signal to stay parked until further notice. Mats: Parking or Stationing and Much More: https://wp.me/p4VYHH-5S9
    6. Handler has developed a clear ‘Zero Intent’ signal so the horse knows when standing quietly is what is wanted. ‘Zero Intent’ and ‘Intent’: https://wp.me/p4VYHH-5RO

    ENVIRONMENT AND MATERIALS

    • A work area where the horse is relaxed and confident.
    • Ideally, the horse can see his buddies, but they can’t interfere.
    • The horse is not hungry.
    • Halter and a lead long enough so you can keep a nice drape in it but not so long it gets in the way. Or work at liberty.
    • Safe fence line or similar.

    VIDEO CLIP

    #201 HorseGym with Boots: Routine 7 – Fence as Focus. https://youtu.be/548G5Ektt4c


    NOTES

    1. I find it easier to memorize the sequence of tasks like this by walking the pattern without the horse and then visualizing the sequence often. If you have a human friend, take turns being the horse or the handler. Usually, as handler precision improves, horse precision improves.
    2. The aim is to keep the rope with a nice drape or loop as much as possible, so the horse is getting his signals from our body language and signals rather than pressure on the halter. Then it will be easy to morph into working at liberty.
    3. Click&treat at a rate that keeps your horse being successful. As the horse learns a pattern through frequent short repetitions, we can gradually ask for a bit more before each click&treat. For this routine I began with click&treat at each halt, then gradually did a bit more before a click&treat.

    TASKS

    1. Handler closest to fence, walk along shoulder-to-shoulder and make a U-turn, staying on the same side of the horse, which will put the horse closest to the fence. Walk to your starting point; halt.
    2. Standing shoulder-to-shoulder with the horse, beside or just behind his withers, ask the horse to back up several steps; halt.
    3. From halt, with the handler on the inside of the turn, make a 90-degree turn and walk 4 or 5 steps, halt. Repeat three more times so that you have walked an entire square with a halt at each corner, ending up where you started.
    4. From halt, walk the first two sides of the square as you did in 3 above, but with no halt at the corner. Halt at the end of the second side. The horse is now parallel to the fence.
    5. Move to face the horse and ask for sidesteps to the fence; halt.
    6. Ask the horse to stay parked with your ‘wait’ signal. Walk up to a couple of meters behind the horse and take up your ‘no intent’ position. Start with only a couple of seconds of ‘wait’ but try to gradually build up to ten seconds. Over multiple sessions gradually increase the distance you move away.
    7. Walk to stand beside the horse’s butt (facing the same way as the horse) and ask for several steps of back-up.
    8. Jackpot on completion of the sequence.

    GENERALIZATIONS

    • Ask for a few more steps during the back-ups (tasks 2 and 7).
    • Walk a larger square (task 3).
    • Ask the horse to wait longer when he is parked (task 6).
    • Walk further away after asking the horse to ‘wait’ (task 6).
    • Start the exercise with a trot along the fence (task 1).
    • Ask for the second back-up (task 7) from further and further behind the horse.
    • Work at liberty or add halter and lead if you started at liberty.
    • Work on a slope if you have one handy.
    • Change the order of the tasks.


    Movement Routine 3 – Fence for Focus

    Photo: Walking concentric circles is part of this routine.

    INTRODUCTION

    For Movement Routine 3 we are back to using a fence as a focal point to initially build the routine. A fence helps the horse maintain straight movement. It also makes it easy to establish beginning and end points for each circle in this sequence of tasks.

    AIMS

    • Transitions from walking forward into finesse back-ups.
    • Walking concentric circles.
    • Stay and Wait.

    PREREQUISITES

    1. Smooth ‘walk on’ and ‘halt’ transitions staying shoulder-to-shoulder. (See Related Resources 1 at the end of this post.)
    2. We have taught the finesse back-up. (See Related Resources 2 at the end of this post.)
    3. Handler has developed a clear ‘Zero Intent’ signal so the horse knows when standing quietly is what is wanted. (See Related Resources 3 at the end of this post.)
    4. While walking shoulder-to-shoulder, the horse follows the movement of the handler’s body axis away from the horse to move into a circle. (See Related Resources 4 at the end of this post.)
    5. We have taught the horse to ground-tie. (See Related Resources 5 at the end of this post.)

    ENVIRONMENT AND MATERIALS

    • A work area where the horse is relaxed and confident.
    • Ideally, the horse can see his buddies, but they can’t interfere.
    • The horse is not hungry.
    • Halter and 10′ (3m) or longer lead.
    • A safe fence or similar. A safe fence or barrier is one the horse can’t put his foot/leg through if he suddenly steps back. Tape fences can work well with some horses – NOT electrified.

    VIDEO CLIPS

    With halter and lead:  https://youtu.be/BHSztrpA8oo


    At liberty: https://youtu.be/O0dpTo6mXSs

    NOTES

    1. Memorize the sequence of tasks by walking the pattern without the horse and then visualizing the sequence often.
    2. The number of steps you take walking forward is not important. I tend to not take many steps when making the video clips to keep the viewing time short. I sometimes suggest a number of steps, but please suit that to your horse and your environment.
    3. However, the number of steps I suggest for moving backwards is significant. Horses don’t naturally do a lot of stepping backwards. We want to stay with only 2-3 steps at first, and gradually, over many short sessions, build it up one or two additional steps at a time. We want to avoid making the horse sore.
    4. While teaching this routine, or revisiting it after a long time, I generally click&treat for each part of each task. When the routine feels familiar, I move the click point along so we are doing more before a click&treat. Each horse will be different and each time doing the pattern will be different. I like to move the click points around a bit to stop the horse anticipating a treat at a specific point every time.
    5. The key to all these tasks is to keep a continuous drape in the lead rope, using halter pressure via the rope only momentarily for additional guidance. Most of our guided shaping comes via our body position, gestures, breathing, energy level and voice signals.

    TASKS

    1. On the horse’s left side, with the horse nearest the fence, walk forward maybe ten steps, halt for a second or two, then turn into a finesse back-up – asking for 2-3 steps back. Repeat two more times (three times in total).
    2. Walk a large circle (handler on the inside). At the point along the fence where you began the large circle, switch to walk a medium-sized circle. Reaching the same spot again, carry on walking a small circle. The circle sizes will depend on the space you have and how flexible your horse is. Start with large circles and gradually make them smaller as indicated by the increasing suppleness of the horse.
    3. Ask the horse to HALT alongside the fence, either ground-tied or put the rope over his neck/back. Then ask him to WAIT while you walk away about ten steps with your back to the horse. Turn to partly face the horse and take up your ‘Zero Intent’ body position for x number of seconds. Then walk back to the horse; click&treat. Gradually (over lots of short sessions with this routine) work up to a WAIT of ten seconds or more.
    4. Walk forward shoulder-to-shoulder with the horse, then turn into a finesse back-up without a halt first. With practice this can get lovely and fluid.
    5. Repeat the whole sequence of tasks walking on the horse’s right side.

    GENERALIZATIONS

    1. Practice alongside different fences/walls/hedges if you can.
    2. Once the horse shows that he knows the pattern, play with it at liberty along a fence using the same signals you have used all along.
    3. Once the routine is smooth along the fence, play with it out in the open first with a lead rope, then at liberty. Alternate on which side of the horse you begin the routine.

    Note that during backing up, horses usually push harder with one hind leg, so their hind end tends to veer away from the stronger leg. You may want to teach a gesture signal that allows you to regain straightness.

    Experiment with how your position to the right or the left of the horse’s head affects his backing up.

    RELATED RESOURCES

    1. Smooth Walk and Halt transitions: https://wp.me/p4VYHH-5TT
    2. Finesse Back-Up: https://wp.me/p4VYHH-5XL
    3. ‘Zero Intent’ and ‘Intent’: https://wp.me/p4VYHH-5RO
    4. Smooth 90-Degree Turns: https://wp.me/p4VYHH-5VM
    5. Ground Tie: https://wp.me/p4VYHH-5WX


    Finesse Back-Up

    At one point a friend and I came up with 29 different ways of backing up a horse, including groundwork, long-reining and riding. This Finesse Back-Up is one of my favorites when I am leading a horse and we need a prompt back-up.

    I learned the essence of this process from Alexandra Kurland, a true pioneer of equine clicker training. I’ve added the idea of using corners to teach because it arranges the environment so that stepping back makes sense to the horse right from the beginning.

    PREREQUISITES:

    1. Horse understands putting his nose on a target results in click&treat. (See Related Resource 1 at the end of this post.)
    2. Horse walks confidently between the handler and a safe fence or similar barrier.
    3. Horse understands ‘Walk On’ and ‘Whoa’ voice and body language signals. (See Related Resource 2 at the end of this post.)
    4. Handler easily slip into and out of ‘zero intent’ so the horse easily knows when he can relax in a ‘wait’ and when he is being asked to move. (See Related Resource 3 at the end of this post.)
    5. Horse understands the handler’s body axis orientation as a signal for bending. (See Related Resource 4 at the end of this post.)

    ENVIRONMENT & MATERIALS:

    • A work area where the horse is relaxed and confident.
    • Ideally, the horse can see his buddies, but they can’t interfere.
    • A safe fence or barrier which leads into a safe corner.
    • Halter and lead.
    • Mat (optional). A mat can make it easier for a mat-savvy horse to settle into standing in a corner.

    AIMS:

    • Handler uses clear, consistent orientation, body language and voice ‘back up’ signals.
    • Horse smoothly shifts from walking forward to stepping backwards on request when the handler turns to face him.

    Clips:

    https://youtu.be/6YYwoGgd_0Y

    https://youtu.be/safxxu90lkA

    Notes:

    1. Once the horse readily parks calmly in the corner, we can begin to teach the Finesse Back-Up. I call it that because it requires gently running our hand or fingers up the rope toward the halter, until we reach a point of contact to which the horse responds.
    2. Each horse will be different. I had trouble having Boots demonstrate clearly because she knows the task so well that she reads the very beginning of my body language sentence and steps back right away. If we teach this well, the horse will step back as soon as we begin to turn and use our voice signal, so that even our hand on the rope eventually becomes redundant.
    3. This is tricky to explain in words. Hopefully the video clips and still pictures will make it easier to understand.
    4. Two terms explained:  Outside hand refers to the hand furthest away from the horse. Inside hand refers to the hand nearest the horse. These obviously change depending on which side of the horse you are on, and whether you are shoulder-to-shoulder with the horse, i.e. both facing the same direction, or you are facing the horse front-on.

    SLICES:

    A: Getting Comfortable in a Corner

    1. Walk with the horse and halt in a corner set up with a gate or a barrier. The handler is on the open side of the corner. It the horse finds it hard to stand relaxed in the corner, and you have taught him to love standing his front feet on a mat, use a mat for your ‘halt’ position. Click&treat for the halt.
    2. Relax into zero intent and ask the horse to ‘wait’ for a little while in the corner. Click&treat the ‘wait’ task a few times.
    3. Turn the horse 90 degrees toward you so he can walk forward out of the corner. Walk a loop and come back to park in the corner again. Click&treat the halt. (This bit is not on the video clip but when first teaching this, we want the horse totally comfortable standing in the corner. It’s helpful to generalize the task to several corners if you have them available or can build them.)
    4. Teach relaxed standing in the corner on the horse’s left and right sides.

    B: The Back-Up Maneuver

    To ask for the back-up, you are going to smoothly pivot 180 degrees, so you face the opposite direction to the direction the horse is facing, but you are a bit to one side of him.

    BUT: ***In the moment before you pivot…*** 

    1. Gently reach across your body with your ‘outside hand’ and slide it quietly up the rope to a point of contact to which the horse responds.
    2. At first, this may be right up to the snap on the halter (or if using a rope halter, even beyond the snap to hold the bottom of the halter) so you can give the horse a very direct backwards feel on the halter.
    3. As you pivot to face the horse, what was your ‘outside hand’ becomes your ‘inside hand’ — the one nearest the horse.
    4. Then simply keep a ‘hold’ tension on the rope and bring up your energy and intent for the horse to step back. This stance causes the horse slight discomfort by making him feel unbalanced. We want him to work out that he can regain his balance/comfort by shifting backwards. Our first click point is the moment he thinks of moving back. Because he’s in a corner, his easiest choice is to step backwards to regain his balance.
    5. When first teaching this task, release your ‘hold’ and simultaneously click&treat at the horse’s smallest inclination to shift his weight back. After the treat, walk a circuit, return to the corner, and ask again.
    6. When you can feel the horse readily shifting his weight back, release the rope pressure, but then, right away, slide up the rope again and ‘hold’ a bit longer to get a whole step back. Drop your signaling hand off the rope as soon as you get backward movement. Walk a circuit, return to the corner, and ask again.
    7. As he begins to understand, eventually ask for two steps, then three steps and so on, before the click&treat. The horse will soon know that when you relax your intent and take your signaling hand off the rope, he can stop backing.
    8. Ask for two or three back-ups (of several steps each) in a row, with release, click&treat for each one. Then ask the horse to step forward into the corner again; click&treat.
    9. Build a little dancing rhythm of movement: back up = click&treat. Forward into corner = click&treat. Back up = click&treat, and so on. After about 3 of these, go away for a bit of relaxation or doing other things.
    10. Gradually, over many short sessions, ask for more steps back until the horse willingly offers as many as you like.

    Generalizations

    1. Move away from the corner and use just a fence on the far side.
    2. Move away from the fence and use just a low raised rail on the far side.
    3. Repeat with just a ground rail along the far side of the horse.
    4. Check to see how well the horse can back with this signal (turning to face him) out in the open. If you lose straightness at any point, return to using a fence or rail on the far side. If the horse begins to swing his hind end away from you, you can straighten his body by touching his neck to move his head away, which will straighten his body.
    5. Back through increasingly narrow spaces; e.g. two barrels, gates, into and out of stalls, always being careful that the horse does not catch his hip on an upright.
    6. Back through lanes set up with higher sides.
    7. Back along a track or trail.
    8. Back down slopes and up slopes. Start with gentle inclines.
    9. Back into a trailer or trailer simulation.
    10. Weave backwards (you need to create signals to direct his butt to the right, to the left and to keep it straight). If you are asking the horse to back up while you face him front on, moving his head a bit to his left (your right) will cause his butt to move to his right (your left). And vice versa if you move his head a little bit to his right, his butt will move to his left. If you want him to back straight, ask his head to stay straight.
    11. Back an L-bend.
    12. Back a U-bend.
    13. Back a Z-bend.
    14. Back in a circle.

    Related Resources:

    1. Using a target: https://youtu.be/IfbdNme5UQA
    2. ‘Walk On’ and ‘Whoa’ Signals: https://wp.me/p4VYHH-5TT
    3.  ‘Zero Intent’ and ‘Intent’: https://wp.me/p4VYHH-5RO
    4. Body Axis Orientation: https://youtu.be/mjBwyDsVX6Y

    Movement Routine 1 – Fence

    Photo: Standing with ‘no intent’ at halt is part of these five chained tasks.

    INTRODUCTION

    This is the first of a series of movement routines we can do with only a fence and an open working area. The routines put together many of the individual skills and movements that my resources have looked at so far.

    The key purpose of these routines is to encourage handlers to work on the precision of their signals in a relaxed manner.  The routines require the handler to pay close attention to refining his/her signals to improve timing, clarity and softness. A horse can only be as precise as we are precise. A horse can only be as soft as we are soft.

    Each routine has five elements that are chained together into a pattern of movement. Horses are pattern learners and, like all of us, like to know what will happen before it happens. We tend to forget that horses living natural lives in the wild are totally in control of all their actions.

    We can increase the positive feeling of ‘certainty’ by teaching these routines in a light-hearted but methodical way. Boots usually picks up a new pattern after three-six repeats over three days. Some horses will be quicker, and some will take longer.

    Other reasons for playing with these routines:

    1. They are a way to keep skills we have already taught current in our repertoire.
    2. They give a way of interacting with our horse when time is short, we don’t have time to set up objects and obstacles, we don’t have access to objects and obstacles, or we are past the point of lugging around heavy rails and other objects.
    3. They include movement tasks we can do between working on stationary tasks, so giving the horse a good mix of activities.
    4. They make excellent cool-down routines after energetic riding or groundwork.

    I’ve called them ‘routines’ because gymnasts first learn the individual elements of a performance and then form the elements into a ‘routine’. First each element is mastered emotionally, intellectually and physically. Then the routine is put into brain memory. Then it is practiced until it is also in muscle memory.

    All this is a little bit tricky because doing a routine with a horse involves two brains and two sets of muscles.

    After jotting down a plan for a possible routine, I try it out with Boots multiple times. The feedback I get from Boots and myself always shows that the initial plan needs a lot of changes. Most of the changes concern my body position plus when and how I give the signal for each part of the action.

    AIM

    Smooth execution of a series of five individual tasks chained together:

    • ‘Walk on’ and ‘halt’ repeated three times;
    • Change of direction and side of horse (so horse remains nearest the fence);
    • ‘Stay’ while handler backs away from the horse to the end of rope (keeping a drape in the rope);
    • Horse Waits for ___ seconds;
    • Recall.

    PREREQUISITES

    1. Smooth ‘walk on’ and ‘halt’ transitions staying shoulder-to-shoulder. (See Related Resources 1 at the end of this post.)
    2. Handler has developed a clear ‘No Intent’ signal so the horse knows when standing quietly is what is wanted. (See Related Resources 2 at the end of this post.)
    3. Change of direction plus changing side of horse the handler is on. (See Related Resources 3 at the end of this post.
    4. Horse and handler agree on clear ‘stay’ signals. (See Related Resources 4 at the end of this post.)
    5. Horse has learned to ‘wait’ until handler gives a new signal or clicks&treats. (See Related Resources 5 at the end of this post.)
    6. Handler and horse agree on a clear ‘recall’ signal. (See Related Resources 6 at the end of this post.)

    ENVIRONMENT AND MATERIALS

    • A work area where the horse is relaxed and confident.
    • Ideally, the horse can see his buddies, but they can’t interfere.
    • The horse is not hungry.
    • Halter and 10′ (3 m) or longer lead.
    • A safe fence line to work alongside. It can be straight, curved or the inside or outside of a round pen fence.

    VIDEO CLIP

    https://youtu.be/HqyJA_E7waY

    NOTES

    1. Since I don’t find memorizing a sequence of tasks easy, I use a ruler as a fence and practice the movements with my small toy hippopotamus. Then I walk the sequence outside by myself, practicing the signals I will use, accompanied by an invisible unicorn.
    2. While working out the plan with Boots’ help, I’ve usually managed to confuse her to some extent, so once the plan feels right, I wait a few days before starting to do the final version with her. Meanwhile we have been practicing the tasks separately.
    3. For the first task, walk as few or many steps as you like. I walked only a few steps in the video to make it easier to film. Vary how long you stand at halt before asking for the next walk transition. Work to get the ‘walk on’ transition with raising your chest, breathing in deeply plus your voice signal. Work on refining your body language and voice signal for each halt.
    4. How often you click&treat depends on where you are with each skill. I always begin with click&treat for each portion of each task. As the horse gets the hang of what we are doing, I move the click point along so the horse does more for each click&treat. I like to eventually be able to do the whole chain with one click point at the end.
    5. As with everything, we keep the sessions short in among other things we are doing. I often do it just once, sometimes twice and rarely three times in a row.
    6. There is no need to rush through the chain of tasks. Walk slowly. Give the horse time put the pattern into his mind and from there into his muscle memory.
    7. Stay’ means that the horse understands that you can walk away while he stays put. ‘Wait’ means that the horse is able to keep standing still for a specific length of time until you click&treat or give another signal. They may appear to be the same at first glance, but teaching/learning ‘Wait’ with duration is a skill set that goes beyond the idea of ‘stay’ for a short period.
    8. For the ‘wait’ task, gradually work up to ten seconds, but be sure to stay well within the time the horse is comfortable with. Better to recall sooner rather than after the horse moves. If he moves, go back to working on the ‘wait’ task by itself for several days. In the video clip, you will note that on the day we filmed at liberty, Boots found it hard to relax into the ‘wait’. There was a lot of commotion including a huge noisy hedge clipping machine working close by.
    9. The more time we spend playing with exercises like this, which look relatively simple on the surface, the more positive spin-offs there will be to the other things we do with the horse.

    SLICES

    1. Memorize the sequence of tasks.
    2. Play with each of the skills separately until you and the horse feel fluent. This might take one session or a long time if some of the tasks are new to you.
    3. Walking with the horse nearest the fence, chain the first two tasks together (3 x walk & halt plus change of direction and sides).
    4. When 3 is smooth, chain the last three mini-tasks together (stay plus wait plus recall).
    5. When both 3 and 4 are going well, chain it all together.
    6. Always adjust your rate of reinforcement (how often you click&treat) to what the horse is able to offer on the day. If he seems unsure, click&treat more of the slices. If he is showing keenness and understanding about what comes next, use your voice to praise and move the click&treat further along the chain.

    We can’t expect our horse to be the same every day, just as we are not the same every day. Good training adjusts what we do to what the horse is telling us. Some days it will feel very smooth. Other days parts will feel sticky. This is normal ebb and flow.

    The day will come when you do it all with one click and treat at the end, but it may not happen again the day after that. Horses read our tension or relaxation in a nanosecond. Often what is happening with the horse relates to ourselves, our emotional state, and how the horse perceives us that day.

    Other times, the horse may be tired or anxious due to rough weather or other changes in his external and/or internal environment.

    GENERALIZATIONS

    1. If you usually start walking on the horse’s left side, start instead walking on his right side. Be aware of keeping your signals equally clear on the side you use less often.
    2. Practice alongside as many different fences as you can.
    3. Once the horse shows that he knows the pattern, play with it at liberty along fences using the same signals you have used all along.
    4. Once the routine is smooth along the fence, play with it out in the open, first with the lead rope and then at liberty. Alternate on which side of the horse you begin the routine.

    RELATED RESOURCES

    1. Smooth Walk and Halt transitions: https://wp.me/p4VYHH-5TT
    2. ‘Zero Intent’ and ‘Intent’: https://wp.me/p4VYHH-5RO
    3. Changing Sides in Motion: https://youtu.be/3oqPs4LM5AM
    4. Park and Wait (Stay): https://youtu.be/UvjKr9_U0ys
    5. Wait Duration: https://youtu.be/jVn3WBuqpno
    6. Recall Clip 1: https://youtu.be/XuBo07q8g24     Recall Clip 2: https://youtu.be/5BQCB2Fe5RE


    One Step at a Time

    Photo above: Boots gained the confidence to step up on this balance beam by being rewarded for venturing one step at a time. After many short, successful sessions, she felt secure enough to target individual legs to my hand.

    INTRODUCTION

    The skill of being able to ask your horse to move one specific foot at a time is worthy of time and attention. It is a task that can be used and refined when riding or doing groundwork, including Horse Agility competition. It starts with being able to visualize the pattern in which horses move their feet.

    Carefully observe the footfall sequences when horses walk, back-up, trot and canter. Reviewing slow motion video is best. Learn the footfall (foot-rise) for walk and trot, one gait at a time. When they are clear in your mind, add the canter.

    Get down on all fours so you can mimic the pattern with your limbs. That helps put the patterns into your deep memory. Once you can easily replay the memory tape for each gait in your mind, you can give your horse much clearer signals.

    Perfecting this helps to build the feel you need in order to time your riding or leading signals to the horse’s feet.

    This is a great task for teaching us to carefully note the horse’s intent and time our click&treat to the moment a foot is lifting. The ability to see and feel footfall (foot-rise) is a huge bonus in a horse training kit.

    It is actually the moment of foot-rise that we need to learn because it is only when the foot is lifted that we can influence where it goes next. Therefore during this exercise we want to click&treat as the foot is lifting.

    Directing our horse’s feet one at a time has many uses. For example:

    • Cleaning/trimming feet.
    • Positioning for mounting.
    • Backing into stalls/wash bays.
    • Breed and showmanship classes .
    • Leading through narrow spaces.
    • Trailer loading and unloading.
    • Precision riding or long-reining/driving.
    • Placing a foot for an x-ray.
    • Precise mat or hoop work.
    • Pedestals.
    • Bridges.
    • Water obstacles.
    • Horse Agility obstacles
    • Getting out of tricky situations on the trail.
    • Stepping up and down a pedestal or balance beam or bridge.

    PREREQUISITES

    1. Horse and handler are clicker savvy.
    2. The horse responds willingly to light pressure on the halter via the lead rope. (See ‘Related Resource’ 1 at the end of this post.)
    3. We have taught the ‘finesse back up’. (See ‘Related Resource’ 2 at the end of this post.)

    ENVIRONMENT AND MATERIALS

    • A work area where the horse is relaxed and confident.
    • Ideally, the horse can see his buddies, but they can’t interfere.
    • The horse is not hungry.
    • Halter and lead. A shorter lead is easier to use for this task.

    AIM

    To create signals for asking the horse to move either front foot one step at a time, both back and forward.

    VIDEO CLIP

    https://youtu.be/http://A6RUNijvf18

    NOTES

    1. Ensure the horse is in a learning frame of mind.
    2. Keep each session working with short – three minutes is plenty. Three minutes of focused work over many sessions will get you the result without lapsing into human or horse frustration.
    3. To lift and move a front foot, the horse must first shift his balance to take the weight off that foot.
    4. Unless the horse is pacing, the hind feet move in unison with the diagonal front foot.
    5. I’m not good with left/right or 3-dimensional thinking so it took me a long time to get these moves firmly into my muscle memory. I had to learn to carefully note where the horse’s feet were and how he was balanced before I asked a foot to move. Then I could decide which way I needed to tilt the horse’s head to move a particular foot.
    6. Remember to click&treat the moment the foot is lifting during this exercise.

    SLICES

    One Step Back

    In order to lift his right front foot, the horse must shift his weight to his left shoulder and slightly back.

    1. Face the horse, slightly to the right side of his head and orientate your belly button toward his nose (when his head is straight).
    2. Hold the rope about an arm’s length from the halter, lightly draped, in the hand nearest the horse’s shoulder (rope hand).
    3. Reach across with the other hand (sliding hand) and slide it gently up the rope toward the halter. If you’ve taught a ‘back’ voice signal, use it as well.
    4. At some stage, you will reach a point of contact to which the horse responds.
    5. When you reach the point of contact tilt his nose/neck slightly to the left and put a bit of backward pressure on the halter. Release immediately when you feel his intent to move back (click&treat). Relax, then ask again.
    6. When you get a whole step, release (click&treat), relax. Maybe rub him if you are not using Clicker Training and he likes to be touched. If you get more than one step, accept it, reward it, and then adjust your signal so it has less energy.

    Some horses may at first respond by leaning forward into the backward pressure you are putting on the halter. They are not ‘wrong’ because moving into pressure is a natural horse response. They are also not wrong because they don’t yet understand what you want.

    If your horse leans into the pressure:

    1. Take up a power position (feet shoulder-width apart, one slightly ahead, hips dropped).
    2. Hold the rope in the hand nearest the horse, about 2’-3’ from the halter with a bit of slack in it.
    3. Reach across with your other hand and softly run it up the rope toward the halter until you meet resistance from the horse.
    4. At that point, simply ‘hold’ just strongly enough to make the horse feel unbalanced.
    5. The moment he shows the slightest tendency to shift backwards to regain his balance, release the pressure (click&treat).
    6. Repeat. If you are clear and consistent and release (click&treat) promptly, the horse will soon read your body language energy and intent and step back before you can even slide your fingers up the rope.
    7. During multiple short practices, also introduce a voice ‘back’ signal.

    When you reach a reliable response as in 6 above, you have created a gesture signal you can use at liberty to ask the horse to step back. Keep the gesture exactly as it was, i.e. running your hand up an imaginary rope.

    When you have one step back at a light signal, ask for two steps back. It’s important to ‘release’ the halter pressure slightly after the first step, then increase the pressure slightly to ask again for the second step before a bigger release (click&treat).

    Once that is smooth, ask for three steps, then four, and so on until you have as many individual steps as you like. Release the pressure at each step, then apply it again lightly to ask for another step. The horse will soon read the intent in your body language and will step back by reading your ‘intent’.

    Pressure on the rope will no longer be necessary except maybe in unusual situations of high stress. In such situations the horse will have an advantage over horses who don’t understand this part of the task because he will remember what the rope pressure means and how to respond to it.

    To move his left front foot back, tilt his nose/neck slightly to the right, i.e. always tilt the nose away from the foot you want him to move.

    If the horse tends to push forward into the handler, it can help to have a rail in front of the horse or start in a blocked-off lane, so that stepping back is the easiest and common-sense thing to do.

    When backing from the halt feels easy, we can expand and generalize the task by walking along beside the horse, halting and smoothly pivoting into position to face the horse and ask him to back up. Teach this first along a safe fence to encourage the horse to back up in a straight line.

    One Step Forward

    To move one step forward, tilt his nose slightly away from the foot you want to move (to take the weight off it) and put gentle forward pressure on the halter.

    GENERALIZATIONS

    Be sure to teach ‘one step at a time’ standing on the horse’s left side and on his right side. If he finds one side harder, work at bit more on that side.

    Most people find giving signals with their less dominant hand harder as well. When each side feels the same, you’ve reached a big milestone.

    When we can use a light signal to ask the horse to glide from walk into a halt, then as we turn to face him, we can ask for an individual step back or forward, we have achieved our task.

    Eventually, get him to put a specific front foot on things. Start with a largish item like a doormat or a piece of carpet. Work toward smaller things like paper plates, Frisbees and leaves, then higher things like stumps, steps, pedestals, ramps, balance beams, hoof stands if he doesn’t already know all these things.

    Be aware that once the horse is close to the object, he can’t see it, but is working from memory. The area directly under his head/neck is a blind spot.

    Be particular but not critical. Always relax, pause and reset if the horse gets confused. After a good effort, go away from the site and do other things the horse already knows.

    Then come back to moving one foot until you get another good effort. Don’t drill. After you’ve had two or three good attempts, stop and come back to it another time.

    The essence of this teaching is that you create mutually-understood signals that communicate to the horse about moving individual feet.

    This clip shows some possible generalizations.

    RELATED RESOURCES

    1. Blog: Soft Response to Rope Pressure: https://wp.me/p4VYHH-5Sq
    2. March 2018 Challenge; Backing Up Part 2; FINESSE BACK-UP https://youtu.be/safxxu90lkA


    Building Task Complexity Using Hoops

    INTRODUCTION:

    This is a superb flexion exercise because it causes the horse to become super aware of what his feet are doing. It also encourages the horse to pick up his feet and stretch his stride, so it aids muscle lengthening and hock flexion.

    It is also an example of how we can gradually build the complexity of a task until eventually the whole task is done with one click&treat at the end.

    Sadly, not all horses are aware of exactly where their feet are and what their feet are doing. Horses raised in flat paddocks or those who spend much of their life stabled have not had opportunity to develop good proprioception. Horses who can move freely in rugged country will have a much stronger sense of where their feet are.

    We can purposefully teach tasks that encourage foot awareness. See ‘Related Resources’ 8 at the end of this post.

    PREREQUISITES:

    1. Horse and handler are clicker savvy.
    2. Horse responds willingly to ‘walk on’ and ‘halt’ signals when the handler is beside his neck/shoulder. (See ‘Related Resources’ 1 at end of this post.)
    3. Horse knows about nose and/or foot targets as destinations where a click&treat occurs each time. (See ‘Related Resources’ 2 at end of this post.)
    4. Horse confidently steps over rails, ropes, logs or similar. (See ‘Related Resources’ 4 and 5 at end of this post.)
    5. Horse confidently walks onto and over unusual surfaces such as tarps, boards, and so on. (See ‘Related Resources’ 6 at end of this post.)

    ENVIRONMENT & MATERIALS:

    • A work area where the horse is relaxed and confident.
    • Ideally, the horse can see his buddies, but they can’t interfere.
    • The horse is not hungry.
    • Five or six hoops. Make hoops with ropes laid into circles or make hoops using plastic water pipe pieces held together with a strip of large or smaller diameter pipe so the hoop can come apart if the horse gets in a muddle.
    • A destination where the horse will receive a click&treat after negotiating the hoop(s). Put the destination, either a mat or a nose target, at a spot an equal distance from either end of your (eventual) line of hoops so it works in either direction of travel.
    • Halter and lead kept loose as much as possible, as we want to use body language for communication as much as possible, rather than rope pressure.

    AIM:

    To smoothly walk (and maybe jog) across a series of five (or more) hoops staying together in the shoulder-to-shoulder position.

    VIDEO CLIP:

    #172 HorseGym with Boots: Building Task Complexity using Hoops

    https://youtu.be/h0sVZqLfNI8

    NOTES:

    1. Boots’ demonstration on the video is the sum of many short training sessions over a long time. During the teaching or acquisition phase, we played with one hoop for a long time before adding the second hoop. As she gained confidence, we added more hoops one at a time.
    2. It’s good to first build confident stepping over things such as rails and as many other safe objects that you can find.
    3. Remember to keep each session short. We don’t want to drill this. We want the horse to learn that stepping through the hoops cleanly earns him a bonus click&treat.
    4. When we have accomplished the task fully, we will be able to cross a series of hoops cleanly in either direction with the handler on either side of the horse.
    5. Some people like to teach everything on both sides from the beginning. Others prefer to get it all smooth staying on one side of the horse and then teach it again from the beginning on the other side of the horse.
    6. Be careful to keep the shoulder-to-shoulder position intact so you are consistently moving in a synchronized way.

    SLICES:

    1. Lay out one hoop and set up your destination (mat or nose target) a good distance away from the hoop so it is not immediately distracting.
    2. Approach the hoop with the horse; click&treat for any interest he shows in the hoop. Allow him to sniff it and paw at it for as long as he wants. Click&treat when he finishes sniffing and/or pawing, walk away from the hoop to the mat or nose target destination; click&treat at the destination.
    3. When the horse is ho-hum about the hoop, ask him to step his front feet into the hoop and halt; click&treat. Walk on to your destination; click&treat.
    4. Ignore any clipping of the hoop with his feet as he steps into it or out of it. Most horse will correct themselves with practice. It is addressed in 8 below.
    5. When 3 above is smooth, ask him to walk through the hoop with his front feet and halt with his hind feet in the hoop; click&treat. Walk on to your destination; click&treat.
    6. Alternate between 3 and 5 above, walking on to your destination each time for a second click&treat.
    7. When the horse feels confident about halting with either his front feet or his hind feet in the hoop, begin to ask him to walk right through the hoop and on to your destination.
    8. At this point, ignore any clipping of the hoop with his feet, BUT when he walks right through CLEANLY, CLICK right after he has cleanly exited the hoop, and deliver the treat. When he does clip the hoop, there is no extra click&treat. You simply move on to your destination; click&treat.
    9. Repeat 7 and 8 until the horse can walk across the hoop smoothly without touching it most of the time. The first time he walks through without touching the hoop, celebrate hugely with a bonus click&treat or a jackpot before walking on to your destination for another click&treat.
    10. When the horse walks across the hoop cleanly almost every time, add a second hoop. Allow him time to investigate if he wants to.
    11. Repeat as above with two hoops, then three hoops, then four hoops, then five hoops, then more if you want.
    12. Be sure to stay with each number of hoops until the horse is super confident and moving across them cleanly almost every time. The easiest way to make it all fall apart is to go too fast or to try to do too much during one session.
    13. By keeping the sessions short and fun, he will be keen to do it again next time.
    14. Ensure that the horse is confident working in both directions.
    15. Ensure the horse is confident with you on his left side or his right side.
    16. When it feels ho-hum to walk across five or more hoops, start the whole process again with one hoop and ask him to jog or trot across it.

    GENERALIZATIONS:

    1. Set up hoops in new venues; slopes can make it more challenging.
    2. Set up hoops where there are different distractions.
    3. If you have a friend that trains in the same way, ask them to do the exercise with your horse.
    4. Use the exercise regularly as part of your warm-up or cool-down gymnastics.
    5. See ‘Related Resources’ 7 below for more ways to play with hoops.

    RELATED RESOURCES:

    1. Blog: Smooth ‘Walk On’ and ‘Halt’ Transitions: https://wp.me/p4VYHH-5TT
    2. Blog: Using Mats: Parking or Stationing and Much More: https://wp.me/p4VYHH-5S9
    3. Destinations: Video Clip: #3 HorseGym with Boots; Stationary Nose Targets: https://youtu.be/TcRjoAnDYPQ
    4. Video Clips: a) Precision with a Single Rail: https://youtu.be/bJzwDq-NvtE 
    5.                      b) Same task at Liberty: https://youtu.be/kvIso5iv-gA
    6. Unusual Surfaces clips:
      1. Thin-Slicing the One Meter Board: https://youtu.be/pLLqtbQJqMs
      2. Tarp and Water Surface: https://youtu.be/AOhKu6oHdkk
    7. Hoops Playlist: First clip in the playlist: Single Obstacle Challenge Hoops 1 https://youtu.be/AfDIAQSOmE0
    8. Video Clip: Foot Awareness: https://youtu.be/7bEkFk0w_gk


    SMOOTH 90-DEGREE TURNS – Handler on the Inside

    INTRODUCTION:

    This activity makes a nice warm-up or cool-down exercise. It also does wonders for maintaining horizontal flexibility. The bone structure of the horse limits flexion to only three points along the body. They simply are not as sinuous as a cat or even a dog.

    A horse’s three flexion points are:

    1. Head alone flexes right and left a little bit.
    2. Base of the neck is the main area of flexion.
    3. A small degree of flexion is possible between the end of the ribs and the hip.

    This exercise encourages maintenance of flexion for 2 and 3 above. To make a nice clean 90-degree (right-angle) turn, the horse must flex a little bit at the shoulder and step the inside hind foot forward and under the belly to navigate the turn as elegantly as possible.

    It’s a good exercise to note the degree of stiffness or flexibility that a horse has in his body.

    If we have a stiff horse, we can set up this exercise so it is relatively easy to accomplish at first. If we consistently do a few repeats of this exercise several times each session, we’ll note that it gradually gets easier for the horse (unless he is incapacitated due to past injury).

    As the horse gets smooth with one level of bend, we can gradually ask for a tighter bend.

    PREREQUISITES:

    1. Horse and handler are clicker savvy.
    2. Horse responds willingly to ‘walk on’ and ‘halt’ signals when the handler is beside his neck/shoulder. (See ‘Linked Resources’ at end of this post.)
    3. Handler understands the skill of shifting his/her body axis away from the horse as a signal for turning when the horse is on the outside of the turn. Practice this first without the horse. If you have a willing human helper, have them be the horse so they can give you feedback about the clarity of your body orientation signal just prior to navigating each corner. (See the ‘Linked Resource’ about 180-Degree Turns. I teach this before these 90-degree turns.)
    4. Handler understands the skill of maintaining ‘forward energy’ at the same time as slowing down to give the horse time to scribe the bigger arc of the turn. This is also improved by practice with another person standing in for the horse.

    ENVIRONMENT & MATERIALS:

    • A work area where the horse is relaxed and confident.
    • Ideally, the horse can see his buddies, but they can’t interfere.
    • The horse is not hungry.
    • Halter and lead (kept loose as much as possible, as we want to use orientation and body language for communication, not rope pressure).
    • Four rails (or similar) that clearly outline the shape of a square or rectangle.
    • Four markers to place beyond the corners of our square or rectangle.

    AIMS:

    1. To have the horse and handler execute fluid, smooth 90-degree (right-angle) turns when the horse is on the outside of the handler; handler on the LEFT side of the horse.
    2. To have the horse and handler execute fluid, smooth 90-degree (right-angle) turns when the horse is on the outside of the handler; handler on the RIGHT side of the horse.

    VIDEO CLIP:

    #171 HorseGym with Boots: SMOOTH 90-DEGREE TURNS.

    NOTES:

    1. What you see Boots doing in the video clip is a result of many very short sessions over a long time. I strive to improve the timing of my body axis turned away from the horse as a signal for the right-angle turn.
    2. If you use ‘right’ and ‘left’ turn voice signals, add the relevant one at the same moment as you shift the angle of your body axis away from the horse
    3. If the horse has been resting or contained, it is important to walk around for a general overall body warm-up before asking for these types of flexion. Walking over rails and weaving obstacles make great warm-up exercises.

    SLICES:

    1. Ask the horse to walk with you around the shape (box or rectangle), with you walking on the inside of the turn. At first be content with fairly wide, flowing corners. At first, click&treat after each corner. Eventually begin to click&treat only especially well done corners.
    2. Focus on three things;

    One: turn your body axis away from the horse just as you approach each corner.

    Two: slow down slightly around the corner but keeping your body energy up as you turn in order to give the horse plenty of time to organize his much longer body and four legs. Raising your knees to ‘march on the spot’ is one way to maintain the energy with less forward movement. If you pause your energy through the turn, the horse may also fade out, as he is taking his cues from your energy.

    Three: note how efficiently or elegantly your horse is bringing his body around each corner; click&treat turns that seem extra efficient or elegant. Offer the click&treat just after the corner has been navigated, not during the turn.

    1. After a few times around with you on the horse’s left side, change direction so you are on his right side. You may notice that the horse is less flexible on one side. You may notice that you are less flexible and less clear with your body language in one direction.
    2. If you have previously taught voice signals for going ‘around’ something or for ‘left turn’ and ‘right turn’, you can use them here at the same moment you are turning your body axis away from the horse.
    3. When 2 and 3 above feel relaxed and easy, set four markers out from each corner of the square or rectangle as in the photo below. At first, make the gap between the rail and the marker much wider than in the photo. Also note that I’v begun walking inside the square, giving the horse more space to navigate the turn.

    1. Repeat  from the beginning with the horse walking inside each corner marker. As you note his suppleness improving day by day, gradually move the markers closer. In the photo above you can see the tracks of our first easy wide turns when I was also walking outside the square. Now Boots is making the tracks close to the rails.
    2. A little bit of this exercise done often, but never ‘drilled’, encourages the horse to flex because a nice turn earns a click&treat. When all the turns feel nice and tight, be sure to still click&treat often – sometimes after 1, 2, 3 or 4 corners and mix up the number of corners done before the click&treat. If you always do the same, the horse will expect you to always do the same. By varying how many corners before the click&treat, he will listen for the click rather than count the turns. Change direction frequently.

    GENERALIZATIONS:

    1. Set up more than one rectangle and do a few circuits of each one.
    2. Set rectangles up in different venues, if possible, or change the spot in the same general venue.
    3. Set up rectangles of different sizes.
    4. Set up rectangles using different props, such as tread-in posts or tall cones and tape.
    5. Use parallel rails as your rectangle so you can change which rails you decide to walk between so the horse watches more carefully for the change in your body axis.
    6. Set up a rectangle on a slope.
    7. Eventually you may only need four corner markers as a baseline.
    8. Walk a square or rectangle without any props to see how well you have established the change in body axis orientation to communicate with your horse. Vary the size of these – maybe by counting your steps.
    9. Use your body axis orientation change consistently when doing other exercises such as weaving.
    10. Walk a circle rather than a square, by keeping your body axis turned slightly from the horse as the signal.
    11. Play with it all at liberty if you didn’t already train it all at liberty.

    LINKED RESOURCES:

    Blog: Smooth ‘Walk On’ and ‘Halt’ Transitions. https://wp.me/p4VYHH-5TT

    Blog: 180-Degree Turns. https://wp.me/p4VYHH-5Ug

    Clip: #170 HorseGym with Boots: Body Axis Orientation https://youtu.be/mjBwyDsVX6Y

    Smooth ‘Walk On’ and ‘Halt’ Transitions

    INTRODUCTION:

    ‘Walk On’ and ‘Halt’ are the foundation of pretty much everything we want a horse to do with us. Even teaching ‘parking’ starts with a solid, confident ‘halt’.

    Teaching the basic ‘walk on’ and ‘halt’ is most easily done in position beside the horse’s neck or shoulder. I like to teach these with a ‘multi-signal’ or ‘signal bundle’. In the science literature multi-signals are referred to as “a compound stimulus”.

    Using the multi-signals consistently from the beginning means that once the horse knows them well, I can use any one of them, or any combination of them, depending on what best suits the situation. It makes it easier for the horse to recognize the signals when I am walking beside his ribs or behind him (outside his blind spot).

    PREREQUISITES:

    1. Horse and handler are clicker-savvy.
    2. Horse readily targets stationary objects with his nose and/or feet. (See ADDITIONAL RESOURCE 5. at the end of this post.)
    3. Horse is comfortable wearing a halter and lead rope.
    4. It’s highly recommended to practice the rope handling mechanical skills to signal ‘walk on’ and ‘halt’ first with a person standing in for the horse. Simulations are a wonderful way to get our body language and rope handling skills organized and smooth before we inflict ourselves on the horse.

    MATERIALS AND ENVIRONMENT:

    • Horse in a familiar area where he is comfortable.
    • Other horse buddies in view, but not able to interfere.
    • Horse is not hungry and in a relaxed frame of mind.
    • Halter and lead. A relatively short lead rope is easier to manage.
    • Destination objects. These can be a series of stationary nose targets, mats as foot targets. Alternatively, we can use a Frisbee or old cap thrown out ahead for the horse to target, then thrown forward again.

    AIM:

    Elegant ‘walk on’ and ‘halt’ transitions with the horse and handler staying shoulder-to-shoulder, with the handler on either side of the horse.

    VIDEO CLIPS:

    ‘Walk on’ signals are illustrated in HorseGym with Boots clip #129.

    ‘Halt’ signals are illustrated in HorseGym with Boots clip #131.

    NOTES:

    1. What you see Boots doing in the video clip is a result many short sessions over a long time.
    2. We can aid the horse’s understanding if we begin teaching this along a safe fence to remove the horse’s option of swinging the hindquarters away from the handler.
    3. We want to strive for consistently staying in the area alongside the horse’s neck and shoulder.

    Photo to illustrate Slice 3 below. A ‘halt’ signal without pulling on the halter: hold the rope straight up into the air and jiggle it lightly. We can use this as part of our ‘halt’ multi-signal if necessary. We can also use it during the process of teaching backing up with a hand gesture signal staying shoulder-to-shoulder with the horse. Teach it as a ‘halt’ signal by using it as the horse approaches a fence or other dead-end where it makes total sense for him to halt .

    SLICES:

    1. Hold the rope in the hand nearest the horse with no pressure on the halter. If you need to send a ‘halt’ signal with the rope, hold the rope straight upwards and jiggle it. The instant the horse responds, stop jiggling, breathe out and lower your hand.
    2. Halt: Ask the horse to walk beside you toward a familiar mat. As you approach the mat, use the following multi-signals almost simultaneously:
    • Visibly drop your weight down into your hips (like we want the horse to do).
    • Breathe out audibly.
    • Say ‘whoa’ or whatever halt voice signal you decided.
    1. Only if necessary, raise the inside hand holding the rope straight up into the air and jiggle the rope. If the horse is initially taught the ‘rope jiggle’ halt signal using a fence or a blocked-off lane, there will be little need to jiggle the rope. As the horse halts on the mat, immediately relax your body language; breathe out; click&treat.
    2. At first, pause briefly before walking on to the next mat; click&treat. Gradually, over many sessions, teach the horse to wait confidently for up to 10 seconds.
    3. Walk On: Ensure you are holding the rope in the hand nearest the horse with no pressure on the halter. To send a ‘walk on’ signal along the rope, reach across with your outside hand and run it gently up the rope toward the halter. As soon as the horse moves, take away your outside hand.
    4. We use our ‘walk on’ multi-signals almost simultaneously:
    • Look up toward the next destination.
    • Breathe in audibly and raise your body energy. Horses are very conscious about our breathing, so this can become an important signal if we use it consistently.
    • Run your outside hand gently up the rope toward halter to a point to which the horse responds by shifting his weight to step forward. This will eventually become a simple arm gesture without needing to touch the rope.
    • Step off with your outside leg (easier for horse to see).
    • Say ‘walk-on’ (or whatever voice signal you’ve decided). A voice signal is useful later when working at liberty, exercising on a long line, or guiding from behind, as in long-reining.

    Our aim is to initiate the first intention of movement, then move in synchronization with the horse. It’s important not to move off without the horse, so losing our position beside the horse’s neck or shoulder.

    People often tend to start walking without first inviting the horse to move in sync with them. The whole point of this exercise is to move forward together companionably, staying shoulder-to-shoulder.

    1. Each time you halt, you have another opportunity to practice the ‘walk on’ multi-signals. Each time you ‘walk on’, you have another opportunity to practice your ‘halt’ multi-signals.
    2. Every time you come to a destination marker, drop your hips and your energy, breathe out, say your voice signal and relax; click&treat. Pause, then politely use your ‘walk on’ multi-signal to ask the horse to walk forward with you to the next destination marker.
    3. It won’t take the horse long to realize that each destination marker is a ‘click point’. He will soon begin to look forward to reaching each destination. He will also begin to organize his body to halt efficiently. Horses love to know what will happen before it happens. Remember, they have four legs and a long body to organize, so begin your ‘halt’ signals well before you reach the destination.
    4. Many short sessions will show improvement in suppleness and body management more quickly than occasional long sessions.
    5. Be sure to teach this in both directions and on each side of the horse. Spending a little time on this, over many sessions, will build a lovely habit of walking with you on a loose rope.

    In a way, although you have the horse on a rope, you are allowing him to self-shape the most efficient way to set himself up to halt at the next marker ready for his click/treat. Because the horse has worked out his way of halting for himself, he has more ‘ownership’ of the task.

    Over time, walking together companionably will become a strongly established habit. As mentioned in Generalization 2. below, we can gradually introduce the ‘whoa’ as our click point, which means we can phase out using destination targets. The horse will comfortably walk with us until we signal for a ‘halt’. Of course, we must reliably reinforce each halt request with a click&treat.

    GENERALIZATIONS:

    1. Gradually increase distances between destinations.
    2. Gradually introduce ‘whoa’ as the click&treat indicator to replace nose or foot targets. Start by asking for ‘whoa’ between destinations. (See ADDITIONAL RESOURCE 2. below.)
    3. Add objects and obstacles to your training spaces to walk through, across, over, weave among. (See ADDITIONAL RESOURCES 3. & 4. below.)
    4. Walk together at liberty. (See ADDITIONAL RESOURCE 1. below.)
    5. Walk together in different venues including public places with slopes, water, trees.

    ADDITIONAL RESOURCES:

    1. Clip: Walking Together at Liberty: https://youtu.be/fD5lWQa6wmo
    2. Clip: 20 Steps Exercise with halter & lead: https://youtu.be/kjH2pS1Kfr8
    3. Clip: Precision Leading: https://youtu.be/2vKe6xjpP6I
    4. Clip: Walk & Hock Gym: https://youtu.be/R62dP1_siaU
    5. Blog about mats: https://wp.me/p4VYHH-5S9


    Link

    2 target 05-30-2015_215749

    What is Equine Clicker Training?

    Clicker training is also called Positive Reinforcement Training.  It is a way of establishing 2-way communication with a horse.

    When the horse presents a behavior that we want to encourage, we use a special sound followed right away with a small food treat that the horse really likes.  Like all of us, horses will seek to re-create a behavior that gives them a positive result.

    The special sound can be made mechanically with a ‘clicker’ or it can be a ‘tongue click’ or a special sound/word that we never use any other time.  Often a mechanical clicker is useful to first teach a new behavior.  Then it is easy to change to a tongue click or our chosen sound/word.  This makes it easier because working with horses we usually need our hands free to use ropes and body extensions.

    Since horses are designed to eat much of the time, a food treat is usually appreciated as long as we make sure it is something they really like.  It’s important to keep each treat very small and to include the treats in the horse’s daily calorie intake.

    A good way to learn clicker training skills is to start with the Target Game.  Before communication can start, the horse has to understand the connection between the marker sound and the treat that will follow.  Some people call this  ‘charging the clicker’.  It just means that the horse has learned that if he hears that particular sound, a treat will always follow.

    Target Game:

    It’s a good idea to first practice the mechanics of this with another person standing in as the horse.  Well-timed food delivery is a key to success with this way of training. It is easier for the horse if the handler had muddled through the learning of  the mechanics of treat delivery. At the beginning it can feel a bit like tapping ones head and rubbing ones belly at the same time.

    Ideally have the horse in view of his friends, but separated from them.  He will learn best if he is not hungry or thirsty and if he is in a relaxed frame of mind. I always ensure that the horse has been grazing or had access to hay before I train.

    We’d like the horse to put his nose on a ‘target’ that we present near his nose.

    The handler’s task is to:

    1. Have a hand ready on the clicker, if using one.
    2. Have a safe barrier between you and the horse.  Present the target – gently to one side of his nose, not thrust directly at him.  A plastic drink bottle or a safe object taped onto a stick is good to start with.
    3. Wait patiently until the horse touches the target with his nose or whisker at which point CLICK, move the target down out of the way
    4. And promptly reach into a pocket or pouch to get out a treat.  Use a pocket or pouch that allows the hand to smoothly slip in and out.  Be careful never to reach into the pocket or pound until after you’ve clicked.  This gets important later.
    5. Present the treat to the horse in a firm, totally flat hand so it is easy for him to retrieve the treat.  For some horses it may work better at first to toss the treat into a nearby familiar food bucket.  The skill of taking a treat politely from the hand can be learned later.  If he pushes your hand down, gently push upwards with equal pressure.
    6. When he’s eaten his treat, present the target again.

    If we keep each targeting session short (3-4 minutes) and are able to repeat them 2 or 3 times in a day, the horse will learn quickly and look forward to each session.

    The Target Game is a good one to start with because when you finish you simply put the target away.  Using the Target Game will let you decide whether Clicker Training (Training with Positive Reinforcement) is something you’d like to carry on with. It can be done alongside anything else you do with your horse.

    The little clip below shows the beginnings and how it might develop over time.  The horses in the clip are already clicker-savvy. Be aware that at first we should always present the target in the same place.  When the horse consistently gets 10/10 for that, we can change to holding it higher up.  Then eventually lower down and to the side and requiring the horse to move to reach it.  But it’s important to get 10/10 for each of these, before we make a change.

    Clip: Starting Equine Clicker Training


    Training with a Marker Signal and Positive Reinforcement

    Click & Scritch Bridget 01-08-2016_082102

    Photo: Using targets as ‘destinations’ makes it much easier to give meaning to our request in a way that the horse easily understands. Reaching the target, whether it is putting the front feet on a mat or touching the nose on a stationary object, earns the horse a click&treat. We can then move between targets to encourage the horse to come with us willingly because there is always something for him to look forward to – the next click&treat when we reach the next destination.

    Training with a Marker Signal and Positive Reinforcement

    Training with the click&treat dynamic is a skill worth learning well, but it is not the only thing we have to learn well.

    Some people handle/condition a horse’s behavior in a way that encourages the horse to always look to the handler – a form of ‘learned helplessness’.  The horse is asked to subjugate his own observations, feelings and natural responses in favor of what the handler requires him to do.

    Other people set themselves the interesting challenge of doing everything with their horses using only positive reinforcement training (often called ‘clicker training’).  They pair each desired response with a marker signal (click) followed immediately by a food treat.  They feel that this is the only way to keep a horse’s ‘sparkle’ alive.

    Somewhere between these two extremes, fall the people who teach many things with the click&treat dynamic, but they also understand, respect, learn and use universal horse language.  In their view, any horse education system that fails to acknowledge group social order, different horse character types and how horses succinctly communicate with body language, will have limited success.

    From our human standpoint, we could define ‘success‘ as having a horse that is safe and fun to be with and that we can take places for exercise to maintain blood circulation health, overall fitness and mental stimulation.

    Success could mean that the horse:

    • greets us willingly
    • enters our space politely
    • offers feet confidently for foot care
    • accepts gear on and off comfortably
    • leads safely and willingly in a variety of positions
    • responds equally well to upward and downward transition requests
    • confidently accepts touch and grooming all over its body
    • confidently accepts ropes draped all over its body and legs
    • willingly, at request, moves away from a food dish, pile of hay or grazing spot
    • not unduly spooked by dragging ropes, wheelbarrows, flapping things, balls, bicycles, vehicles
    • able to stay ‘parked’ quietly or stand and ‘wait’ for a further signal
    • confident moving through gates/narrow spaces/lanes and over water/unusual surfaces at our request
    • approaches new/spooky things as long as we give him the approach & retreat time to convince himself it is harmless
    • at ease with any body extensions the handler might use to clarify or accentuate signals

    Once we have all that, we can endlessly refine the basics and teach new patterns and tricks.

    Teaching with the click&treat dynamic is hugely helpful to horse handlers for two main reasons:

    1. Encourages accurate observation of what the horse is doing in order to pick the ‘clickable moments‘, which are also the moments that signal/cue pressure is released.  Therefore becoming a good clicker trainer also hones the skill of becoming an excellent trainer with simple ‘release reinforcement’.
    2. It teaches ‘thin-slicing’ — the cutting of a large task into its smallest ‘clickable’ components so that we can get the horse confident with each tiny ‘slice’.  Then we can chain the slices together until the whole task is achieved.  This way of teaching/learning, often called ‘mastery learning‘ keeps the horse successful all the way through the process.  A clicker-savvy horse knows that if the click&treat is withheld, they need to try something else.

    Developing the two skills above will greatly increase the ‘feel‘ of the handler.  That ‘feel‘ will translate to the times when a good choice is use of ‘release reinforcement’ by itself.  Feeling what the horse is doing — understanding what his body language is saying and knowing how to respond to that with our feel and body language, is the key to training with signal pressure and release of signal pressure (‘release reinforcement’).

    What horses gain from positive reinforcement  Horses trained with the click&treat dynamic discover that they can have a voice.  Once they learn that a certain behavior will earn them a click&treat, they can become pro-active in offering that behavior.  For many horses this is huge because in the past things have only been done to them or demanded of them — they could only be re-active.

    When a task is thin-sliced so they understand each part of the training process, the horse’s learning can progress in leaps and bounds.  We’d all rather work for a boss who praises what he likes rather than one who only criticizes what he doesn’t like.

    Horses are not blank pages on which we write what we want.  They already have a perfectly good language.  It seems logical to learn it and use it as best as we can with our non horse-shaped bodies.  Horses are very generous with their interpretation of what we mean.  No doubt we have a very funny accent, but unless they have been traumatized by humans, they are happy to learn new things and accept us as part of their personal herd.

    Social Group  Once the horse accepts us as part of her personal ‘ in-group’, we have a position in the group social order.  The two things go together.  We can’t form a bond of understanding with a horse unless he or she lets us into their social group.  Once we are part of the social group, we have a ranking within it.  If the horse can move our feet at will, she or he stands above us in the social order.  If we can ask move the horse’s feet, we rank above him her in the social grouping recognized by the horse.  When people don’t understand this dynamic, or chose to deny/ignore it, things might not go well.

    Horse Character Types  Like us, horses can be innately anxious or innately confident and imaginative.  They come as extroverts who like to/need to move their feet a lot and they come as introverts who prefer the quiet life.  A careful look at how our horse perceives and reacts to things can give us insight into how we can best proceed with an individualized training program.  What works perfectly with one horse can be quite problematic with another.

    Universal Horse Language  Horses have a complex communication system using their body language and a few vocalizations. They ‘message’ other horses with body tension, body orientation, neck position/movement, ear position, tail activity, posturing, striking out, kicking, biting, nibbling.   How they use each of these depends on their intent at the time.  An ‘alarm snort’ will instantly have the whole herd on alert. Quietly turning the head away as another horse (or a person) approaches is an appeasement signal.

    With the aid of body extensions which make us as tall and long as a horse, and simulate a horse’s expressive tail, we can more clearly emulating universal horse language.  If we are good at it and use our movements consistently, any horse will understand our intent without us ever needing to touch the horse or use a rope.  We can establish our position in the social order by ensuring we can move the horse’s feet in a variety of situations while the horse is at liberty to move away, as it would be in a natural herd situation.

    Once we have established our social position, we maintain it by the way we behave.  Anxious type horses may rarely challenge our position.  Confident, imaginative type horses may well challenge our position regularly.  In a natural herd situation, they have the drive and sparkle to work their way up the group’s social order.

    With an understanding of, horse character typesequine body language,  and how the social order works, we can flow with the information the horse gives us via his behavior and body language.  Skills of observation, timing and ‘feel’ allow us to decide how we will use clicker training to make his life in his strange human-dominated world a little bit more interesting and understandable.

    With equine clicker training, we experiment to find out what the horse can already do, then build his skills in a way that has him being continually successful.

    The link below contains a bit more information about horse character types.

    PDF Ch 5 READING HORSES


    Destination Training

    mat cameo boots 10-30-2017_122916

    Photo: Mats laid out in our training area make good destinations to encourage willing movement to the next destination to earn a click&treat. First we can have them close together, then further apart. Once the horse understands the game, we can use small ‘mat’ targets like plastic lids.

    Destination Training

    Destination training adds an important dimension to a horse’s ability to understand what we would like him to do.  We have to remember that the horse is captive to an alien species. Unless we take him through a careful, thin-sliced training program to teach him what we would like him to do, he has no way of knowing what we want.

    While we are trying to figure out how to communicate with our horse, he is trying even harder to figure us out, and work out what we want him to do.

    Giving the horse destinations helps him to make sense of many of our signals, because he sees a purpose to what we are asking him to do. He is not forever locked into a mystery tour.  Like us, to remain confident, horses like to know what is going to happen before it happens.

    Target discs 1 10-26-2017_153255

    Photo: Here we have set up a series of white target disks along a track. Boots earns a click&treat for targeting each one with her nose (or foot). Gradually we would spread them out further and further, eventually attach them in appropriate places along a longer walk or ride on a road or trail.

    Once the horse eagerly targets hand-held targets, we can tie similar targets around our training area and ask the horse to walk with us from target to target. This gives us many opportunities to seamlessly show the horse that walking with us (being led) is a fun thing because we are always reach a destination that results in a click&treat.

    We can ‘stretch the value of each click&treat’ by gradually putting the targets further and further apart and/or in more challenging places. Doing this, we continue to build the horse’s willingness to come along with us because he knows that we know where these magic ‘click&treat spots’ are.

    For horses that are barn/buddy sweet (they are not confident about leaving home) we can set out targets in a curve that gently goes away from home and then returns home. As the horse becomes more confident with the game, we can make the curve further and further away from home.

    Once the horse is keen to hunt out the next target to earn a click&treat, we can set the targets in a straight line leaving home, being careful to stay within a distance that allows the horse to remain comfortable. We click&treat at each target going away from home and again on the way home. Eventually the targets can be a long way apart.

    wk on road 1 (2)

    Once the horse is keen to walk forward to target a familiar object, we can use something like a Frisbee to toss ahead of us, walk to it, target it to earn a click&treat. Then toss it forward again, and so on.

    target frisbee 1 10-26-2017_154327

    More About Foot Targets

    When we introduce mats as foot target destinations, we open up further possibilities for seamless teaching/learning. Once the horse is eager to approach his mats because he knows he will earn a click&treat, the mats can serve the same purpose as the nose targets — desirable destinations.

    But that’s not all. When a horse learns to line up his front feet tidily on a mat, he will generalize this to a tidy approach to the mat so he can step on it elegantly. We have given him a reason to line up his body and use it with more precision.
    An energy conserving horse will be motivated to speed up to reach the mat. A rushing horse will be motivated to calm and collect himself to reach the mat.
    For teaching the leading positions, the mat helps sustain the horse’s attention and focus. We can also use a mat as a positive destination or  ‘relaxation spot’ to visit periodically while we work on more complex tasks.

    Once the horse has established the habit of moving on with us to find the next target, we can introduce targeting of natural objects like trees or rocks, bushes, particular fence posts. We can also teach ‘target places’ like corners of paddocks or favorite grazing spots.

    Video Clips Available

    My  video clips are available on YouTube by searching for HorseGym with Boots or Herthamuddyhorse on the YouTube search engine.

     In this clip the targets are close together for ease of filming. I eventually tied rags to fences and hedges far apart so we did a lot of walking between a click&treat upon reaching each target.

    Clips #3 – #14 of HorseGym with Boots go through the detail of using destinations to give the horse a sense of purpose when we are asking him to walk along with us.

    Number 16 in my Blog Contents List (link at the top of this page) will take you the blog that has details about teaching smooth WALK ON and HALT signals.

    Parameters: Setting the Rules for the Games we Play

    Parameters

    Photo: I’m teaching my horse, Boots, to back up to a mounting block. My parameters include backing straight (hence the guide rails for this early lesson), backing for 6-8 steps (she started at the fence on the right) and halting with her withers just in front of the two tubs. This time she moved back an extra step, but it was a very good response for early in the training of this task. I’ve stepped off the black tub so I could deliver the treat while she stayed in the position I wanted.

    Parameters: Setting the Rules for the Games we Play

    Because of their role in the web of life —  to be a meal for predators — horses are so much more observant than we are.  They read our mood the moment we appear.  They read our body language with exquisite care.  When something in the environment is different from last time, they notice instantly.

    If we want to become good at communicating with our horse, it helps to become more aware of what our mood, our body orientation and our body energy may be saying to the horse.  Horses get confused and worried when our body language does not agree with what we are asking them to do.  Or if we use a similar message to mean two different things.

    As horsemen often say, “Nothing means nothing to a horse”.  So if everything means something, it is good to be aware of the parameters we are setting when we interact with a horse.  Here is a bit more detail about what parameters are, and things to remember to become better teachers for our horse.

    A parameter is something we decide to keep the same or constant.

    For example:

    • Walking on the horse’s left side would be a constant or parameter you have chosen.
    • If you then change to walking on his right side, that is a new parameter.
    • If you decide to walk beside the horse’s ribs (where you will be if you ride) rather than beside his neck, you have changed a parameter.
    • If you decide to walk behind the horse rather than beside him, you have changed a major parameter.
    • When you ask the horse to walk with you on the road rather than at home in his paddock or arena, you have changed a major parameter.
    • Walking on an unfamiliar road or track is changing a parameter.
    • If you are walking together toward a familiar destination, where he knows he will halt to earn a click&treat, the first time you ask him to halt before he reaches the destination, you have changed a parameter.
    • If you are walking and change to asking for a trot or jog, you are changing a parameter.

    Whenever we change a parameter, it is important that we increase the rate of reinforcement (i.e. click&treat more often) and work our way forward again until we and the horse are both confident in the new situation, with one click&treat at the end of a task or a series of tasks. For example, relating to the photo above, once Boots confidently backed up in a straight line to stand between the two tubs, I removes the rails (one at a time) and ask her to back up for just a step or two, then work forward again to get 6-8 steps straight back.

    Horses are super observant of all changes, large or small, and can often be ‘thrown’ by them if we proceed too fast or ask for too much too soon. They also immediately pick up if we are unsure about what we are doing.

    This is why it’s important to have a written Individual Education Program suited to this horse in this environment before we delve into teaching our horse something new. If we are clear in our mind about what we are working on, that confidence will be picked up by the horse.

    If you want to look at 20+ training sessions to achieve the objective outlined in the photo above, done at liberty with no extra props, here is the link to the very first session (lessons were mostly one a day, weather willing and lasted about three minutes each day). I can’t ride any more (dodgy hips & knees) so we did this as a just an interesting training project. The second video clip below takes you to the last clip in the series, in case you don’t want to see all the others in between!

    Safety

    smile while st&s 2 06-16-2016_155354

    Photo: Sitting with the horse in a roomy, enclosed area, asking nothing of him except politeness. This is a superb way to build a new relationship with a new horse or to to build an improved relationship with a horse we have already.

    Safety

    It’s only when we feel safe with our horse and our horse feels safe with us that real teaching and learning can go on.  If our horse makes us feel worried or afraid, we need to take heed of the feeling and organize our environment so that we can be with the horse in a way that allows us to regain our safe, calm, centered core. Maybe we need to sit in our chair just outside the horse’s enclosure to start with.

    It will be difficult for a horse to remain in his calm, centered core in our presence if we are sending out vibes that tell him we are uneasy and nervous.  A good first step is to spend undemanding time with the horse, in his home if we feel safe there, or on the other side of a fence or gate if we don’t.  We need to carry a swishy type body extension so that we can enlarge our bubble without offending the horse by striking out toward him.  Horses are very sensitive to the air movement of two swishy twigs or dressage whips, or the swishing of a string rotated like a helicopter blade.

    Horses easily understand when we are merely enlarging our bubble of personal space.  If we strike out toward their personal bubble rather than just protect our own space, the horse will realize it instantly.  It is important to be aware of the difference between acting in an assertive way and acting in an aggressive way, and to be mindful of which one we are doing.

    As we sit with our horse, we can read, meditate or just enjoy the quiet of being in the moment, looking and listening and breathing.  It’s nice if the horse can be in a roomy area where he is comfortable, able to see his companions but not where they can interfere with your special time together.

    It works well to set a time limit.  It doesn’t matter what the horse does.  We are there as a companion, a paddock mate for the time we have set.  We expect nothing of the horse except politeness.  If he becomes overbearing, we move away with our chair or ask him to back off by swishing the air toward his feet to protect our personal bubble.

    The PDF attached has a look at ways to ensure our safety.

    Safety with Protected Contact and Body Extensions

    HorseGym with Boots video clip series on YouTube

    Over the last few years I have created a series of clicker training activities posted as clips on YouTube.  They can be reached by putting HorseGym with Boots or HerthaMuddyHorse into the YouTube search engine.

    If you click on the HorseGym with Boots playlist in my channel, they should line up in number order as I’ve created them through the years.

    There are a number of other playlists devoted to specific topics. Clips are kept short, usually under five minutes long, to make them easy to find and review. New clips are added each month. Many are being incorporated into my blog posts.

    See the Books section for books available from Amazon as e-books or paperbacks. On Amazon you can ‘Look Inside’ each one. The notes mentioned at the end of the clips have been superseded by my books.

    If you would like more information, email me at:  hertha.james@xtra.co.nz

    Below is one of the “HorseGym with Boots” series. “Boots” is my horse’s name – ‘Nirvana Puss ‘n Boots‘. She is 3/4 Quarter Horse, born in 2002.

    THE PLAN: Thin-Slicing the Tasks We Want to Teach

    LP8 3 05-31-2015_225803

    Bursting a balloon is not an every-day thing a horse does. Teaching it requires a careful plan of ‘thin slices’ that allows the horse to master the task being continually successful and so remaining motivated to try again.

    What is Thin-Slicing?

    When we want to teach our horse something, the first thing we need is a PLAN.  A plan written down has the advantage that we can look back on it.  As we get feedback from the horse and our own actions, we can go back and tweak our original plan.  Or we can throw it out and start again.

    One way to create a plan is to:

    1. Visualize the finished task.
    2. Experiment gently to see what the horse can already offer in relation to the desired task.
    3. Brainstorm all the individual specific actions the horse needs to be able to do to complete the whole task.
    4. Put the actions from 2. above into an order that seems logical.  Each specific action will have one or more ‘click points’ where we click&treat.  This allows the horse to pro-actively seek the hot ‘click point’ of the moment and makes training fun for everyone involved.  This is the thin-slicing part.
    5. Decide how we might teach each specific action (by free-shaping, guided shaping, using a nose or foot target, or even modeling for the horse what we would like him to do).
    6. Organize environmental props that make each part of the task easier for the horse to learn (e.g., rails, markers, barriers, lane-ways, corners).
    7. Start with the first slice of your plan, watching for feedback to see what is working and what needs rethinking and tweaking [or starting over with a new idea  🙂 ].
    8. Gradually chain the slices of the task together until the horse knows the pattern and willingly carries out the whole task with one ‘click point’ at the end.

    My book, How to Create Good Horse Training Plans covers this topic in great detail. (See the BOOKS link at the top.)

    The video clip link below is a bit long (9 min) but it demonstrates all the parts of a PLAN and it uses various teaching methods to get to the final successful outcome.

    Clip: Thin-slicing the Water Obstacle

    http://youtu.be/ojOaYaq8ItQ?list=UUGMJ0ZTjACQ2Ok8civ_9IVQ