Tag Archives: yielding quarters

Movement Routine 5 – Fence for Focus

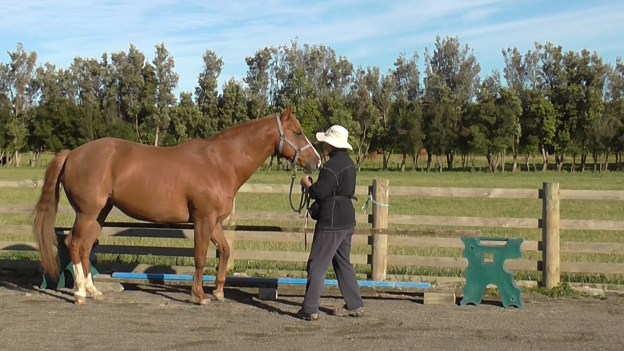
Photo: Task 3: Walking a half-circle away from the fence.

INTRODUCTION

The purpose of this series of movement routines is to regularly have the horse doing a series of gentle movements that aid his overall flexion and suppleness.

We need to consider both physical suppleness and mental suppleness. Mental suppleness is about the horse’s ability to understand the signals for each task and to move calmly between tasks.

Once the horse is adept with each of the tasks in the routine, this whole routine takes about two minutes. But it might take weeks or months of short daily practices to teach each element of the routine to the proficiency needed to link them all together.

I like to mark the end of a routine such as this with a celebration which in our case is a triple treat (details in Prerequisite 8).

AIM

To link this series of tasks into a sequence:

  1. Walk together.
  2. Recall toward fence.
  3. Walk a half-circle
  4. Yield shoulder to put horse’s butt at 90 degrees to fence.
  5. Back butt against fence.
  6. Two steps forward, one step back.
  7. One step forward, one step back; repeat once.
  8. Yield shoulder so horse faces fence and morph into sidestepping away.
  9. Sidestep in the opposite direction.

PREREQUISITES

  1. Smooth ‘walk on’ and ‘halt’ transitions staying shoulder-to-shoulder. (Smooth Walk and Halt transitions: https://wp.me/p4VYHH-5TT)
  2. Horse can smoothly U-turn into a recall when the handler changes from walking forward to walking backwards. (https://youtu.be/XuBo07q8g24)
  3. The horse understands yielding the shoulder. (Yielding the Shoulder: https://youtu.be/eSlin8ZYcRA)
  4. Horse backs up easily to put his butt against a solid barrier. (#186 HorseGym with Boots: Backing Against Objects: https://youtu.be/SBcdVtV-eCo)
  5. Horse is familiar with backing up one step at a time and recalling one step at a time. (One Step at a Time: https://wp.me/p4VYHH-5X6)
  6. Horse understands a signal for sidestepping away from the handler. (Sidestepping: https://wp.me/p4VYHH-5RL)
  7. Horse understand a signal for sidestepping toward the handler. (Target Shoulder to Hand: https://wp.me/p4VYHH-5SH and Targeting Hindquarters to Our Hand: https://wp.me/p4VYHH-5Tk)
  8. Triple Treat: #16 HorseGym with Boots: https://youtu.be/FaIajCMKDDU

ENVIRONMENT AND MATERIALS

  • A work area where the horse is relaxed and confident.
  • Ideally, the horse can see his buddies, but they can’t interfere.
  • The horse is not hungry.
  • Halter and 10′ (3m) or longer lead.
  • A safe fence or other barrier. For this challenge, we ask the horse to back his butt against the barrier, so something solid like a wooden fence, a wall or a hedge is best. We could also use a line of barrels or a raised rail.

VIDEO CLIP

NOTES

  1. Be sure that the horse is confident with each task before starting to link them together. We never want to make the horse feel wrong. He can’t be wrong because he doesn’t yet know what you want. Do a quiet reset and start again if things don’t go to plan.
  2. It is usually helpful to link pairs of tasks at first, then add the first pair to the second pair, and so on.
  3. I like to memorize the sequence of events by walking the pattern without the horse and then visualizing the sequence often (a good substitute for counting sheep to go to sleep!) If you have a human friend, take turns walking the sequence being both the horse and the handler.

TASKS

Use a rate of reinforcement (how often you click&treat) that keeps your horse being continually successful as much as possible. As he learns the routine, ask for a bit more before the next click&treat but always be prepared to increase the rate of reinforcement again if the horse needs you to clarify your intent.

  1. Walk along shoulder-to-shoulder with the handler nearest the fence.
  2. Gently change to walking backwards, asking the horse to make a U-turn toward the fence, so he is walking toward you.
  3. Stop walking backwards and ask him to halt in front of you.
  4. Move to the side that allows you to easily walk a half-circle together, with you on the inside of the circle.
  5. Halt when you have walked a half-circle away from the fence. Ask the horse to yield his shoulder 90 degrees so his butt is toward the fence.
  6. Ask the horse to back up until his butt (or tail) is against fence.
  7. Ask the horse to take two steps forward toward you, then ask for one step back.
  8. Now ask for one step forward, followed by one step back; repeat once.
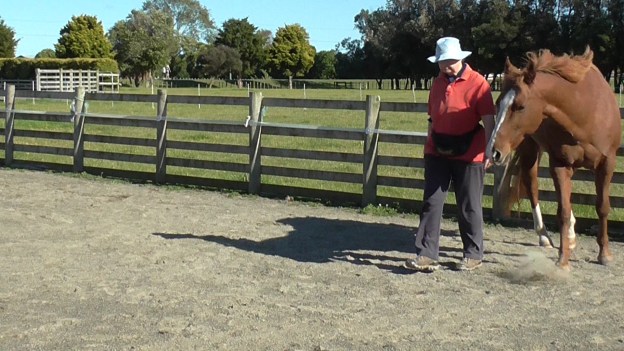
  9. Ask the horse to yield his shoulder 180 degrees so he faces the fence and morph that movement into stepping away from you sideways.
  10. Ask the horse to sidestep toward you or move to his other side and ask him to sidestep away from you.
  11. Finish with a big celebration (e.g. a Triple Treat).
  12. Repeat from task 1 walking on the horse’s other side.

GENERALIZATIONS

  • Practice in different spots and/or different venues.
  • When it is super smooth with rope and halter, play at liberty.
  • Move away from the fence to do the routine. Change task 6 to ask for a set number of back-up steps or have a ground rail as a back-up destination.
  • Chain the tasks in a different order.


Finesse Back-Up

At one point a friend and I came up with 29 different ways of backing up a horse, including groundwork, long-reining and riding. This Finesse Back-Up is one of my favorites when I am leading a horse and we need a prompt back-up.

I learned the essence of this process from Alexandra Kurland, a true pioneer of equine clicker training. I’ve added the idea of using corners to teach because it arranges the environment so that stepping back makes sense to the horse right from the beginning.

PREREQUISITES:

  1. Horse understands putting his nose on a target results in click&treat. (See Related Resource 1 at the end of this post.)
  2. Horse walks confidently between the handler and a safe fence or similar barrier.
  3. Horse understands ‘Walk On’ and ‘Whoa’ voice and body language signals. (See Related Resource 2 at the end of this post.)
  4. Handler easily slip into and out of ‘zero intent’ so the horse easily knows when he can relax in a ‘wait’ and when he is being asked to move. (See Related Resource 3 at the end of this post.)
  5. Horse understands the handler’s body axis orientation as a signal for bending. (See Related Resource 4 at the end of this post.)

ENVIRONMENT & MATERIALS:

  • A work area where the horse is relaxed and confident.
  • Ideally, the horse can see his buddies, but they can’t interfere.
  • A safe fence or barrier which leads into a safe corner.
  • Halter and lead.
  • Mat (optional). A mat can make it easier for a mat-savvy horse to settle into standing in a corner.

AIMS:

  • Handler uses clear, consistent orientation, body language and voice ‘back up’ signals.
  • Horse smoothly shifts from walking forward to stepping backwards on request when the handler turns to face him.

Clips:

https://youtu.be/6YYwoGgd_0Y

https://youtu.be/safxxu90lkA

Notes:

  1. Once the horse readily parks calmly in the corner, we can begin to teach the Finesse Back-Up. I call it that because it requires gently running our hand or fingers up the rope toward the halter, until we reach a point of contact to which the horse responds.
  2. Each horse will be different. I had trouble having Boots demonstrate clearly because she knows the task so well that she reads the very beginning of my body language sentence and steps back right away. If we teach this well, the horse will step back as soon as we begin to turn and use our voice signal, so that even our hand on the rope eventually becomes redundant.
  3. This is tricky to explain in words. Hopefully the video clips and still pictures will make it easier to understand.
  4. Two terms explained:  Outside hand refers to the hand furthest away from the horse. Inside hand refers to the hand nearest the horse. These obviously change depending on which side of the horse you are on, and whether you are shoulder-to-shoulder with the horse, i.e. both facing the same direction, or you are facing the horse front-on.

SLICES:

A: Getting Comfortable in a Corner

  1. Walk with the horse and halt in a corner set up with a gate or a barrier. The handler is on the open side of the corner. It the horse finds it hard to stand relaxed in the corner, and you have taught him to love standing his front feet on a mat, use a mat for your ‘halt’ position. Click&treat for the halt.
  2. Relax into zero intent and ask the horse to ‘wait’ for a little while in the corner. Click&treat the ‘wait’ task a few times.
  3. Turn the horse 90 degrees toward you so he can walk forward out of the corner. Walk a loop and come back to park in the corner again. Click&treat the halt. (This bit is not on the video clip but when first teaching this, we want the horse totally comfortable standing in the corner. It’s helpful to generalize the task to several corners if you have them available or can build them.)
  4. Teach relaxed standing in the corner on the horse’s left and right sides.

B: The Back-Up Maneuver

To ask for the back-up, you are going to smoothly pivot 180 degrees, so you face the opposite direction to the direction the horse is facing, but you are a bit to one side of him.

BUT: ***In the moment before you pivot…*** 

  1. Gently reach across your body with your ‘outside hand’ and slide it quietly up the rope to a point of contact to which the horse responds.
  2. At first, this may be right up to the snap on the halter (or if using a rope halter, even beyond the snap to hold the bottom of the halter) so you can give the horse a very direct backwards feel on the halter.
  3. As you pivot to face the horse, what was your ‘outside hand’ becomes your ‘inside hand’ — the one nearest the horse.
  4. Then simply keep a ‘hold’ tension on the rope and bring up your energy and intent for the horse to step back. This stance causes the horse slight discomfort by making him feel unbalanced. We want him to work out that he can regain his balance/comfort by shifting backwards. Our first click point is the moment he thinks of moving back. Because he’s in a corner, his easiest choice is to step backwards to regain his balance.
  5. When first teaching this task, release your ‘hold’ and simultaneously click&treat at the horse’s smallest inclination to shift his weight back. After the treat, walk a circuit, return to the corner, and ask again.
  6. When you can feel the horse readily shifting his weight back, release the rope pressure, but then, right away, slide up the rope again and ‘hold’ a bit longer to get a whole step back. Drop your signaling hand off the rope as soon as you get backward movement. Walk a circuit, return to the corner, and ask again.
  7. As he begins to understand, eventually ask for two steps, then three steps and so on, before the click&treat. The horse will soon know that when you relax your intent and take your signaling hand off the rope, he can stop backing.
  8. Ask for two or three back-ups (of several steps each) in a row, with release, click&treat for each one. Then ask the horse to step forward into the corner again; click&treat.
  9. Build a little dancing rhythm of movement: back up = click&treat. Forward into corner = click&treat. Back up = click&treat, and so on. After about 3 of these, go away for a bit of relaxation or doing other things.
  10. Gradually, over many short sessions, ask for more steps back until the horse willingly offers as many as you like.

Generalizations

  1. Move away from the corner and use just a fence on the far side.
  2. Move away from the fence and use just a low raised rail on the far side.
  3. Repeat with just a ground rail along the far side of the horse.
  4. Check to see how well the horse can back with this signal (turning to face him) out in the open. If you lose straightness at any point, return to using a fence or rail on the far side. If the horse begins to swing his hind end away from you, you can straighten his body by touching his neck to move his head away, which will straighten his body.
  5. Back through increasingly narrow spaces; e.g. two barrels, gates, into and out of stalls, always being careful that the horse does not catch his hip on an upright.
  6. Back through lanes set up with higher sides.
  7. Back along a track or trail.
  8. Back down slopes and up slopes. Start with gentle inclines.
  9. Back into a trailer or trailer simulation.
  10. Weave backwards (you need to create signals to direct his butt to the right, to the left and to keep it straight). If you are asking the horse to back up while you face him front on, moving his head a bit to his left (your right) will cause his butt to move to his right (your left). And vice versa if you move his head a little bit to his right, his butt will move to his left. If you want him to back straight, ask his head to stay straight.
  11. Back an L-bend.
  12. Back a U-bend.
  13. Back a Z-bend.
  14. Back in a circle.

Related Resources:

  1. Using a target: https://youtu.be/IfbdNme5UQA
  2. ‘Walk On’ and ‘Whoa’ Signals: https://wp.me/p4VYHH-5TT
  3.  ‘Zero Intent’ and ‘Intent’: https://wp.me/p4VYHH-5RO
  4. Body Axis Orientation: https://youtu.be/mjBwyDsVX6Y

Targeting Hindquarters to our Hand

INTRODUCTION:

Once the horse understands targeting his shoulder to our hand, we might like to teach targeting his hindquarters to our hand. If we can ask for ‘shoulder to hand’ and ‘hip to hand’ we have a way of asking the horse to bring his whole body toward us.

It’s a useful maneuver when we would like him to line up at a mounting block, fence or bank and he’s not quite close enough. It is also a gymnastic exercise and one that encourages handlers to develop their timing plus clear, consistent body language.

PREREQUISITES:

  • Horse and handler are clicker savvy.
  • Horse is comfortable standing ‘parked’ with the handler standing alongside facing behind the horse.
  • Handler has developed his/her ‘zero intent’ and ‘intent’ body language. To review, see the clip or blog link at the end of this post.
  • Signals for moving the hip away from the handler are well established. There are various ways to teaching this. A clip demonstrating one way is also added at the end of this post.

ENVIRONMENT & MATERIALS:

  • A work area where the horse is relaxed and confident.
  • Ideally, the horse can see his buddies, but they can’t interfere.
  • The horse is not hungry.
  • A safe, enclosed area for working at liberty, if possible. Otherwise, halter and lead (kept loose or the rope safely draped over the horse’s neck).
  • A hand-held target on a long stick, a mid-length target and a short target.
  • For generalizations, pedestal, mounting block or similar, hoop.

My current collection of targets. In the video below, I used the three on the right-hand side of the photo. The others come in handy in various contexts.

AIM:

Horse confidently moves his hindquarters toward the handler’s ‘outstretched hand’ signal.

Video Clip: #164 HorseGym with Boots: TARGET HIPS TO HAND  https://youtu.be/aYlILbkwsBA


Note: When we request the horse to yield his hip away from us, we project energy toward the horse’s hindquarters from our body’s core at the belly-button, which causes our posture to be upright.

When we request the horse to move toward us, it’s important to pull our belly-button back so that we shrink back and create a ‘draw toward me’ energy with our whole body.

Horses are so sensitive to advancing and receding energy from another body, that they easily read the intent of our posture as long as we are consistent and not sloppy.

SLICES:

Stay with each slice until it feels ho-hum and smooth for both of you.

Make each session extremely short, a few minutes. The magic is not in the final result as much as it is in the process of helping the horse figure it out.

  1. Choose a spot where you can easily stand the horse alongside a safe fence, wall, or similar with the barrier on the horse’s far side. The barrier discourages the option of moving the hindquarters away, which is something you have hopefully taught previously.
  2. Ask the horse to stand squarely beside the fence; click&treat.
  3. Take up a ‘zero intent’ position standing beside the horse’s neck, facing behind the horse, holding the target down by your side ‘out of play’ and relax; click&treat. Work up to standing together quietly like this for three or four seconds before the click&treat, on either side of the horse. Have the space between you and the horse’s neck at a distance comfortable for both of you. Close is usually safer than standing away, but it depends.
  4. Stretch your arm to gently touch the long-handled target to the side of the horse’s hindquarters. Click just as the target makes contact; deliver the treat.
  5. Move the target down behind your leg to take it ‘out of play’ and resume the ‘zero intent’ body position. Observe to see if the horse is okay for you to carry on. If he continues to stand in a relaxed manner, he is probably okay to carry on, or you may have sorted out one or more ‘okay to proceed’ signals. A link to information about these is at the end of this post.
  6. Repeat 4 and 5 above, watching for any weight shift the horse might make toward the target as you move it toward his hindquarters. If he does, celebrate hugely with happy words and a jackpot or triple treat. Maybe ask for one or two repeats, then wait until your next session to do more.
  7. When you feel the time is right, hold the target a tiny distance away from touching the hindquarters and WAIT for the horse to shift his weight to make the contact; click&treat. Some horses may step over to make the contact right away. For either a weight shift or a whole step toward the target, celebrate hugely again. Maybe repeat the request once or twice more to consolidate the idea. If you have waited 3-4 seconds and nothing happens, simply return to slices 4, 5, 6 above.
  8. It took Boots a good number of daily mini-sessions before she a) consistently leaned toward the target and  b) consistently moved a tiny distance toward the target to make the contact. Then it took more days before she confidently stepped toward the target when I held it further away.
  9. Decide whether you want to continue teaching on the side you started with, or if you want to teach slices 1-7 on the other side of the horse before proceeding.
  10. When 7 is ho-hum, gradually hold your target a little bit further away so the horse must take a full step to contact the target; click&treat.
  11. Whenever the response seems slow or unsure (or is missing), go back to touch the target to the hindquarters; click&treat. Then work forward again at a rate that keeps the horse being continually successful as much as possible.
  12. This willingness to back up in the teaching is sometimes hard, but we always must go where the horse tell us he is, not where we want him to be.
  13. When starting a new session, always introduce the task with a touch of the target (and eventually your hand) to the hindquarters; click&treat, to let the horse know which game you are playing.
  14. Work to having the response equally smooth on either side of the horse.
  15. You may want to introduce a voice signal to go along with your body language and orientation signals.
  16. When all is smooth using your long-handled hand-held target, repeat the slices using a shorter target. The one I use in the clip is a soft plastic toy sword.
  17. When all is smooth with the mid-length target, reach out with an even shorter target. You may have to move from beside his neck to beside his shoulder or ribs, depending on the size of the horse.
  18. When 16 and 17 are smooth on either side of the horse, ask for the hindquarters over using just your arm lifted up in the same way you did when holding a target. Most horses will respond readily to the arm movement. I personally hold my hand open with my palm facing the horse. Handler body position is upright. By pulling back our belly-button area we create a ‘draw toward me’ energy.

When we ask for hindquarters to yield away, we send energy toward the horse and look down and gesture toward his hocks, so it is a very different body orientation and energy. Plus, we may have added distinct and different voice signals for each one.

It’s good to frequently practice ‘hip away’ and ‘hip toward’ as a little sequence to make sure our signals stay true and the horse easily responds to either one without confusion.

Left photo: ‘hip toward me’ signal and body language. Right photo: ‘hip away please’ signal and body language.

GENERALIZATIONS:

Clip: #165 HorseGym with Boots TARGET BUTT TO HAND:


Generalizations:

  1. Stand the horse so his shoulder is near a mounting block, but his hindquarters are angled away. Ask him to bring his butt (hip) toward your hand. If he gets confused, return to using your long, medium and short targets, fading out each one as his confidence returns, until your outstretched arm and hand are sufficient.
  2. Generalize the ‘bring your hip over’ skill to different venues and different mounting situations, e.g. fences, gates, stumps, banks – especially if you ride out in wider and varied environments. Before my hips gave up riding, I would often have been totally grounded after dismounting if Boots wasn’t 100% confident about lining up quietly alongside a gate or any other raised surface in the vicinity.
  3. If you have a pedestal on which the horse puts his front feet, you can ask him to bring his hindquarters toward you in a circle while his front feet stay on the pedestal.
  4. Alternately, if you have a soft rubber tub, ask the horse to put his front feet into the tub and repeat 3 above.
  5. To increase the expertise required (by horse and handler) ask the horse to place his front feet into a hoop and keep them in the hoop while moving his butt to target the handler’s arm (or a target) moving in a circular pattern, both clockwise and anti-clockwise. Start with one step and a high rate of reinforcement.
  6. Be careful not to ask too much at first. A frequent minute or two of exercises such as these is enough to have a worthwhile gymnastic effect.
  7. Whenever you do ‘hip toward me’, balance it with ‘hip away please’.

BACKGROUND CLIPS FOR QUICK REVIEW:

Clip: #153 HorseGym with Boots: ZERO INTENT AND INTENT

https://youtu.be/3ATsdPvld4Q

Clip: May 2018 Challenge: YIELD HINDQUARTERS: https://youtu.be/AkjIT8Tjxw0

Clip: #154 HorseGym with Boots: OKAY TO REPEAT SIGNALS

https://youtu.be/W3-Pw6d-Gic

BLOG LINKS FOR MORE DETAILED REVIEW:

Blog: No Intent and Intent

https://herthamuddyhorse.com/2018/11/30/dec-2018-challenge-no-intent-and-intent/

Blog: Seeking the Horse’s Consent Signals.

https://herthamuddyhorse.com/2018/12/22/seeking-the-horses-consent-signals/)


Sidestepping


INTRODUCTION

To teach sidestepping, we carefully and quietly add the forequarter yield and the hindquarter yield together until the horse is able to move sideways in a straight line.

Teaching willing hindquarter yields on request is one of the essentials for safety around horses. Anything unexpected can cause serious harm around the most benign horse. A willing hindquarter yield eases daily care and husbandry, especially around gates, stables, or any tight space.

Teaching the forequarter yield makes it easy to ask our horse to stand in the best position for foot care, grooming or saddling. Teaching these yields on both sides of the horse aids in strengthening proprioception.

Proprioception is an animal’s clear perception about where various body parts are, what they are doing, and the amount of energy needed to carry out a specific activity.

Sportspeople tend to have much better proprioception than people who spend most of their times sitting. Horses raised in flat paddocks and stables lack the proprioception evident in horses who grew up moving extensively in rugged, hilly country.

When our horse can co-ordinate the front-end and hind-end yields to smoothly sidestep on one plane, his proprioception will have improved considerably. Some horses almost fall over when first asked to step across sideways with a front foot, so we have to be gentle and take the time it takes with short, frequent sidestepping sessions.

In horse language, yielding the quarters seems to be an appeasement action. The horse is willing to shift his personal space away from you. Horses with a relatively timid or anxious nature are usually quick to grant you this space.

Horses with a bold or exuberant nature may be less willing (or extremely resistant) when this task is first introduced. They are more prepared to ‘stand their ground’. Who moves whose feet is highly significant in the horse word. Much the same is true for people.

How readily a horse sidesteps on request depends on his innate nature, his opinion of the handler and how he is being (or has been) taught the tasks.

PREREQUISITES:

  • Handler has taught or revised clear ‘Yield Forequarters’ and ‘Yield Hindquarters’ signals with touch, gesture and body language intent.
  • Horse responds readily and confidently to ‘Yield Forequarters’ and ‘Yield Hindquarters’ signals.

Forequarter Yield: April 2018 Challenge: https://youtu.be/eSlin8ZYcRA

Hindquarter Yield: May 2018 Challenge: https://youtu.be/AkjIT8Tjxw0

ENVIRONMENT & MATERIALS:

  1. Work area where the horse is relaxed.
  2. Ideally, the horse can see his buddies, but they can’t interfere.
  3. Safe fences or other barrier to inhibit forward movement and to generalize the task.
  4. Ground rails and raised rails for generalizing the task.
  5. Depending on what you choose to do: halter and lead or safe enclosed area for working at liberty.
  6. Horse warmed up with a few active tasks before asking for these yields.

AIM:

To have the horse willingly yield six to eight steps sideways away from the handler, in a variety of contexts.

GETTING STARTED WITH A BARRIER IN FRONT:

SLICES (Illustrated in Clip 1)

Click here for Clip 1.

  1. Ask the horse to halt facing a safe fence: click&treat.
  • Repeat a few times until you are both comfortable and confident doing this.
  • If you can, practice at a variety of different fences or other barriers to generalize this first part of the task and make it ho-hum.
  • Teach all the slices on both sides of the horse. One side is often easier. Do a bit more with the harder side until both sides feel the same.
  1. When 1 above is easy and relaxed, while the horse is standing facing the fence:
  • Focus strongly on his hip. Use touch or gesture to quietly ask the horse to yield the hindquarters one step: click&treat.
  • Try to click the moment the near hind leg passes in front of the far hind leg.
  • Walk away from the fence together to a relaxation spot (mat, hoop, nose target): click and treat.
  • Repeat a few times, walking to the relaxation spot after each yield, or walk to another barrier and repeat the task there.
  1. When 2 is easy and relaxed, repeat the procedure but this time ask the horse to yield his forequarters: click&treat.
  • Clearly direct your focus plus touch or gesture signal toward his front-end. Click&treat for one step over. Ideally click just as the near foot crosses in front of the far foot.
  • Walk away for a break or head to a different barrier to repeat, as you did in 2.
  1. Start with either 2 or 3 above, whichever feels better for you and your horse.
  • Some horses may do these yields smoothly after one session.
  • Others may take many sessions over many days.
  1. When 2 and 3, done individually, are smooth and ho-hum, we can begin to put them together.
  • Vary which end you ask to yield first.
  • We still click&treat for each yield, but right after the click&treat for the first yield, we ask for the other end to yield (click&treat).
  1. Now we will ask for front end plus hind end BEFORE the click&treat. This part is illustrated at the beginning of Clip 2.
  • Stay with this slice for several short sessions until you are sure the horse is comfortable with it – often there is a bit of tail swishing, blinking and chewing as the horse is figuring something out.
  • After a good effort, it pays not to do it again right away. A triple treat or a wee break walking to a target or a spot of grazing helps the horse realize that what he did was what you wanted.
  • Be sure not to ‘drill’. We don’t want to lose the horse’s interest or enthusiasm to do it again.
  1. Once we have the horse easily moving both ends on request, with one click&treat after both have moved, we can begin to ask for additional steps sideways.
  • Ask for two sets of sideways steps before the click&treat. Stay with this slice until it is smooth.
  • Ask for three or four sets of sideways steps. Stay with this slice until it is smooth.
  • This is hard work for the horse, so build up his strength to do more sidestepping gradually until he can easily do six to eight steps.
  • Sidestepping is a great suppling exercise when the horse is warmed up.

GENERALIZATIONS

Clips 2, 3 and 4 look at generalizations

Click here for Clip 2.

Click here for Clip 3.

Click here for Clip 4.

  • The first generalization was to ensure that the horse could stand comfortably in front of a variety of barriers.
  • The generalizations after achieving part 7 above all serve to help the horse become more fluid with the sidestepping task and to put it into his long-term muscle memory.
  • With each new generalization, start right at the beginning with a high rate of reinforcement. Gradually work toward the point at which the horse easily does 6-8 sidesteps with one click&treat at the end.
  • It’s important to be consistent with our gesture, voice, touch and body language signals, despite the different obstacles in use. Once the horse understands what I am asking, I add a voice signal, which for us is “Across” because we use “Over” for jumping things.

Generalizations on the video clips include:

  1. Between two rails.
  2. Rail under the horse’s belly.
  3. Half-barrels under the horse’s belly.
  4. Toward a barrier such as tall cones, (or a fence, a wall, the side of a horse trailer).
  5. Toward a mat or a hoop.
  6. Toward a mounting block.
  7. Without a barrier in front.
  8. With handler face to face with the horse.
  9. Around a square of rails (possibilities are: front feet in box, hind feet in box, no feet in box, whole horse in box).
  10. Straddle a rail.