Once we have taught our horse to park on a mat, we can begin to teach WAIT. WAIT is parking with duration. Along with duration, we can teach WAIT while we go further and further away from the horse.
We can then generalize by asking the horse to:
Wait in unusual places including over, between or on obstacles.
Wait to be invited through gates, into and out of wash-bays and stalls.
Wait as a way to explain ‘being tied up’ to the horse.
Wait for mounting/dismounting or harnessing/unharnessing.
Wait while we go out of sight.
Wait to enter a trailer/truck and wait to be asked to exit a trailer/truck.
Wait during husbandry care – grooming, tending feet, vet procedures.
Wait while we adjust our camera position.
Wait while we move around obstacles we are using for training.
Wait anytime and anywhere. Maybe paired with ground-tying.
Wait while we talk to another person.
Wait for our turn at a competition.
AIM
Horse and handler agree on WAIT signals and horse is able to WAIT in a variety of situations.
The horse can’t be wrong when he is learning something new. We have simply not YET explained what we want clearly enough in a way that he can understand. Never make him feel wrong if he needs to move.
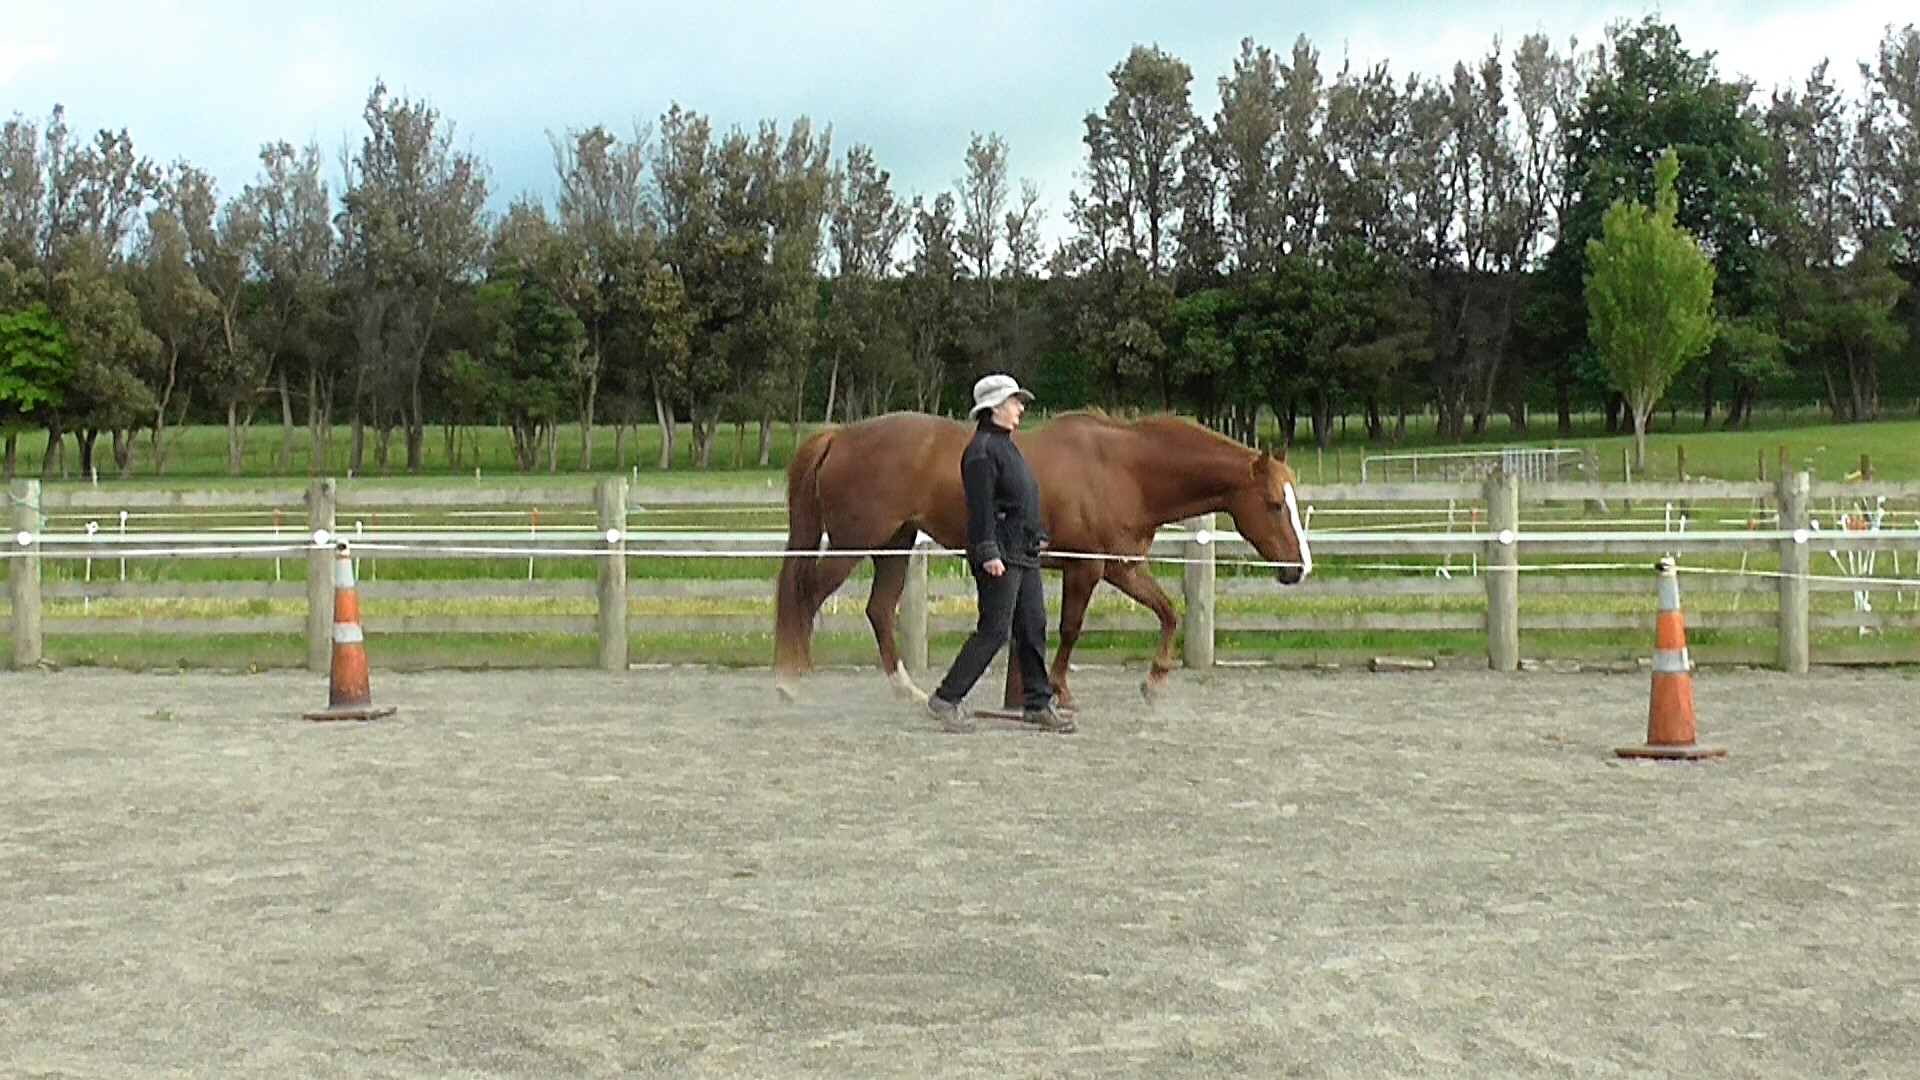
Photo: Our horse walking with us confidently is basic to everything else we want to do.
INTRODUCTION
This is one of my favorite exercises. It is fun to do as a warm-up or a cool-down or if horse time is short. If you are energetic you can eventually do it trotting.
This exercise encourages the horse to walk with us in position beside his neck or shoulder. It is a way of teaching ‘leading’ without the need to put pressure on the lead rope or use a lead rope at all. We can teach this exercise totally at liberty once the horse is clicker-savvy.
The more precise we can be with our body language, the easier it is for the horse to read our intent.
When we invite the horse to walk with us in the ’20 Steps Exercise’ we adjust our pace to the horse’s natural pace, so we can walk ‘in step’ with each other.
When we do this task at liberty, it’s easy for the horse to let us know if he is not in the mood to do things with us because he can peel off in his own direction.
If you have a safe, enclosed area, and protected contact is no longer needed, starting at liberty is ideal.
If the horse is exuberant and protected contact remains a good idea, you can still do this exercise with the horse at liberty by using a reverse round pen (person in the pen, horse moves around the outside of it) or a stretch of paddock fence. If your fencing is electric tape, make sure it is turned off. Lots more about reverse pens here: https://wp.me/p4VYHH-64e
Doing a little at a time keeps this exercise fresh and lively in the repertoire.
If protected contact is a good idea, we can set up a reverse round pen with uprights and fencing tape. The horse moves around the outside of the ‘pen’ while the handler stays inside. We can make it a size that best suits the task we are working with.
AIMS
Handler refines clear ‘walk-on’ and ‘halt’ body language, energy level and voice signals.
Horse willingly mirrors the handler’s energy changes and stays in position with his neck/shoulder area beside the handler.
PREREQUISITES
Handler is aware of using breathing and body energy level to indicate ‘energy up’ before moving off and ‘energy down’ before coming to a halt.
Handler had decided on clear ‘walk on’ and ‘halt’ voice signals.
Handler has developed a consistent ‘walk on’ arm gesture.
Handler uses clear preparatory body language before coming to a ‘halt’, e.g. slowing down, breathing out and dropping weight into the hips.
Optional: These prerequisites are nice but not essential. This task is a way of achieving or improving the three skills below.
Horse walks smoothly beside the handler’s shoulder.
Horse understands ‘Whoa’ voice, breathing and body language signals.
Horse willingly responds to ‘Walk On’ voice, breathing, gesture and body language signals.
ENVIRONMENT & MATERIALS
A work area where the horse is relaxed and confident.
Ideally, the horse can see his buddies, but they can’t interfere.
Horse is not hungry.
A safe, enclosed area for working at liberty.
If protected contact is the best choice, use a reverse round pen or use a paddock fence, whichever suits your situation best.
If there are no other options, use halter and lead, keeping a non-influencing drape in the lead rope. A light-weight lead is preferable.
VIDEO CLIPS
December 2017 Obstacle Challenge: 20 Steps Exercise.
#30 HorseGym with Boots illustrates Boots helping Zoë learn the process with halter and lead.
SLICES
Standing beside the horse’s neck/shoulder, do the following pretty much all at the same time:
Raise torso and look ahead.
Breathe in deeply.
Gesture forward with the hand furthest from the horse.
Step off with your outside leg to walk one step using ‘draw energy’ to encourage the horse to move with you. The horse can more easily see movement of your outside leg.
Halt after one step by breathing out and releasing your energy; click&treat when your feet are stopped. If the horse has moved out of position accept that for now – deliver the treat as close as possible to where you want him to be.
We will click&treat for EACH halt.
If the horse is a bit surprised and moves out of position, move YOURSELF back into position beside his neck/shoulder and start again, raising torso breathing in, gesturing and stepping off to walk on. Slow down, breathe out, and drop into your hips to stop. If you are consistent, the horse will begin to take note of your breathing and posture.
If you are on the other side of a barrier or fence from the horse, walk on and click&treat any indication that the horse is willing to come join you, then start again with 1 above.
If you are not in protected contact, it’s ideal to start with the horse between the handler and a safe fence, so the option of swinging the hindquarters away is removed. I didn’t show this part in the video clip.
If protected contact is necessary and the horse is unsure about what you want to do if you try using a reverse round pen or paddock fence, we can use a lane. A lane can work well because it reduces the horse’s options. The horse walks in the lane and the handler walks on the outside of the lane.
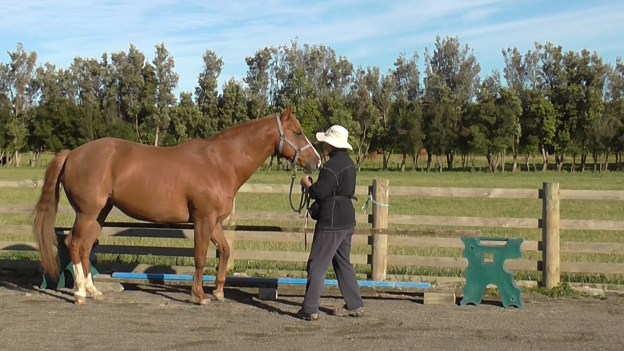
Lanes can be set up with fencing tape and uprights next to an existing fence or made with bits and pieces like the one in the photo below.
We can usually make learning easier for the horse by organizing our training environment so that what we will click&treat is easy for the horse to discover. Here ware are using a lane to initiate walking side-by-side together.
Next Slices
When one or two steps together is smooth, take three steps before the halt, click&treat.
When three steps together are smooth, take four steps before the halt, click&treat, and so on.
Each time you walk on, begin counting at ‘one’ again.
Stay with four-five steps until moving off together is smooth and the horse stays in position beside you for the halt.
Adjust how many steps you add before each halt and click&treat. It will depend on how fast the horse catches on to the pattern, the clarity and consistency of your signals, as well as how the horse is feeling that day.
With some horses you can soon add steps in 2’s, 3’s or 5’s to reach the twenty steps.
If the horse gets lost or seems to forget, go back to where he can be successful and work with a smaller number of steps until you gain true confidence.
Gradually work up to 10, 15, then 20 steps before each halt, click&treat.
Asking for 20 steps before the click&treat, carried out on both sides of the horse, is usually plenty at one time. But there is no reason we can’t do several sets of 20 steps if the horse stays keen.
Be sure to teach this walking on either side of the horse. One side may be easier. Start again from the beginning (along a fence or in a lane) for the second side. Some horses easily transfer new learning to the other side. Other horses find everything harder on one side.
Handlers usually must also focus to consciously produce clear, consistent body language with the less dominant side of their body. If the horse’s and handler’s stiffer sides coincide, everything will feel a bit harder at first.
When a task feels equally smooth on either side of the horse, a big milestone has been achieved.
GENERALIZATIONS
If you started with a lane, move from the lane to working alongside a fence.
Play the game in an open area, away from a fence-line.
Teach, then add drawing the horse into arcs and turns with the horse on the outside of the turn. See also: Smooth 90-Degree Turns: Handler on the Inside: https://wp.me/p4VYHH-5VM
Teach, then add walking arcs and turns toward the horse (counter-turns). See also: Smooth Counter Turns: https://wp.me/p4VYHH-5WK
If you can run, play with it at trot. It’s best to begin this in protected contact in case the horse finds it exciting.
Photo: using the fence around a grazing area as a reverse pen.
A reverse pen is set up so the horse moves along one side of a barrier and the handler moves on the other side. People come up with all sorts of ways to make reverse pens. Larger is better for reverse pens so that the horse is not working on a tight bend. It’s important to change direction often. The video clips coming up show several ways of setting up a reverse pen.
Any fence line that allows delivery of the treat across or through it can be used for reverse pen exercises. In a couple of the video clips I used the fence around the area Boots is grazing so I had nothing extra to set up. If the horse is comfortable working across electric fence materials (not electrified) we can easily set up (and take down as necessary) pens of any size or shape.
Reverse pens are useful for:
Keeping ourselves in protected contact while in motion.
Some horses also feel more secure if the handler is on the other side of a fence at first.
Working without halter and rope.
Discourage the horse moving his shoulder into the handler.
Encourage the horse to develop muscles that help him stay on a circle and not ‘fall in’ with the shoulder or to navigate corners elegantly if we use a rectangular or triangular reverse pen.
Using a hand-held target to encourage walking with us, gradually morphing into a hand gesture.
Creating duration – maintaining a gait for longer.
Playing with transitions: halt to walk to halt; walk to trot to walk; trot to canter to trot.
Often reverse pens are round, as in Connection Training’s ‘Around the Round Pen’ exercises. But they can also be rectangular or triangular, giving the horse the different challenge of organizing his body to negotiate the corners effectively.
Using a Hand-Held Target to Encourage Walking with Us
If we are going to use a hand-held target and a reverse round pen to encourage the horse to walk with us, we want to click&treat for the movement, not the catching up to and putting nose on the target. We don’t want to turn it into a chasing game. We present the target to encourage forward movement, click for the number of steps we decided to take before moving off, put the target down behind us out of sight, then deliver the treat.
Building Duration Walking with Us
#210 HorseGym with Boots: Reverse Pens Clip 4; Duration Walking Together
Details
We must decide how many steps will earn a click&treat before we begin. That is:
We present the target.
Walk ‘X’ number of steps (previously decided – kept within the horse’s present ability)
Click.
Remove the target while we reach for a treat.
Feed the treat.
Start with one step; click&treat. Add one more step at a time as long as the horse shows interest. Stop to do something else if his interest wanes or wait until your next session. Start each session with a few steps and gradually add more.
Keep the sessions short and as you present the target, also use your body language, big breath in, energy raised and your voice ‘walk on’ signal.
Fading out Hand-held Targets
While targets are a great tool to initiate all sort of behaviors, it is important that we teach voice, body language and gesture signals once each behavior is established, so we don’t need to rely on carrying a target.
By consistently using your ‘walk on’ and ‘halt’ multi-signals, you will soon be able to fade out using the target, keeping your hands free. Your voice, energy and body language tell the horse what you would like him to do. Voice and body language ‘halt/whoa’ signals (as well as the click) tell him when you would like him to halt.
Using Foot Targets
If the horse has a strong history or reinforcement for putting his front feet on a mat, we can use that to work with a reverse pen. Using a mat target has the advantage of leaving our hands free. This clip looks at using mats after the first minute.
In the following video clip, I began with the horse on a lead because that can be another way to start. Not everyone has the facility to work safely at liberty. The video clip explains the process: #162 HorseGym with Boots: Introduction to Liberty Circles.
Once the horse understands our body language, gesture, voice and breathing signals, we can use them whenever we lead the horse. For walking side-by-side at liberty, we can develop the Twenty Steps Exercise: https://youtu.be/xYYz0JIpZek
The mat idea works with riding as well as with groundwork.
Some More Reverse Pen Clips
In the next two clips I’m using the fence around the area that Boots is grazing, so there nothing extra to set up/take down.
Photo: The first task is to weave the rags together.
INTRODUCTION
Maintaining mobility is an important aspect of keeping horses in captivity. Usually they live without the freedom of movement over large areas with varied terrain. We can take a small step to encourage whole-body movement with short routines done often but never turned into a drill.
AIM
To combine weaving (serpentines) with sidestepping, backing up and recall using rags as markers.
PREREQUISITES
‘Walk on’ and ‘halt’ transitions staying shoulder-to-shoulder. Smooth Walk and Halt transitions: https://wp.me/p4VYHH-5TT
We have established clear mutual signals for weaving obstacles. https://youtu.be/mjBwyDsVX6Y. As well as this clip,there are several more in my playlist called Weave and Tight Turns.
A work area where the horse is relaxed and confident.
Ideally, the horse can see his buddies, but they can’t interfere.
The horse is not hungry.
Halter and a lead long enough so we can keep a nice drape in the rope but not so long it gets in the way. 12′ (4m) is a useful length.
Six rags laid out in a straight line far enough apart to allow comfortable weaving of the rags walking the pattern together. As the horse becomes more supple, the rags can be put closer together.
VIDEO CLIPS
#203 HorseGym with Boots: Routine 8, Rags as Focus: Click here.
#204 HorseGym with Boots: Routine 8 at Liberty: Click here.
NOTES
It helps to memorize the sequence of tasks by walking the pattern without the horse. If you have a willing human friend, take turns being the horse or the handler. Usually, as handler precision improves, horse precision improves.
The aim is to keep the rope with a nice drape or loop as much as possible, so the horse is getting his signals from our body language and signals rather than rope pressure. We want the horse to find his own balance rather than be pushed or held into a certain outline.
Click&treat at a rate that keeps your horse being successful. As a horse learns a pattern through frequent short repetitions, we can gradually ask for a bit more before each click&treat.
TASKS
Handler on the horse’s left side, weave the rags together.
Turn at the end of the rags and weave in the opposite direction.
Walk a circle around the last rag to end up between the last two rags plus several steps beyond them.
Halt, then ask the horse to back up between the rags. If he backs up on his own, go to the horse to deliver a click&treat.
Ask the horse to sidestep to put him in line with the middle of the next two rags.
Ask the horse to ‘wait’ while you walk between the rags to the end of the rope.
Ask the horse to ‘recall’.
Ask the horse to sidestep so he is in line with the middle of the next two rags.
Halt, then ask the horse to back up between the rags. If he backs up on his own go to the horse to deliver a click&treat.
Ask the horse to sidestep so he is in line with the middle of the next two rags.
Ask the horse to ‘wait’ while you back away to the end of the rope.
Ask the horse to ‘recall’.
Ask the horse to do the final sideways so he is in line with the middle of the last two rags if you are using six rags.
Ask the horse to back up.
Do an established ‘end of routine’ celebration. I use a ‘Triple Treat’.
GENERALIZATIONS
Repeat with the handler on the horse’s right side for the weaving.
Practice in different venues.
Use more rags.
Play at liberty.
Have only the horse weave – handler walks a straight line.
Practice on a slope.
Carry out the same sequence of tasks without marker rags.
At one point a friend and I came up with 29 different ways of backing up a horse, including groundwork, long-reining and riding. This Finesse Back-Up is one of my favorites when I am leading a horse and we need a prompt back-up.
I learned the essence of this process from Alexandra Kurland, a true pioneer of equine clicker training. I’ve added the idea of using corners to teach because it arranges the environment so that stepping back makes sense to the horse right from the beginning.
PREREQUISITES:
Horse understands putting his nose on a target results in click&treat. (See Related Resource 1 at the end of this post.)
Horse walks confidently between the handler and a safe fence or similar barrier.
Horse understands ‘Walk On’ and ‘Whoa’ voice and body language signals. (See Related Resource 2 at the end of this post.)
Handler easily slip into and out of ‘zero intent’ so the horse easily knows when he can relax in a ‘wait’ and when he is being asked to move. (See Related Resource 3 at the end of this post.)
Horse understands the handler’s body axis orientation as a signal for bending. (See Related Resource 4 at the end of this post.)
ENVIRONMENT & MATERIALS:
A work area where the horse is relaxed and confident.
Ideally, the horse can see his buddies, but they can’t interfere.
A safe fence or barrier which leads into a safe corner.
Halter and lead.
Mat (optional). A mat can make it easier for a mat-savvy horse to settle into standing in a corner.
AIMS:
Handler uses clear, consistent orientation, body language and voice ‘back up’ signals.
Horse smoothly shifts from walking forward to stepping backwards on request when the handler turns to face him.
Once the horse readily parks calmly in the corner, we can begin to teach the Finesse Back-Up. I call it that because it requires gently running our hand or fingers up the rope toward the halter, until we reach a point of contact to which the horse responds.
Each horse will be different. I had trouble having Boots demonstrate clearly because she knows the task so well that she reads the very beginning of my body language sentence and steps back right away. If we teach this well, the horse will step back as soon as we begin to turn and use our voice signal, so that even our hand on the rope eventually becomes redundant.
This is tricky to explain in words. Hopefully the video clips and still pictures will make it easier to understand.
Two terms explained: Outside hand refers to the hand furthest away from the horse. Inside hand refers to the hand nearest the horse. These obviously change depending on which side of the horse you are on, and whether you are shoulder-to-shoulder with the horse, i.e. both facing the same direction, or you are facing the horse front-on.
SLICES:
A: Getting Comfortable in a Corner
Walk with the horse and halt in a corner set up with a gate or a barrier. The handler is on the open side of the corner. It the horse finds it hard to stand relaxed in the corner, and you have taught him to love standing his front feet on a mat, use a mat for your ‘halt’ position. Click&treat for the halt.
Relax into zero intent and ask the horse to ‘wait’ for a little while in the corner. Click&treat the ‘wait’ task a few times.
Turn the horse 90 degrees toward you so he can walk forward out of the corner. Walk a loop and come back to park in the corner again. Click&treat the halt. (This bit is not on the video clip but when first teaching this, we want the horse totally comfortable standing in the corner. It’s helpful to generalize the task to several corners if you have them available or can build them.)
Teach relaxed standing in the corner on the horse’s left and right sides.
B: The Back-Up Maneuver
To ask for the back-up, you are going to smoothly pivot 180 degrees, so you face the opposite direction to the direction the horse is facing, but you are a bit to one side of him.
BUT: ***In the moment before you pivot…***
Gently reach across your body with your ‘outside hand’ and slide it quietly up the rope to a point of contact to which the horse responds.
At first, this may be right up to the snap on the halter (or if using a rope halter, even beyond the snap to hold the bottom of the halter) so you can give the horse a very direct backwards feel on the halter.
As you pivot to face the horse, what was your ‘outside hand’ becomes your ‘inside hand’ — the one nearest the horse.
Then simply keep a ‘hold’ tension on the rope and bring up your energy and intent for the horse to step back. This stance causes the horse slight discomfort by making him feel unbalanced. We want him to work out that he can regain his balance/comfort by shifting backwards. Our first click point is the moment he thinks of moving back. Because he’s in a corner, his easiest choice is to step backwards to regain his balance.
When first teaching this task, release your ‘hold’ and simultaneously click&treat at the horse’s smallest inclination to shift his weight back. After the treat, walk a circuit, return to the corner, and ask again.
When you can feel the horse readily shifting his weight back, release the rope pressure, but then, right away, slide up the rope again and ‘hold’ a bit longer to get a whole step back. Drop your signaling hand off the rope as soon as you get backward movement. Walk a circuit, return to the corner, and ask again.
As he begins to understand, eventually ask for two steps, then three steps and so on, before the click&treat. The horse will soon know that when you relax your intent and take your signaling hand off the rope, he can stop backing.
Ask for two or three back-ups (of several steps each) in a row, with release, click&treat for each one. Then ask the horse to step forward into the corner again; click&treat.
Build a little dancing rhythm of movement: back up = click&treat. Forward into corner = click&treat. Back up = click&treat, and so on. After about 3 of these, go away for a bit of relaxation or doing other things.
Gradually, over many short sessions, ask for more steps back until the horse willingly offers as many as you like.
Generalizations
Move away from the corner and use just a fence on the far side.
Move away from the fence and use just a low raised rail on the far side.
Repeat with just a ground rail along the far side of the horse.
Check to see how well the horse can back with this signal (turning to face him) out in the open. If you lose straightness at any point, return to using a fence or rail on the far side. If the horse begins to swing his hind end away from you, you can straighten his body by touching his neck to move his head away, which will straighten his body.
Back through increasingly narrow spaces; e.g. two barrels, gates, into and out of stalls, always being careful that the horse does not catch his hip on an upright.
Back through lanes set up with higher sides.
Back along a track or trail.
Back down slopes and up slopes. Start with gentle inclines.
Back into a trailer or trailer simulation.
Weave backwards (you need to create signals to direct his butt to the right, to the left and to keep it straight). If you are asking the horse to back up while you face him front on, moving his head a bit to his left (your right) will cause his butt to move to his right (your left). And vice versa if you move his head a little bit to his right, his butt will move to his left. If you want him to back straight, ask his head to stay straight.
Having a horse stop and wait when his lead rope is dropped onto the ground is useful for management around home as well as out on the trail. It pops up occasionally as a challenge in Horse Agility competitions.
SAFETY
When first teaching this I prefer to use a wide webbing or leather halter. If the horse moves he may step on his rope and react by jerking his head up. With a wide halter there is less chance of spinal trauma. Alternately, we can attach the rope to the halter with a bit of wool that will break in such a situation.
I also suggest using a soft, thick rope not longer than 12 feet. If something causes the horse to move, it’s better if there isn’t a long, thin rope chasing him.
First we must of course make sure that the horse is totally relaxed with ropes dragging all around his body and legs. He must be cool with ropes moving in front of him, behind him and dragging alongside while attached to his halter.
PREREQUISITES
Rope relaxation and rope calmness in various situations. (See ‘Additional Resources’ 5, 6, and 7 at the end of this post.)
Able to stand still in relaxed mode while things are happening around him. (See ‘Additional Resources’ 8, 9 and 10 at the end of this post.)
Stop willingly to target his front feet to a mat. (See ‘Additional Resources’ 1 at the end of this post.)
Smooth ‘walk-on’ and ‘halt’ transitions staying beside the handler on a draped lead rope. (See ‘Additional Resources’ 2 at the end of this post.)
Willing response to a “Whoa” voice signal. (See ‘Additional Resources’ 3 at the end of this post.)
Smooth ‘back-up’ with the handler beside the horse or in front facing the horse. (See ‘Additional Resources’ 4 at the end of this post.)
ENVIRONMENT & MATERIALS
A work area where the horse is relaxed and confident.
Ideally, the horse can see his buddies, but they can’t interfere.
The horse is not hungry; he’s had ample time to graze or eat hay right before the training session.
Halter and lead kept loose (draped) as much as possible, because as much as possible, we want to use body language for communication, not rope pressure.
Two or more familiar mats.
A second rope.
AIM
When we drop the lead rope and give our horse a ‘wait’ hand signal, we would like him to stay parked in that spot until we return.
VIDEO CLIPS
#72 HorseGym with Boots: Ground-tie Clip 1 GETTING STARTED:
#73 HorseGym with Boots: Ground-tie Clip 2 ANOTHER VENUE:
NOTES
Boots’ demonstration on the video clips is the sum of many short sessions over a long time. When teaching something new, we stay with each slice of the task over as many short sessions as necessary until it feels ho-hum (easy and smooth). Then we link in the next slice.
Teach the whole process from the horse’s left side, then teach it again walking on his right side. Alternatively, teach each slice on both sides before adding in the next slice.
SLICES
Walk on the horse’s left side with a loose lead toward a mat. Hold the horse’s lead rope in the hand nearest the horse. Carry a second rope in your other hand.
Halt with the horse at the mat using your halt voice signal and body language.
Drop your second rope on the ground under the horse’s nose.
Allow him to satisfy his curiosity about it (sniff it, put a foot on it, and so on); relax (click&treat.)
Keep a drape or ‘smile’ in your actual lead rope.
Pick up the dropped rope and walk together to another mat, or walk a large loop that returns you to the same mat.
Looking for: Horse halts with front feet on the mat and remains relaxed when the second rope is dropped and picked up again.
If you set up a circuit of several mats, you can move from mat to mat.
Remember to do something easy the horse already knows and build in ‘down time’ in between bursts of activity with this new task.
If you have a circuit of several mats, do the circuit once. Then do something else that’s easy and come back to the circuit again if it feels right to do more.
As 1, but without using mats. Everything stays the same except that we have removed the prop of the mat or mats. It may help the horse at first if you walk the same circuit as you walked when you were using the mat(s). Halt and drop the second rope where the mats were during the previous lessons.
Once the horse seems to recognize the dropped rope as a place to stop and stand, gradually generalize to dropping the second rope in new places.
As 2, but now drop the lead rope itself: relax as the horse halts; pause for a second or two, with neutral (no intent) body language. We want to begin building duration into the time the horse stands quietly after the lead rope is dropped. Be sure to click&treat well before the horse shows any tendency to move.
Looking for: Horse halts when you use body language and voice signal plus drop the lead rope and relax (click&treat). Horse relaxes too.
It’s helpful if we can ground-tie the horse after we’ve asked him to back up. Ask the horse to back up and while he is backing drop the lead rope and at the same time use your halt voice signal, relax (click&treat) when the horse halts. Intersperse these requests with walking forward.
Looking for: Horse backs up on request and halts with the handler’s voice halt signal plus the dropped rope.
Experiment to see what happens when:
Walking along you slow to a halt and gently drop the lead rope without using your voice signal as well.
If you have developed clear body language to communicate that you are going to stop, the horse will respond to just your body language and the dropped rope.
Relax (click&treat) at the first sign of a halt.
If the horse finds this difficult, leave it out for now and maybe return to it as part of your generalization when he knows the ground-tying task better.
Looking for: Horse brings himself to a halt when the handler halts and the rope is gently dropped in even in the absence of a voice signal.
Bring back the matsand the second rope. Ask the horse to jog (or trot) with you and halt with you when you halt beside the mat. Use your voice signal plus drop the second lead rope from the jog.When it feels smooth, phase out the second rope and drop the horse’s lead rope.
Looking for: Horse willingly halts at the mat from jog/trot when the handler halts, gives the voice halt signal and drops the lead rope.
Slices 1-6 above have the handler stopping with the horse. Now we want to generalize the skill so the horse stops when rope is dropped plus stays parked while handler keeps walking. Ask the horse to halt at a mat, drop the lead rope, and use your ‘wait’ signal to let the horse know you want him to remain parked while you walk away from him. For the ‘wait’ I use a gesture and voice signal at the same time.
For the early lessons with this generalization, it’s good to use a circuit of mats again, until you see that the horse understands the new nuances of the task consistently over several sessions.
Walk with a loose lead toward a mat. Halt with horse at the mat using:
Halt voice signal
Dropped lead rope
Give your voice and gesture ‘wait’ signals Then walk forward a few steps away from the horse.
Turn to face the horse and take up a neutral (no intent) body language position – place both hands flat over your belly button, drop your shoulders and have a soft focus not looking at the horse.
Wait a second or two, be sure to return before the horse even thinks about moving. Count the seconds. Start with one second and don’t wait longer until one second is completely okay with the horse.
If the horse moves, gently return to him, pick up the lead rope, walk together in a relaxed manner and start again. This is a re-set. Don’t make the horse feel wrong. He can’t be wrong because he doesn’t yet know what you want. Next time don’t go as far away and return to him sooner rather than waiting that extra moment.
Pick up the lead rope and walk on to the next mat to repeat, or walk a loop to return to the same mat.
Looking for: Horse halts at mat and remains there confidently while the handler walks on a few steps, turns, pauses, and walks back to the horse.
Gradually walk a few more steps away from the horse and increase how long you wait before returning to the horse; relax (click&treat). Click&treat after you return to the horse.
If he loses confidence, immediately return to the distance and time he can cope with. Add distance and duration very slowly – one second and/or half a step at a time over many, many short sessions.
Looking for: Horse stays with the mat and the dropped rope until the handler returns.
This slice asks the horse to halt at the mat while you keep on walking without stopping first. You drop the lead rope and use your voice & gesture ‘stay’ signals but you don’t halt yourself – you keep on walking.
If the horse has been mainly watching your body language as his signal to halt, it could be hard for him at first until he realizes that,
the mat
dropped lead rope
voice signal
all mean he still should halt, even if you keep moving.
The Task: Walk toward a mat with a loose lead. When you reach the mat, simultaneously:
use your halt voice signal
drop the lead rope
give your ‘wait’ signal without stopping your feet when the horse stops
walk on a few steps.
Turn and face the horse, then:
wait a second or two
return to the horse
relax (click&treat).
Pick up the lead rope and walk on to the next mat.
Looking for: Horse stays halted on the mat while the handler walks on, halts, turns, pauses and walks back to the horse.
Play with this by gradually moving further away from the horse.
Still using a mat, play with 9 above at the trot. Handler keeps jogging forward while the horse halts on the mat.
Repeat 9 above without the mat, at walking pace.
Repeat 9 above without the mat at jog or trot.
Make sure the horse is comfortable when you leave from his left eye and from his right eye. Spend a bit more time with the harder side, if there is one.
Further Generalization
Generalize ground-tying to new venues and around new distractions, as long as it’s safe. Include mats initially if it helps the horse, then phase them out.
This flexion activity follows on from teaching the 90 and 180-degree turns when the handler is on the inside of the turn. Now we want to develop a smooth turn when the handler is on the outside of the turn; counter turns.
When we are on the inside of a turn, we teach ourselves to slow down but maintain energy to give the horse time to organize his longer body and four legs to negotiate the larger arc of the turn without losing forward motion.
When we are on the outside of the turn, we have to travel a bigger arc than the horse to get around the turn. If we ‘hurry’ our strides it can cause the horse to hurry around the corner too, leaving us behind. Or our ‘hurrying’ may block the horse and he halts or moves away.
Ideally, we want the horse to slow his turn so we can negotiate our wider arc without stress.
Boots and I did a lot of experimentation to get this flowing smoothly. I have new knees, so it is hard for me to hurry myself around the turn. When we started the task in the shoulder-to-shoulder position, I ended up beside her butt after the corner.
It was time to re-think and play with possibilities. Eventually it became obvious that adjusting our leading position, so the horse’s nose was beside my shoulder, made the whole thing much more manageable.
In my book, Walking with Horses, I did a detailed exploration of the eight basic body positions or orientations we use when communicating with our horse. Each of these of course has many nuances of angle. Here are the eight positions:
Walking directly in front of the horse, with our back to the horse.
The horse is beside us with his head at our shoulder.
Shoulder-to-shoulder with the horse.
Walking beside the ribs, just behind the withers, where we would be if riding.
Walking or standing alongside the horse’s rump, as for tending hind feet or brushing tail.
Walking behind the horse as in long-reining.
In front of the horse, facing him.
Facing the horse’s ribs, as in saddling or lunging.
Eventually Boots and I worked out that the first slice we needed for counter turns was to review our signal for staying in Leading Position 2 – where my shoulder stays beside the horse’s head.
Much of our recent work has been using Leading Position 3 – shoulder-to-shoulder, but it didn’t take long to review and update the gesture signal we used for walking together with my head beside her ears.
PREREQUISITES
Horse and handler are clicker savvy.
Horse responds willingly to ‘walk on’ and ‘halt’ signals while keeping his head next to the handler’s shoulder. (See ‘Related Resources’ at end of this post.)
Handler understands the skill of shifting his/her body axis toward the horse as a signal for turning when the horse is on the inside of the turn. Practice this first without the horse. If you have a willing human helper, have them be the horse so they can give you feedback about the clarity of your body orientation signal just prior to navigating each corner. (See ‘Related Resource’.)
Handler understands the skill of navigating the bigger arc of the turn without raising his/her energy so much that it influences the horse to either speed up or stall out. This can also be practiced with another person standing in for the horse.
MATERIALS AND ENVIRONMENT
A work area where the horse is relaxed and confident.
Ideally, the horse can see his buddies, but they can’t interfere.
The horse is not hungry.
Halter and lead (kept draped as much as possible, as we want to use orientation and body language for communication, not rope pressure).
Safe stretches of fence along which you can walk in position beside the ears, keeping the horse between the fence and the handler to encourage straightness.
Four markers. The markers can be anything safe. In the beginning, it’s easiest if the markers are relatively large, so the horse sees the sense in walking around them rather than across or through them. Barrels, tall cones, tread-in posts if working on grass, or if these are not available, cardboard boxes can do the job.
Four rails to set up in a square or rectangular shape with one of the large markers set into each corner.
AIMS
To have the horse and handler execute fluid, smooth counter turns when the horse is on the inside of the turn; handler on the LEFT side of the horse.
To have the horse and handler execute fluid, smooth counter turns when the horse is on the inside of the turn; handler on the RIGHT side of the horse.
VIDEO CLIPS
Clip 1:
Clip 2:
NOTES
What you see Boots doing in the video clips is a result of many very short sessions over a long time. I always strive to improve the timing of my body axis turned toward the horse as a signal for the counter turn.
If the horse has been resting or contained, it is important to walk around for a general overall body warm-up before asking for this sort of flexion. A relaxed road walk or moving over rails and weaving obstacles make great warm-up exercises.
It’s important to teach each slice on both the left and right sides of the horse.
Quite often it is harder for the horse and/or the handler when they are using the non-dominant side of their body. With patience and extra practice on the harder side, it will start to feel more equal.
Signals given with the handler’s non-dominant side are often not as fluid or well-timed as signals given on the dominant side. Once we become aware of this, we can focus on it as necessary.
As with most things, progress without causing soreness is best made by doing a few counter turns every session; never turning it into drilling.
SLICES
Stay with each slice until if feels easy for both handler and horse.
Walk along a safe fence with the horse between the handler and the fence. Keep a nice drape in the lead rope. For this slice, we are not yet focusing on keeping a position beside the ears. Our focus is the horse walking calmly and willingly along the fence. Occasionally ask for a halt; click&treat.
When 1 feels smooth, put yourself into position beside the horse’s ears while you are at the halt; click&treat (still halted). Then ask for ‘walk on’ and see how well you can maintain the shoulder/ear position (I’ll refer to this as just the ‘ear position’ from now on).
If the horse tends to want to walk behind you, he may have been taught to lead mainly by staying behind, so treat this gently. Slow down with him to stay by his ear; click&treat when you achieve the position. Ask for only a couple of steps in ‘ear position’ before you halt; click&treat. We want to gradually have him realize that being in the ‘ear position’ is what elicits the click&treat.
If the horse tends to forge ahead, it makes more sense to me to use a body extension to block the forward surge, rather than to ‘correct’ with pressure on the rope.
A horse with the habit of cutting in front of the person leading is not in a good place in terms of getting along with people. If the horse has been taught to lead by following a hand-held target or walking calmly between stationary targets, this problem may never arise. You may want to go back and work on these skills before continuing with this exercise.
If your horse has been traumatized by stick objects in the past, the prerequisite task now becomes to build his confidence with body extensions before proceeding any further. (See ‘Related Resource’ 6 at the end of this chapter.)
Note: I am a fan of using targets for many things, but they can become a problem when the training does not progress to developing the relevant skills so a target is no longer needed.
In the first video clip, I use my arm to indicate a halt. Eventually this arm signal will no longer mean halt; it will instead be our signal for communicating that we are about to do a counter turn.
If the horse has the habit of surging ahead and is not traumatized by sticks, simply use a stick to put motion energy out in front of him to block his surge, followed by click&treat when he stops surging / stays beside you. This is an example of ‘combined reinforcement’. We use negative reinforcement to help the horse quickly understand the answer we need. The instant he finds the answer, we click&treat. There is no need to touch the horse with the body extension. We only use it to disturb the air in front of the horse by moving it up and down.
If the horse is full of energy, for whatever reason, the way forward is to give him opportunity to run off the energy so he can regain focus on the quieter work you want to do. Every horse is different and every training situation is a new combination of environment and events.
He will learn to keep the ‘ear position’ both while moving and when you ask for the halt. Eventually your raised arm will be enough and the body extension becomes redundant. If you feel your ‘halt’ could be improved, see Getting a Smooth Halt in Many Situations: https://wp.me/p4VYHH-5R9
5. Work with ‘walk on’ and ‘halt’ in the ‘ear position’ until it feels fluid in a variety of places and with the handler walking on either side of the horse.
6. When 5 is smooth, set up your rectangle of ground rails with a bulky object at each corner. Make the square/rectangle as large as you like. The one in the video clip is small for easier filming. As you approach a corner of the rectangle, turn your body axis toward the horse and raise your outside arm as you did previously for the halt.
The horse will feel your energy as you continue to step the arc around the corner and realize you are not stopping. Click&treat as soon as you come around the corner. If the horse does halt when you raise your arm, use some of your ‘walk on’ multi-signals to let him know that you are not stopping.
7. At first, click&treat after each corner. Gradually change to every second corner, and so on. Eventually vary the number of corners done before the click&treat. I don’t often ask for more than four corners in a row before the click&treat.
8. Change direction (and therefore side of the horse) often. This is a fairly concentrated flexion exercise and we don’t want to make the horse stiff.
9. When 7 is going well, remove the rails and use just the corner markers.
10. When 9 is going well, put markers at random throughout the training area Walk toward one and adjust your position so you can ask for a counter turn around it. I couldn’t fit this into the video clip, but it is an easy way to include a few counter turns in any training session.
GENERALIZATIONS
Set out a row of markers to weave for practicing your ‘drive’ and ‘draw’ body axis changes to really consolidate the idea for both of you. (See ‘Related Resources’ 2 and 3 at the end of this post.)
Set out markers around which you can do figure eight patterns, which combines the counter turn with the turn where you are on the inside. (See ‘Related Resource’ 4 and 5 at the end of this post.)
When everything is going smoothly, we can increase the challenge by asking for 180-degree counter turns (U-turns). We achieve this by keeping our body axis turned toward the horse for longer.
These are fairly extreme flexion tasks, so be gentle and only ask for a couple at a time at first. A few done often will certainly increase suppleness but be careful if your horse has (or might have) joint, stifle or arthritis issues. Always make sure the horse is well warmed up.
4. Eventually, we can ask for 360-degree counter turns around a marker. At first, a barrel or cluster of markers may make it easier because the turn is wider. With practice, the horse will get adept with tighter turns, but please note the cautions in 3 above.
5. Freestyle Counter turns: When it feels right, begin to ask for 90-degree counter turns without markers. If these fall apart, you have feedback about which slice to return to in order to regain the horse’s confidence and willingness. Usually we have to ask for less or in other words, raise the rate of reinforcement.
6. Morph the freestyle counter turns into a quiet, relaxed circle with the handler on the outside, then gradually change that into a tidy turn on the haunches. It may look messy at first, but with practice can become lovely and fluent.
7. Back-Up Counter Turns: Ask the horse to back up with you for a few steps, then ask for a counter turn; click&treat. These may also feel messy at first, but once you and the horse get synchronized via many mini-practices, they will become more and more exact. When one of these feels good, ask for two in a row before the click&treat.
Then do three in a row and finally four in a row so you have backed a complete square. I count our steps back and usually do the turn after every third or fourth step. If you are consistent with the number of the steps back before you ask for the turn, you will find that horses are excellent at counting. Teach again on the horse’s other side, which will probably feel quite different due to handler and horse asymmetry.
These activities are all based on equine clicker training. Please see my book, How to Begin Equine Clicker Training: Improve Horse-Human Communication if you would like to investigate clicker training with horses. Details of my books are on the ‘BOOKS’ page link above. The books are all available via Amazon.com. Topics in the books contain free links to relevant YouTube video clips.
I keep the clips short – most are under five minutes. Each relates to a specific skill. Keeping them short makes them easier to find and review.
Each of the activities listed below has one or more accompanying video clips. Depending on the reason a horse is on stall rest, some tasks may be a more useful than others.
Nose to Target
This is fully discussed and explained in the book mentioned above. It is usually one of the first tasks when we introduce clicker training with horses.
Once the horse understands that touching his nose to a target held out by the handler earns him a click&treat, and he has a strong history of reinforcement for the task, we can use it to gradually develop flexion.
This clip shows a way to introduce the ‘nose to target’ task with the handler in protected contact (i.e. on the other side of a barrier). It’s good to use protected contact until we know how the horse responds to food being part of the training process. https://youtu.be/Rat3P1pGKjU
Head Lowering (and Head Up)
This illustrates the process of free-shaping a behavior. Free-shaping means that we wait for the horse to do something it naturally does (e.g. lower the head) and ‘mark’ that behavior with a click&treat. It’s important to accurately ‘mark’ and treat each little approximation toward the final behavior we want, so timing of the click and smooth treat delivery are necessary. It’s helpful to work on these away from the horse by asking another person to stand in for the horse.
This clip shows an overview. Each body part would be taught separately following the outline for targeting chin or shoulder to our hand, as in items 7 and 8 above. https://youtu.be/tFGvmRRYdHQ
This clip shows the final task. It was thin-sliced to first teach it. Be aware that some horses might generalize this bit of fun to pulling off their saddle pads unless you put it on cue or ‘on signal’. https://youtu.be/M8vzn1JsR_k
Bursting Balloons
This clip shows Smoky after a few sessions when he is just beginning to get the hang of it. https://youtu.be/Md7ui1DejaI
I learned this exercise from Alex Kurland. It seems simple but is enormously useful in maintaining both physical and mental suppleness for the horse and handler.
It also serves to practice our ‘walk on’ signals and allows us to consolidate our ‘halt’ signals each time we approach the mat, with special emphasis on our voice ‘whoa’ signal.
It is a super exercise to check the flexibility of our horse and we may also gain insight into the flexibility of our own body as we improve the timing of shifting our body axis on the approach to each marker. We are usually more flexible bending either right or left, just like horses are.
If we consistently do short bursts of this exercise over many sessions, we’ll notice that it gets easier and easier to do tighter, elegant 180-degree turns (unless horse or handler are restricted due to past injury or arthritis).
PREREQUISITES:
Horse and handler are clicker savvy.
Horse willingly moves to target his front feet on a mat. (There is a relevant link under ‘Addition Resources’ at the end of this post.)
Horse responds willingly to ‘walk on’ and ‘halt’ signals when the handler is beside his neck/shoulder. (There is a relevant link under ‘Addition Resources’ at the end of this post.)
Handler understands the skill of maintaining ‘forward energy’ at the same time as slowing down to give the horse time to scribe the bigger arc of the turn. This can be improved by practice with another person standing in for the horse. We have to remember that the horse has four legs to organize and a long body that more resembles an ocean-liner than a ballerina.
Handler is aware of using the orientation of his/her body axis as a key body language signal for the horse.
ENVIRONMENT & MATERIALS:
A work area where the horse is relaxed and confident.
Ideally, the horse can see his buddies, but they can’t interfere.
The horse is not hungry.
Halter and lead (lead kept loose as much as possible. We want to use orientation and body language for communication, not touch signals via the rope, but we may use these when we first teach teach this pattern).
6 or 8 markers set out in a relatively large circle. The markers can be anything safe: cones, stones, pieces of firewood, tread-in posts if working on grass, jump stands, barrels, 5-liter containers of water, cardboard boxes, rags. In the beginning, it’s easiest if the markers are relatively large, so the horse sees the sense in walking around them rather than across or through them.
Different-colored markers make it easier to keep track of where we are heading and where we have been. If they are the same size and shape, they give continuity to the development of the horse’s fluidity since it needs the same body adjustment around each marker. Therefore, identical markers are best to first teach this exercise.
Different-sized markers encourage the horse to vary his body adjustment to navigate each one, so they are a good generalization.
A familiar mat placed in the center of the circle.
AIMS:
To have the horse and handler execute fluid, smooth 180-degree turns (U-turns) with the horse on the outside of the turn; handler on the LEFT side of the horse.
To have the horse and handler execute fluid, smooth U-turns – horse on the outside of the turn, handler on the RIGHT side of the horse.
Handler becomes super conscious of the position and timing of his/her body axis orientation to signal the turn coming up.
VIDEO CLIP:
NOTES:
What you see Boots doing in the video clip is a result many very short sessions over a long time. I’m always striving to improve the timing of my body axis turned away from the horse as a signal for the turn.
If the horse has been resting or contained, it’s important to walk around for a general overall body warm-up before asking for this sort of flexion. A companionable walk or moving over rails and weaving obstacles are good warm-up exercises.
SLICES:
Walk on the left side of the horse to target the mat in the middle of the circle; click&treat.
Focus on one of the markers ahead of you of the circle and ‘walk on’ toward it. Ensure that you walk off together by using all your ‘walk on’ multi-signals. We don’t want the horse surprised and left behind.
Walk around the marker and back to the mat; click&treat.
Did you manage to keep up your energy while walking the inner curve around the marker? If we let our energy drop, the horse can fade out too. In the learning phase, it can help to raise our knees as in ‘marching on the spot’ to keep our energy up, as demonstrated in the video clip.
Not only does the horse have further to travel, he must organize two pairs of legs and a non-bendy torso to navigate the corner, so we have to give him time.
At first the U-turns might be wide and/or sloppy. Don’t worry, you will both gradually improve if you stick with the task over many short sessions.
The horse will soon work out that each time you go around a marker, you head straight back to the mat where he will earn another click&treat. This realization motivates him to begin making his U-turns more efficient and elegant.
As you begin the change of direction at each marker, turn the axis of your body away from the horse. This will become a body language signal you can eventually use later in many different situations and to communicate at liberty.
Add a voice signal at some point. I use “Round”. Choose a word that is short, clear, and not used in other contexts.
As you notice improvement in his flexion during the turns, you can begin to selectively click&treat nice tight ones as he comes out of the turn, then carry on for another click&treat at the mat.
After each return to the mat (click&treat), choose a different marker and repeat.
After navigating all the markers walking on the left side of the horse, repeat walking on his right side. Once around each marker on each side of the horse is usually enough of this exercise during one session.
Often it is harder for the horse and/or the handler when they are using the non-dominant sides of their bodies. With patience and extra practice on the harder side(s), it will start to feel more equal.
Signals given with the handler’s non-dominant side are often not as fluid or well timed as signals given on the dominant side. Once we become aware of this, we can focus on it as necessary.
GENERALIZATION:
The first generalization is to repeat walking on the horse’s right side.
Begin to focus on using body axis orientation in other contexts such as weaving obstacles
The clip below demonstrates how Boots and I use my body axis orientation to work on flexion during our walks down the road.
‘Walk On’ and ‘Halt’ are the foundation of pretty much everything we want a horse to do with us. Even teaching ‘parking’ starts with a solid, confident ‘halt’.
Teaching the basic ‘walk on’ and ‘halt’ is most easily done in position beside the horse’s neck or shoulder. I like to teach these with a ‘multi-signal’ or ‘signal bundle’. In the science literature multi-signals are referred to as “a compound stimulus”.
Using the multi-signals consistently from the beginning means that once the horse knows them well, I can use any one of them, or any combination of them, depending on what best suits the situation. It makes it easier for the horse to recognize the signals when I am walking beside his ribs or behind him (outside his blind spot).
PREREQUISITES:
Horse and handler are clicker-savvy.
Horse readily targets stationary objects with his nose and/or feet. (See ADDITIONAL RESOURCE 5. at the end of this post.)
Horse is comfortable wearing a halter and lead rope.
It’s highly recommended to practice the rope handling mechanical skills to signal ‘walk on’ and ‘halt’ first with a person standing in for the horse. Simulations are a wonderful way to get our body language and rope handling skills organized and smooth before we inflict ourselves on the horse.
MATERIALS AND ENVIRONMENT:
Horse in a familiar area where he is comfortable.
Other horse buddies in view, but not able to interfere.
Horse is not hungry and in a relaxed frame of mind.
Halter and lead. A relatively short lead rope is easier to manage.
Destination objects. These can be a series of stationary nose targets, mats as foot targets. Alternatively, we can use a Frisbee or old cap thrown out ahead for the horse to target, then thrown forward again.
AIM:
Elegant ‘walk on’ and ‘halt’ transitions with the horse and handler staying shoulder-to-shoulder, with the handler on either side of the horse.
VIDEO CLIPS:
‘Walk on’ signals are illustrated in HorseGym with Boots clip #129.
‘Halt’ signals are illustrated in HorseGym with Boots clip #131.
NOTES:
What you see Boots doing in the video clip is a result many short sessions over a long time.
We can aid the horse’s understanding if we begin teaching this along a safe fence to remove the horse’s option of swinging the hindquarters away from the handler.
We want to strive for consistently staying in the area alongside the horse’s neck and shoulder.
Photo to illustrate Slice 3 below. A ‘halt’ signal without pulling on the halter: hold the rope straight up into the air and jiggle it lightly. We can use this as part of our ‘halt’ multi-signal if necessary. We can also use it during the process of teaching backing up with a hand gesture signal staying shoulder-to-shoulder with the horse. Teach it as a ‘halt’ signal by using it as the horse approaches a fence or other dead-end where it makes total sense for him to halt .
SLICES:
Hold the rope in the hand nearest the horse with no pressure on the halter. If you need to send a ‘halt’ signal with the rope, hold the rope straight upwards and jiggle it. The instant the horse responds, stop jiggling, breathe out and lower your hand.
Halt: Ask the horse to walk beside you toward a familiar mat. As you approach the mat, use the following multi-signals almost simultaneously:
Visibly drop your weight down into your hips (like we want the horse to do).
Breathe out audibly.
Say ‘whoa’ or whatever halt voice signal you decided.
Only if necessary, raise the inside hand holding the rope straight up into the air and jiggle the rope. If the horse is initially taught the ‘rope jiggle’ halt signal using a fence or a blocked-off lane, there will be little need to jiggle the rope. As the horse halts on the mat, immediately relax your body language; breathe out; click&treat.
At first, pause briefly before walking on to the next mat; click&treat. Gradually, over many sessions, teach the horse to wait confidently for up to 10 seconds.
Walk On: Ensure you are holding the rope in the hand nearest the horse with no pressure on the halter. To send a ‘walk on’ signal along the rope, reach across with your outside hand and run it gently up the rope toward the halter. As soon as the horse moves, take away your outside hand.
We use our ‘walk on’ multi-signals almost simultaneously:
Look up toward the next destination.
Breathe in audibly and raise your body energy. Horses are very conscious about our breathing, so this can become an important signal if we use it consistently.
Run your outside hand gently up the rope toward halter to a point to which the horse responds by shifting his weight to step forward. This will eventually become a simple arm gesture without needing to touch the rope.
Step off with your outside leg (easier for horse to see).
Say ‘walk-on’ (or whatever voice signal you’ve decided). A voice signal is useful later when working at liberty, exercising on a long line, or guiding from behind, as in long-reining.
Our aim is to initiate the first intention of movement, then move in synchronization with the horse. It’s important not to move off without the horse, so losing our position beside the horse’s neck or shoulder.
People often tend to start walking without first inviting the horse to move in sync with them. The whole point of this exercise is to move forward together companionably, staying shoulder-to-shoulder.
Each time you halt, you have another opportunity to practice the ‘walk on’ multi-signals. Each time you ‘walk on’, you have another opportunity to practice your ‘halt’ multi-signals.
Every time you come to a destination marker, drop your hips and your energy, breathe out, say your voice signal and relax; click&treat. Pause, then politely use your ‘walk on’ multi-signal to ask the horse to walk forward with you to the next destination marker.
It won’t take the horse long to realize that each destination marker is a ‘click point’. He will soon begin to look forward to reaching each destination. He will also begin to organize his body to halt efficiently. Horses love to know what will happen before it happens. Remember, they have four legs and a long body to organize, so begin your ‘halt’ signals well before you reach the destination.
Many short sessions will show improvement in suppleness and body management more quickly than occasional long sessions.
Be sure to teach this in both directions and on each side of the horse. Spending a little time on this, over many sessions, will build a lovely habit of walking with you on a loose rope.
In a way, although you have the horse on a rope, you are allowing him to self-shape the most efficient way to set himself up to halt at the next marker ready for his click/treat. Because the horse has worked out his way of halting for himself, he has more ‘ownership’ of the task.
Over time, walking together companionably will become a strongly established habit. As mentioned in Generalization 2. below, we can gradually introduce the ‘whoa’ as our click point, which means we can phase out using destination targets. The horse will comfortably walk with us until we signal for a ‘halt’. Of course, we must reliably reinforce each halt request with a click&treat.
GENERALIZATIONS:
Gradually increase distances between destinations.
Gradually introduce ‘whoa’ as the click&treat indicator to replace nose or foot targets. Start by asking for ‘whoa’ between destinations. (See ADDITIONAL RESOURCE 2. below.)
Add objects and obstacles to your training spaces to walk through, across, over, weave among. (See ADDITIONAL RESOURCES 3. & 4. below.)
Walk together at liberty. (See ADDITIONAL RESOURCE 1. below.)
Walk together in different venues including public places with slopes, water, trees.
It’s not uncommon for a horse to have bad feelings or mixed emotions about halters and ropes. My book, WALKING WITH HORSES has a detailed section about developing a horse’s willingness to put his nose into a halter. For more details, click on the BOOKS section above. Also, see ‘Willing Haltering‘ in the Further Resources section at the end of this post.
To help horses deal well with captivity, confidence with halter and lead rope needs careful attention. Essentially, putting a halter and rope on our horse is similar to putting on our ‘work clothes’, which will be an outfit or uniform suitable for the type of work we do. When we work for an organization or with other people, we adjust our behavior to what is appropriate at our job.
In the same way, a horse carefully educated about halters and ropes will recognize that he is wearing his ‘uniform’ and relate it to certain ways of behaving. Mainly, it limits his behavior choices. Ideally it also encourages him to pay careful attention to requests made via messages sent along the rope.
We can use the rope to send text messages. But, obviously, we must first carefully teach the horse what the ‘letters’ of our text mean. The lighter the pressure of our ‘texting’, the lighter the horse’s responses can be. In other words, the horse can only be as light in his responses to rope messages as we are light in sending them.
A rope is a way of ‘holding hands’ with our horse, not a tether kept tight to stop the horse escaping our influence. There is nothing so heartbreaking as see a gasping dog at the end of a tight leash or a horse struggling to understand why the tightness of the rope won’t go away, no matter what he does.
The key to lead rope handling is that the rope is always slack except for the brief moments it is sending a message to the horse. The instant the horse complies with our request, the slack is returned to the rope. It is the instant release of rope pressure plus the simultaneous click (and the accompanying treat) that enables the horse to understand which task we are requesting.
PREREQUISITES:
Horse is comfortable wearing a halter.
Horse is comfortable with a lead rope.
Horse and handler are clicker savvy.
Horse has established the behavior of touching his nose to a target to earn a click&treat.
Horse understands standing on a mat with duration.
For the early sessions, it’s helpful to have the horse standing with his butt in a safe corner so that backing up and swinging the hind end away are not options. The first slices will therefore involve making sure the horse is comfortable and relaxed standing in a corner.
ENVIRONMENT & MATERIALS:
A work area where the horse is relaxed.
The horse is not hungry.
Ideally, the horse can see his buddies, but they can’t interfere.
A safe corner the horse can stand in confidently. A safe corner is one where there is no chance of the horse putting a leg through wire or rails if he steps back or sideways. Hedges, sides of buildings or a corner made with barrels or jump stands plus rails tend to be the safest. Even a raised rail or a log behind the horse with a small barrier on the far side of the horse might be enough of a corner.
A familiar mat to ‘station’ or ‘park’ the horse.
A familiar hand-held target.
When using the halter touch signal via the rope, be ready to click&treat for even the tiniest turn of the head at first. If we miss the horse’s first attempt to solve a puzzle, he can think his idea was wrong, and it can take a while for him to try it again.
When we lead, long-rein or ride a horse, it does not take much movement of the head to cause the horse to change direction. What we are doing here is not an extreme flexion exercise. It is an exercise to see how softly we can give what will become our ‘please change direction’ signals once the horse is moving.
AIMS:
To have the horse comfortable standing in a safe corner.
To teach an ‘anchor task’ that precedes our request to turn the head.
Use a target to teach head flexion to right and left; no rope.
Add ‘right’ and ‘left’ voice signals to the task.
Teach soft lateral flexion (turning the head right or left) using gentle touch on the halter via a rope until it feels equally smooth to the right and the left.
Generalize the task to different places and situations.
SLICES:
A: STANDING COMFORTABLY IN A CORNER
Introduce the horse to each corner in small, easy steps. Thin-slice the process to what your horse needs. Use a familiar mat to indicate where you would like his front feet to be . Three kinds of corners are shown in the videos clips.
If the horse readily yields hindquarters and forequarters we can use these to adjust his position.
Or we can lead him through the corner and back him into it.
If using a rail, we can walk him over the rail and halt with the rail behind him .
Play with as many safe corners as you can find or set up, to generalize the ‘corner task’ to different situations.
B: TEACH AN ANCHOR TASK
VIDEO CLIPS 1 & 2 (Right side)
Clip 1:
Clip 2:
In the same way that music is made up of notes and the pauses between the notes, we must have pauses between asking the horse to repeat the same task. Because the horse is at halt for this challenge, the anchor task creates the pauses between our requests.
We begin teaching the anchor task once the horse is comfortable standing in a corner, on a mat, with reasonable duration.
An anchor task is what we do to ‘set the stage’ for what we will do next. For example, when I play with targeting body parts to my hand with Boots, our anchor task is lifting a front knee to my hand. It tells her what game we are about to play.
Another example of a ‘stand quietly waiting’ anchor task might be to hang a special nose target in the spot you would like the horse to stand (park) while you tack up. Used like this, the foot or nose targets become a way that the horse can tell us that he is okay with us to proceed with what we are doing. There is a link to more about this in the Further Resources section at the end of the post.
As an anchor task for this behavior, I’ve chosen to rest my nearest hand lightly on Boots’ withers while she keeps her head forward. It is the position my hand would be if I were resting my reins while not giving a rein signal while riding. You might prefer a different anchor task.
In our case, this is a bit tricky because I use the same anchor position I use when we do belly crunches while standing beside the horse. The handler’s body orientation is often a large part of an anchor task.
I decided that Boots is far enough along in her training to learn to pause in this anchor position and wait for the next signal to find out whether a crunch or head flexion is the hot topic of the moment. You’ll see that we have a couple of conversations about this.
SLICES:
Stand beside horse’s withers.
Lightly rest your near hand on the withers.
Click&treat when the horse’s head is straight, or he is in the process of moving his head into the ‘straight’ position.
Step forward to deliver the treat so the horse keeps his head straight, then step back into position beside the withers.
Repeat until the horse confidently stays facing forward for 3-4 seconds until you click&treat .
C: LATERAL FLEXION TO A TARGET and D. THE VOICE SIGNAL
VIDEO CLIPS 1 & 2 (Left side)
Hold the target out of sight behind your back and review the anchor task.
When the horse stands reliably with his head forward in the anchor position, bring the target forward so he has to turn his head a little bit to touch it: click&treat & step forward so the horse straightens his head to receive the treat, putting the target out of sight behind your back as you step forward.
Step back beside the withers and put your hand back on his withers: click&treat for head forward until that is firmly established again (3-4 seconds). Be patient about establishing (and frequently re-establishing) this step because clever horses will want to skip straight from your anchor (hand on withers) to telling you that they know what to do – turn toward you (as Boots does in Clip Two).
Repeat 2 and 3 above until the horse reliably waits for you to produce the target before turning his head. If he turns without your signal, spend more click&treat on facing forward. Make sure you keep the target out of view behind your back. If turning his head is harder, spend more click&treat on asking for the bend.
ADD VOICE SIGNAL
You will obviously want different voice signals for right and left. Voice signals need to be short, clear, and sound different from other voice signals you use. I use “and Gee” for right. I use “and Left” for left. “Haw” for left sounds too much like “Whoa” which we use a lot. The “and” in front of the key word is a bit of a preparatory signal that lets the horse know a request is coming. My voice emphasis is on the key word.
Some horses do better if you teach something thoroughly on one side, then repeat from the beginning on the other side.
Some horses may cope well with doing a little bit on each side from the beginning.
Some handlers do better when teaching the task thoroughly on one side first.
E. RESPONSE TO ROPE or REINS SIGNALS
VIDEO CLIPS 3 & 4
Clip 3:
Stand beside the horse’s ribs just behind the withers, facing forward, rope in the hand closest to the horse. Keep a drape or ‘smile’ in the rope. Ensure that the horse can stay facing forward with relaxed body language for 3-4 seconds in the presence of the rope: (click&treat).
When 1 above is ho-hum, say your voice signal and gently use both hands to ‘milk’ the rope, putting light pressure on the halter, looking for the slightest ‘give’ of the horse’s nose toward you. Release (click&treat). Step forward to deliver the treat in a way that has the horse straighten his head again.
Work with 1 and 2 above until the horse waits for the touch signal on the halter and willingly yields his nose. If he turns before you give the rope signal, spend more click&treat time on keeping the nose forward.
If he begins to turn his head as soon as you move back into position behind his withers, also go back to click&treat more for a head kept straight.
Some horses catch on very quickly. Others may need multiple short sessions.
Teaching a horse with no rope experience is usually easier than teaching a horse who has had rough treatment with ropes. In the second case, you must adjust your training plan to help overcome any anxiety the horse carries from previous handling.
Clip 4:
F: GENERALIZATION
Some of these are shown in clip 4:
Once the whole task is smooth and ho-hum on both sides of the horse, move away from the corner but still use a mat. Do the task in a variety of different places.
Once 1 above is good in a variety of places, omit the mat and again work in a variety of places and spaces.
Replace the rope/halter touch signal with a distinctive hand signal that can be used to draw the horse right or left at liberty.
Once the horse understands the halter touch signal via the rope, plus the voice signal, the anchor task can morph into just standing quietly together.
Use the touch and voice signals while in motion to change direction, keeping the pressure on the rope as light as possible.
The YouTube playlist called Developing Soft Rein Response (see Further Resources at the end of the post for the link) gives further ideas about how we can generalize the task further using reins but without being mounted.
Building a strong history of response to directional voice signals is most helpful if you are planning to teach long-reining and if you take part in Horse Agility. The following clips suggest ways of strengthening the voice signals.