Tag Archives: Finesse Back-Up

Movement Routine 11: Fence for Focus

INTRODUCTION

As we build up a collection of routines, we can:

  • Improve on tasks we’ve done before.
  • Add a new aspect to a task, e.g. different handler position.
  • Do tasks in a different order.
  • Introduce new tasks.
  • Add trot to some of the tasks.

AIM

This routine links together a finesse back-up, targeting shoulder to hand, sidestepping, counterturn circle, ‘wait’ while the handler walks around the horse plus signaling a back-up from behind the horse.

PREREQUISITES

  1. Smooth ‘Walk on’ and ‘Halt’ Transitions (staying shoulder-to-shoulder). https://wp.me/p4VYHH-5TT
  2. Finesse Back-Up. https://wp.me/p4VYHH-5XL
  3. Target Shoulder to Hand. https://wp.me/p4VYHH-5SH
  4. Smooth Counterturns. https://wp.me/p4VYHH-5WK
  5. Horse has learned to ‘wait’ until handler gives a new signal or clicks&treats. Mats: Parking or Stationing and Much More. https://wp.me/p4VYHH-5S9
  6. Horse and handler agree on clear ‘stay’ signals. https://youtu.be/UvjKr9_U0ys
  7. Horse understands a back-up signal when the handler is behind the horse. https://youtu.be/501PSnAA-po
  8. Triple Treat. https://youtu.be/FaIajCMKDDU

ENVIRONMENT AND MATERIALS

  • A work area where the horse is relaxed and confident.
  • Ideally, the horse can see his buddies, but they can’t interfere.
  • The horse is not hungry.
  • Halter and 12′ (4m) or longer lead if not working at liberty.
  • A safe fence line to work alongside.

VIDEO CLIP

Movement Routine 11: Fence as Focus (filmed at liberty)

NOTES

  • Be sure that you have mastered each task before chaining them together.
  • Chain pairs of tasks to begin with, then gradually join the pairs together.
  • Click&treat at a rate that keeps your horse being continually successful. As he learns the routine, ask for a bit more before each click&treat.

TASKS

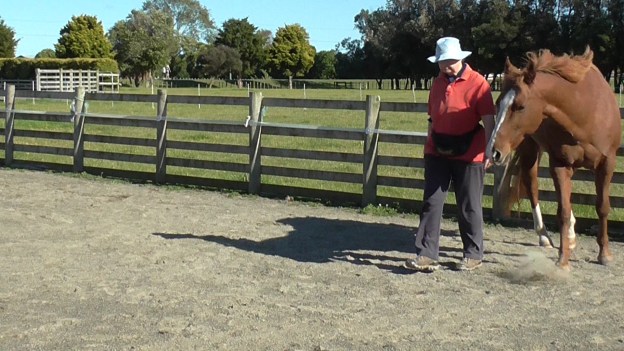
  1. Walk shoulder-to-shoulder with the horse nearest the fence.
  2. Smoothly turn to face the horse and ask for a Finesse Back-up. Eventually work up to ten steps back.
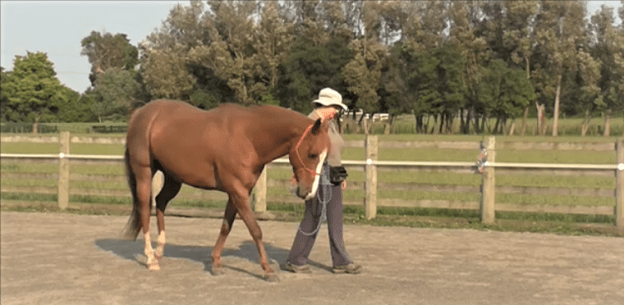
  3. Ask the horse to target your hand with his shoulder to turn him 90 degrees so his butt is against the fence.
  4. Ask the horse to sidestep one direction, then in the other direction. You could be facing the horse, at his side asking him to yield away or at his side asking him to step toward you.
  5. Take position alongside the horse’s head/neck so you can ask him to walk a counterturn half-circle with you, then halt. A counterturn has the handler on the outside of the turn.
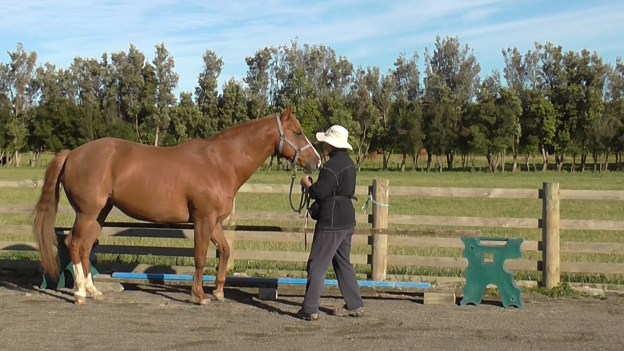
  6. Put the rope over the horse’s back, take if off, or ground-tie if your horse knows that. Ask the horse to ‘wait’. Walk forward and right around the horse. Click&treat when you return.
  7. Complete the counterturn circle so you are both once again parallel to the fence; the handler will be nearest the fence.
  8. Ask the horse to ‘wait’ with clear voice and gesture signals. Walk backwards and around behind the horse to end up standing beside his hip furthest from the fence.
  9. Ask the horse to back up while you move to remain beside his hip. Alternately, you could keep your feet still and ask the horse to back up until his head is at your shoulder.
  10. Use your ‘end of routine’ routine to let the horse know the routine is finished for now.
  11. If you started walking on the horse’s left side, teach it again walking on his right side. One side may feel harder.

GENERALIZATIONS

  • Work alongside as many different safe fences as you can find.
  • When it is super smooth with halter and lead, play at liberty.
  • Use a line of ground rails instead of a fence.
  • Do the routine in an open area with no fence or ground rails.

Movement Routine 5 – Fence for Focus

Photo: Task 3: Walking a half-circle away from the fence.

INTRODUCTION

The purpose of this series of movement routines is to regularly have the horse doing a series of gentle movements that aid his overall flexion and suppleness.

We need to consider both physical suppleness and mental suppleness. Mental suppleness is about the horse’s ability to understand the signals for each task and to move calmly between tasks.

Once the horse is adept with each of the tasks in the routine, this whole routine takes about two minutes. But it might take weeks or months of short daily practices to teach each element of the routine to the proficiency needed to link them all together.

I like to mark the end of a routine such as this with a celebration which in our case is a triple treat (details in Prerequisite 8).

AIM

To link this series of tasks into a sequence:

  1. Walk together.
  2. Recall toward fence.
  3. Walk a half-circle
  4. Yield shoulder to put horse’s butt at 90 degrees to fence.
  5. Back butt against fence.
  6. Two steps forward, one step back.
  7. One step forward, one step back; repeat once.
  8. Yield shoulder so horse faces fence and morph into sidestepping away.
  9. Sidestep in the opposite direction.

PREREQUISITES

  1. Smooth ‘walk on’ and ‘halt’ transitions staying shoulder-to-shoulder. (Smooth Walk and Halt transitions: https://wp.me/p4VYHH-5TT)
  2. Horse can smoothly U-turn into a recall when the handler changes from walking forward to walking backwards. (https://youtu.be/XuBo07q8g24)
  3. The horse understands yielding the shoulder. (Yielding the Shoulder: https://youtu.be/eSlin8ZYcRA)
  4. Horse backs up easily to put his butt against a solid barrier. (#186 HorseGym with Boots: Backing Against Objects: https://youtu.be/SBcdVtV-eCo)
  5. Horse is familiar with backing up one step at a time and recalling one step at a time. (One Step at a Time: https://wp.me/p4VYHH-5X6)
  6. Horse understands a signal for sidestepping away from the handler. (Sidestepping: https://wp.me/p4VYHH-5RL)
  7. Horse understand a signal for sidestepping toward the handler. (Target Shoulder to Hand: https://wp.me/p4VYHH-5SH and Targeting Hindquarters to Our Hand: https://wp.me/p4VYHH-5Tk)
  8. Triple Treat: #16 HorseGym with Boots: https://youtu.be/FaIajCMKDDU

ENVIRONMENT AND MATERIALS

  • A work area where the horse is relaxed and confident.
  • Ideally, the horse can see his buddies, but they can’t interfere.
  • The horse is not hungry.
  • Halter and 10′ (3m) or longer lead.
  • A safe fence or other barrier. For this challenge, we ask the horse to back his butt against the barrier, so something solid like a wooden fence, a wall or a hedge is best. We could also use a line of barrels or a raised rail.

VIDEO CLIP

NOTES

  1. Be sure that the horse is confident with each task before starting to link them together. We never want to make the horse feel wrong. He can’t be wrong because he doesn’t yet know what you want. Do a quiet reset and start again if things don’t go to plan.
  2. It is usually helpful to link pairs of tasks at first, then add the first pair to the second pair, and so on.
  3. I like to memorize the sequence of events by walking the pattern without the horse and then visualizing the sequence often (a good substitute for counting sheep to go to sleep!) If you have a human friend, take turns walking the sequence being both the horse and the handler.

TASKS

Use a rate of reinforcement (how often you click&treat) that keeps your horse being continually successful as much as possible. As he learns the routine, ask for a bit more before the next click&treat but always be prepared to increase the rate of reinforcement again if the horse needs you to clarify your intent.

  1. Walk along shoulder-to-shoulder with the handler nearest the fence.
  2. Gently change to walking backwards, asking the horse to make a U-turn toward the fence, so he is walking toward you.
  3. Stop walking backwards and ask him to halt in front of you.
  4. Move to the side that allows you to easily walk a half-circle together, with you on the inside of the circle.
  5. Halt when you have walked a half-circle away from the fence. Ask the horse to yield his shoulder 90 degrees so his butt is toward the fence.
  6. Ask the horse to back up until his butt (or tail) is against fence.
  7. Ask the horse to take two steps forward toward you, then ask for one step back.
  8. Now ask for one step forward, followed by one step back; repeat once.
  9. Ask the horse to yield his shoulder 180 degrees so he faces the fence and morph that movement into stepping away from you sideways.
  10. Ask the horse to sidestep toward you or move to his other side and ask him to sidestep away from you.
  11. Finish with a big celebration (e.g. a Triple Treat).
  12. Repeat from task 1 walking on the horse’s other side.

GENERALIZATIONS

  • Practice in different spots and/or different venues.
  • When it is super smooth with rope and halter, play at liberty.
  • Move away from the fence to do the routine. Change task 6 to ask for a set number of back-up steps or have a ground rail as a back-up destination.
  • Chain the tasks in a different order.


Movement Routine 3 – Fence for Focus

Photo: Walking concentric circles is part of this routine.

INTRODUCTION

For Movement Routine 3 we are back to using a fence as a focal point to initially build the routine. A fence helps the horse maintain straight movement. It also makes it easy to establish beginning and end points for each circle in this sequence of tasks.

AIMS

  • Transitions from walking forward into finesse back-ups.
  • Walking concentric circles.
  • Stay and Wait.

PREREQUISITES

  1. Smooth ‘walk on’ and ‘halt’ transitions staying shoulder-to-shoulder. (See Related Resources 1 at the end of this post.)
  2. We have taught the finesse back-up. (See Related Resources 2 at the end of this post.)
  3. Handler has developed a clear ‘Zero Intent’ signal so the horse knows when standing quietly is what is wanted. (See Related Resources 3 at the end of this post.)
  4. While walking shoulder-to-shoulder, the horse follows the movement of the handler’s body axis away from the horse to move into a circle. (See Related Resources 4 at the end of this post.)
  5. We have taught the horse to ground-tie. (See Related Resources 5 at the end of this post.)

ENVIRONMENT AND MATERIALS

  • A work area where the horse is relaxed and confident.
  • Ideally, the horse can see his buddies, but they can’t interfere.
  • The horse is not hungry.
  • Halter and 10′ (3m) or longer lead.
  • A safe fence or similar. A safe fence or barrier is one the horse can’t put his foot/leg through if he suddenly steps back. Tape fences can work well with some horses – NOT electrified.

VIDEO CLIPS

With halter and lead:  https://youtu.be/BHSztrpA8oo


At liberty: https://youtu.be/O0dpTo6mXSs

NOTES

  1. Memorize the sequence of tasks by walking the pattern without the horse and then visualizing the sequence often.
  2. The number of steps you take walking forward is not important. I tend to not take many steps when making the video clips to keep the viewing time short. I sometimes suggest a number of steps, but please suit that to your horse and your environment.
  3. However, the number of steps I suggest for moving backwards is significant. Horses don’t naturally do a lot of stepping backwards. We want to stay with only 2-3 steps at first, and gradually, over many short sessions, build it up one or two additional steps at a time. We want to avoid making the horse sore.
  4. While teaching this routine, or revisiting it after a long time, I generally click&treat for each part of each task. When the routine feels familiar, I move the click point along so we are doing more before a click&treat. Each horse will be different and each time doing the pattern will be different. I like to move the click points around a bit to stop the horse anticipating a treat at a specific point every time.
  5. The key to all these tasks is to keep a continuous drape in the lead rope, using halter pressure via the rope only momentarily for additional guidance. Most of our guided shaping comes via our body position, gestures, breathing, energy level and voice signals.

TASKS

  1. On the horse’s left side, with the horse nearest the fence, walk forward maybe ten steps, halt for a second or two, then turn into a finesse back-up – asking for 2-3 steps back. Repeat two more times (three times in total).
  2. Walk a large circle (handler on the inside). At the point along the fence where you began the large circle, switch to walk a medium-sized circle. Reaching the same spot again, carry on walking a small circle. The circle sizes will depend on the space you have and how flexible your horse is. Start with large circles and gradually make them smaller as indicated by the increasing suppleness of the horse.
  3. Ask the horse to HALT alongside the fence, either ground-tied or put the rope over his neck/back. Then ask him to WAIT while you walk away about ten steps with your back to the horse. Turn to partly face the horse and take up your ‘Zero Intent’ body position for x number of seconds. Then walk back to the horse; click&treat. Gradually (over lots of short sessions with this routine) work up to a WAIT of ten seconds or more.
  4. Walk forward shoulder-to-shoulder with the horse, then turn into a finesse back-up without a halt first. With practice this can get lovely and fluid.
  5. Repeat the whole sequence of tasks walking on the horse’s right side.

GENERALIZATIONS

  1. Practice alongside different fences/walls/hedges if you can.
  2. Once the horse shows that he knows the pattern, play with it at liberty along a fence using the same signals you have used all along.
  3. Once the routine is smooth along the fence, play with it out in the open first with a lead rope, then at liberty. Alternate on which side of the horse you begin the routine.

Note that during backing up, horses usually push harder with one hind leg, so their hind end tends to veer away from the stronger leg. You may want to teach a gesture signal that allows you to regain straightness.

Experiment with how your position to the right or the left of the horse’s head affects his backing up.

RELATED RESOURCES

  1. Smooth Walk and Halt transitions: https://wp.me/p4VYHH-5TT
  2. Finesse Back-Up: https://wp.me/p4VYHH-5XL
  3. ‘Zero Intent’ and ‘Intent’: https://wp.me/p4VYHH-5RO
  4. Smooth 90-Degree Turns: https://wp.me/p4VYHH-5VM
  5. Ground Tie: https://wp.me/p4VYHH-5WX


Finesse Back-Up

At one point a friend and I came up with 29 different ways of backing up a horse, including groundwork, long-reining and riding. This Finesse Back-Up is one of my favorites when I am leading a horse and we need a prompt back-up.

I learned the essence of this process from Alexandra Kurland, a true pioneer of equine clicker training. I’ve added the idea of using corners to teach because it arranges the environment so that stepping back makes sense to the horse right from the beginning.

PREREQUISITES:

  1. Horse understands putting his nose on a target results in click&treat. (See Related Resource 1 at the end of this post.)
  2. Horse walks confidently between the handler and a safe fence or similar barrier.
  3. Horse understands ‘Walk On’ and ‘Whoa’ voice and body language signals. (See Related Resource 2 at the end of this post.)
  4. Handler easily slip into and out of ‘zero intent’ so the horse easily knows when he can relax in a ‘wait’ and when he is being asked to move. (See Related Resource 3 at the end of this post.)
  5. Horse understands the handler’s body axis orientation as a signal for bending. (See Related Resource 4 at the end of this post.)

ENVIRONMENT & MATERIALS:

  • A work area where the horse is relaxed and confident.
  • Ideally, the horse can see his buddies, but they can’t interfere.
  • A safe fence or barrier which leads into a safe corner.
  • Halter and lead.
  • Mat (optional). A mat can make it easier for a mat-savvy horse to settle into standing in a corner.

AIMS:

  • Handler uses clear, consistent orientation, body language and voice ‘back up’ signals.
  • Horse smoothly shifts from walking forward to stepping backwards on request when the handler turns to face him.

Clips:

https://youtu.be/6YYwoGgd_0Y

https://youtu.be/safxxu90lkA

Notes:

  1. Once the horse readily parks calmly in the corner, we can begin to teach the Finesse Back-Up. I call it that because it requires gently running our hand or fingers up the rope toward the halter, until we reach a point of contact to which the horse responds.
  2. Each horse will be different. I had trouble having Boots demonstrate clearly because she knows the task so well that she reads the very beginning of my body language sentence and steps back right away. If we teach this well, the horse will step back as soon as we begin to turn and use our voice signal, so that even our hand on the rope eventually becomes redundant.
  3. This is tricky to explain in words. Hopefully the video clips and still pictures will make it easier to understand.
  4. Two terms explained:  Outside hand refers to the hand furthest away from the horse. Inside hand refers to the hand nearest the horse. These obviously change depending on which side of the horse you are on, and whether you are shoulder-to-shoulder with the horse, i.e. both facing the same direction, or you are facing the horse front-on.

SLICES:

A: Getting Comfortable in a Corner

  1. Walk with the horse and halt in a corner set up with a gate or a barrier. The handler is on the open side of the corner. It the horse finds it hard to stand relaxed in the corner, and you have taught him to love standing his front feet on a mat, use a mat for your ‘halt’ position. Click&treat for the halt.
  2. Relax into zero intent and ask the horse to ‘wait’ for a little while in the corner. Click&treat the ‘wait’ task a few times.
  3. Turn the horse 90 degrees toward you so he can walk forward out of the corner. Walk a loop and come back to park in the corner again. Click&treat the halt. (This bit is not on the video clip but when first teaching this, we want the horse totally comfortable standing in the corner. It’s helpful to generalize the task to several corners if you have them available or can build them.)
  4. Teach relaxed standing in the corner on the horse’s left and right sides.

B: The Back-Up Maneuver

To ask for the back-up, you are going to smoothly pivot 180 degrees, so you face the opposite direction to the direction the horse is facing, but you are a bit to one side of him.

BUT: ***In the moment before you pivot…*** 

  1. Gently reach across your body with your ‘outside hand’ and slide it quietly up the rope to a point of contact to which the horse responds.
  2. At first, this may be right up to the snap on the halter (or if using a rope halter, even beyond the snap to hold the bottom of the halter) so you can give the horse a very direct backwards feel on the halter.
  3. As you pivot to face the horse, what was your ‘outside hand’ becomes your ‘inside hand’ — the one nearest the horse.
  4. Then simply keep a ‘hold’ tension on the rope and bring up your energy and intent for the horse to step back. This stance causes the horse slight discomfort by making him feel unbalanced. We want him to work out that he can regain his balance/comfort by shifting backwards. Our first click point is the moment he thinks of moving back. Because he’s in a corner, his easiest choice is to step backwards to regain his balance.
  5. When first teaching this task, release your ‘hold’ and simultaneously click&treat at the horse’s smallest inclination to shift his weight back. After the treat, walk a circuit, return to the corner, and ask again.
  6. When you can feel the horse readily shifting his weight back, release the rope pressure, but then, right away, slide up the rope again and ‘hold’ a bit longer to get a whole step back. Drop your signaling hand off the rope as soon as you get backward movement. Walk a circuit, return to the corner, and ask again.
  7. As he begins to understand, eventually ask for two steps, then three steps and so on, before the click&treat. The horse will soon know that when you relax your intent and take your signaling hand off the rope, he can stop backing.
  8. Ask for two or three back-ups (of several steps each) in a row, with release, click&treat for each one. Then ask the horse to step forward into the corner again; click&treat.
  9. Build a little dancing rhythm of movement: back up = click&treat. Forward into corner = click&treat. Back up = click&treat, and so on. After about 3 of these, go away for a bit of relaxation or doing other things.
  10. Gradually, over many short sessions, ask for more steps back until the horse willingly offers as many as you like.

Generalizations

  1. Move away from the corner and use just a fence on the far side.
  2. Move away from the fence and use just a low raised rail on the far side.
  3. Repeat with just a ground rail along the far side of the horse.
  4. Check to see how well the horse can back with this signal (turning to face him) out in the open. If you lose straightness at any point, return to using a fence or rail on the far side. If the horse begins to swing his hind end away from you, you can straighten his body by touching his neck to move his head away, which will straighten his body.
  5. Back through increasingly narrow spaces; e.g. two barrels, gates, into and out of stalls, always being careful that the horse does not catch his hip on an upright.
  6. Back through lanes set up with higher sides.
  7. Back along a track or trail.
  8. Back down slopes and up slopes. Start with gentle inclines.
  9. Back into a trailer or trailer simulation.
  10. Weave backwards (you need to create signals to direct his butt to the right, to the left and to keep it straight). If you are asking the horse to back up while you face him front on, moving his head a bit to his left (your right) will cause his butt to move to his right (your left). And vice versa if you move his head a little bit to his right, his butt will move to his left. If you want him to back straight, ask his head to stay straight.
  11. Back an L-bend.
  12. Back a U-bend.
  13. Back a Z-bend.
  14. Back in a circle.

Related Resources:

  1. Using a target: https://youtu.be/IfbdNme5UQA
  2. ‘Walk On’ and ‘Whoa’ Signals: https://wp.me/p4VYHH-5TT
  3.  ‘Zero Intent’ and ‘Intent’: https://wp.me/p4VYHH-5RO
  4. Body Axis Orientation: https://youtu.be/mjBwyDsVX6Y