Tag Archives: wait

Placing the Feet using a Single Rail

INTRODUCTION

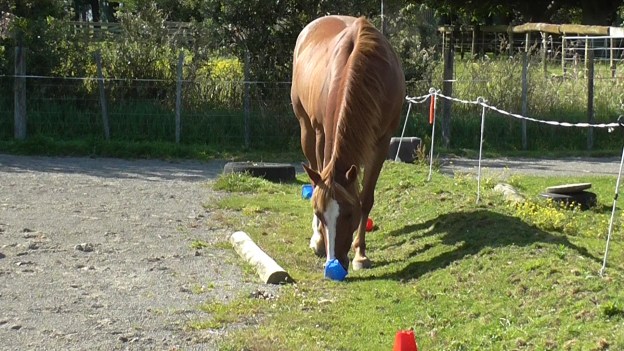
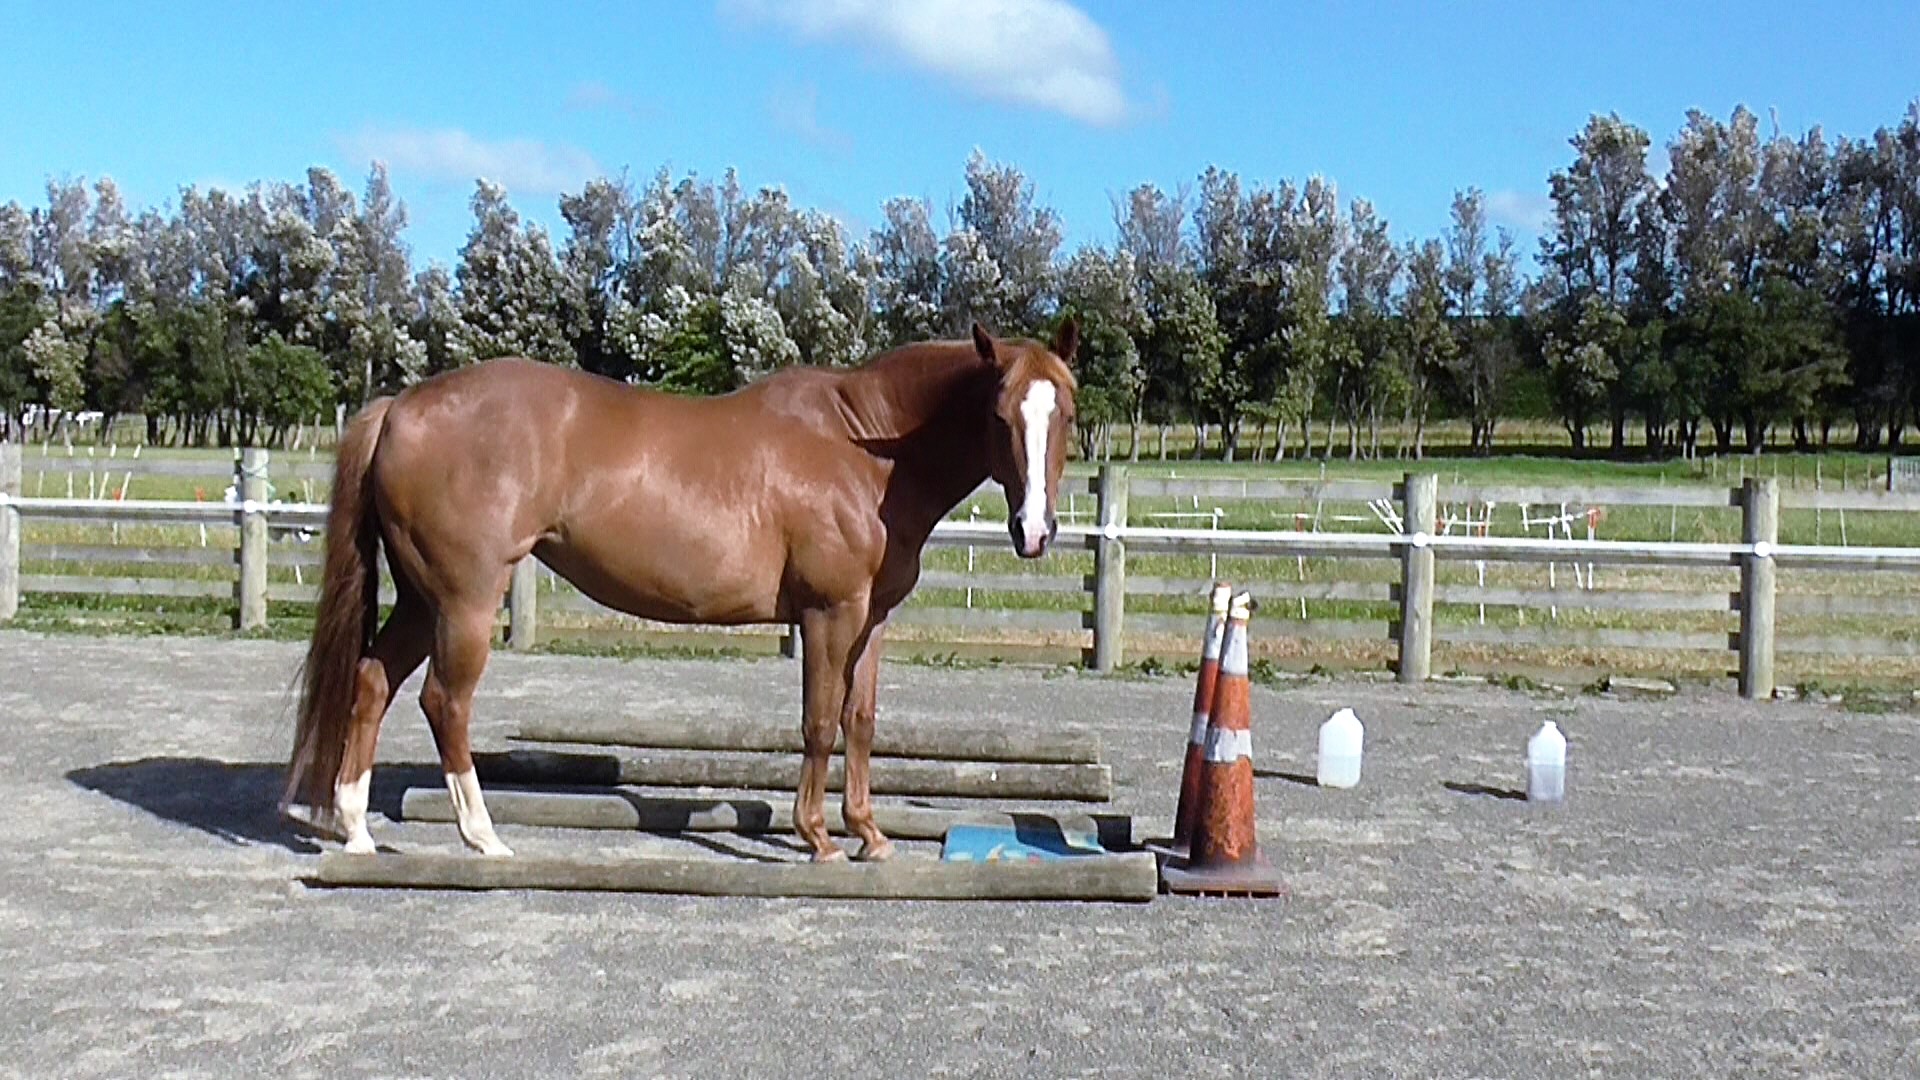
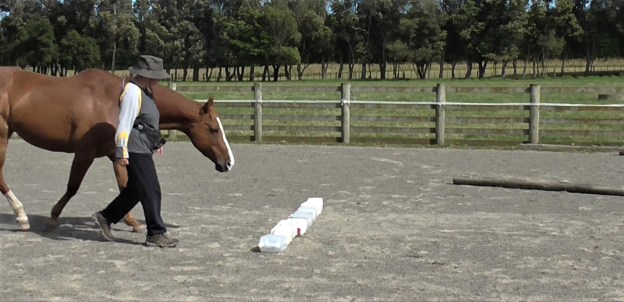
In the photo above we are using a line of 5-liter containers as our ‘rail’.

This is another exercise that helps a horse with proprioception – knowing where his feet are, what they are doing, and how much energy is required.

Equally, it is a superb exercise for the handler to refine communication skills. All training with a horse is about building a mutual language. If we are consistent with our body language and energy changes, the horse will use these as his main cues for following our lead. For further refinement we add gesture signals and perhaps voice signals.

Sometimes people think, “Oh, I’ll try that”. They do an exercise once or twice and think that it’s ‘done’. They totally miss the point that exercises like this are little workouts for both handler and horse that need to be done often, always stiving for more refinement of handler communication until it feels like magic with the horse at liberty.

For this exercise there are five different basic tasks, but since we do them in the horse’s left and right eyes, we have ten tasks. Then we consolidate the tasks by doing them in two directions for each eye, giving us a total of 20 tasks.

Once the five basic tasks are mastered, there are eight refinements we can add. Doing these on either side of the horse gives a total of 16 refinements.

This series of tasks also makes a good warm-up or cool-down exercise. And they can be stretching and accuracy exercises if time is short to do other things.

AIMS:  

  1. Handler works on using clear, smooth ‘walk on’, ‘halt’, ‘wait’ and ‘back up’ signals using a single rail as a focal point.
  2. Handler uses ‘Intent and Zero Intent’ body language to create short WAIT times between requests.
  3. Horse develops confidence with walking across a rail (or similar).
  4. Horse gains confidence standing with a rail (or similar) under his belly.
  5. Horse practices placing his feet carefully in response to handler signals.

PREREQUISITES:

  1. Horse leads smoothly beside the handler’s shoulder. See Number 68 in my Blog Contents List. The link for my Blog Contents List is at the top of the page.
  2. Handler and horse agree on ‘Intent and Zero Intent’ signals. See Number 10 in my Blog Contents List.
  3. Handler and horse agree on clear ‘walk on’ and ‘halt’ signals. See Number 16 in my Blog Contents List.
  4. Handler is aware of The Rule of Three. See number 46 in my Blog Contents List.
  5. Horse and handler agree on a back-up signal, either with the handler turning to face the horse – See Number 40 in my Blog Contents List, or the handler staying in the shoulder-to-shoulder position – See the first clip in Number 32 in my Blog Contents List.
  6. Handler knows to stay with each small task until it is ho-hum, before asking for a different task.

VIDEOS: 

#267 HorseGym with Boots: One Rail Basics. https://youtu.be/wMwBqiaBruI

#268 HorseGym with Boots: One Rail Refinements. https://youtu.be/L1fdlegEHFo

ENVIRONMENT & MATERIALS:

  • A work area where the horse is relaxed and confident.
  • Ideally, the horse can see his buddies, but they can’t interfere.
  • A single rail or several single rails (or similar) laid out a good distance apart.
  • Halter and lead or liberty. A light, shorter lead is easier to manage.

NOTES:

  1. A little bit of these tasks during one training session is plenty. If it’s all done quietly with no fuss or drilling, the horse will think on it and remember what behaviors earn a click&treat. The Rule of Three can be useful.
  2. Asking a horse to lift a front foot to back across a rail means that he is moving it back against the pressure of his whole body which is not easy. Ignore any touching of the rail at this stage as the horse draws a leg back. Frequent short practices will strengthen the muscles and ligaments so lifting the foot up and back becomes easier for the horse.
  3. To help the horse strengthen, and maintain the strength, to lift his feet easily, we can lay a raised rail or similar in a gateway that the horse uses regularly during his everyday life. I’ve done this with two gates, and it seems to do a good job at helping to maintain suppleness. I leave a small gap for my wheelbarrow to squeeze through.
  4. When confusion arises, it is because we are not clear enough or are going faster than the horse is able to absorb the new learning. Horses working for a food reward are usually super-observant of all our body language as well as carefully taught and executed voice and gesture signals. We must continually strive to ‘speak’ clearly with our body language, orientation and gestures every time we request an action (or inaction). Otherwise, the horse will only ‘hear’ a mumble and be confused, just as a person mumbling to us is frustrating and makes us give up trying to understand.
  5. Once all the tasks are going smoothly, we can mix them up in any order, which teaches us to be crystal clear for the horse and has the horse watch us carefully to pick up the next signal that will lead to a click&treat.
  6. When we use the less dominant side of our body, our body language and gesture signals tend to be less clear until we become super conscious of what we are doing. If you are right-handed and haven’t usually done much on your horse’s right side, there will be a lot of learning going on for both of you.
  7. I find it useful to take written memo cards out with me when first doing a series of moves like this.
  8. In-between moving, build it WAIT time before asking for the next movement. I.e., MOVEMENT – WAIT (x number of seconds) – MOVEMENT.
  9. In the video clips I only show each request once to keep the clip short. When in the teaching (acquisition*) phase, three repeats in a row is usually a good number to work with.
  10. If the horse finds one of the slices difficult, spend as many short sessions as necessary to build his confidence before asking for anything new.

SLICES:

  1. Walk right over the rail, halt a few paces beyond the rail, click&treat. Walk a loop and repeat a couple more times. Or you could have more than one rail laid out in your training area and walk to each rail in turn to get the repeats. I used one rail in the video clips for ease of filming with a set camera.
  2. Halt with the rail under the horse’s belly, click&treat; pause for a WAIT, walk on forward over the rail, walk a loop (or move to next rail) so you can repeat a couple of times.
  3. Halt and WAIT before stepping over the rail, click&treat; pause and WAIT, walk on over the rail and into your loop or on to the next rail.
  4. Halt immediately after all four feet have stepped over the rail, click&treat; pause and WAIT, walk on into your loop or to the next rail.
  5. Halt with the rail under the horse’s belly, click&treat. Pause and WAIT, ask the horse to back his front feet across the rail, click&treat; pause, walk on forward over the rail. Be gentle teaching this. If you have taught a ‘Lift’ voice signal for foot care it can be useful here.
  6. Repeat 1-5 above but this time approach the rail(s) from the opposite direction.
  7. Repeat 1-5 above walking on the horse’s right side.
  8. Repeat 7 above (on his right side) in the opposite direction.

GENERALIZATIONS:

  1. Work in different venues.
  2. Repeat slices 1-5 trotting.
  3. Play at liberty once you’ve built up good communication for each task.
  4. Work on a slope.

ONE RAIL REFINEMENTS

  1. Walk all four feet over the rail and halt. Back only the hind feet over the rail; wait; walk forward again.
  2. Walk all four feet over the rail and halt. Ask the hind feet to back over the rail, then the front feet.
  3. Approach the rail but turn in front of the rail to set up the horse to halt/wait with his hind feet at the rail but not over it.
  4. As 3 above, then ask the horse to back all four feet across the rail.
  5. If you’ve taught sidestepping (see Number 29 in by Blog Contents List), ask the horse to step his front feet over the rail at one end and sidestep along the rail. If you are facing the horse’s ribs ask him to sidestep away from you. You can also ask him to sidestep toward you if you’ve taught this previously. You can also build a signal for sidestepping along a rail while you are face-to-face with the horse.
  6. Straddle the rail. See Number 67 in my Blog Contents List.
  7. Ask one front foot to stand across the rail and WAIT. See if you can do it with either foot. Then either ask the horse to lift the foot back over the rail or walk on forward.
  8. Back one hind foot over the rail and wait in that position; walk forward. Work to be able to do this with either hind foot.

Mainly, HAVE FUN developing your communication skills.

Treasure Hunt

Introduction

This is a fun activity when we don’t have a lot of time with our horse. Or we can use it to begin or finish a longer training session.

We can expand the task as much as we like, depending on the space we have available to lay out the ‘treasures’.

Aim

Horse confidently follows a trail of markers to find a treat under or alongside each marker.

Prerequisites

  1. Horse is relaxed enough in the venue for his curiosity to be engaged.
  2. Horse readily targets the ‘markers’ you will use when you hold them in your hand. In the clip I used small plastic plant pots that are easy for the horse to push aside and easy to see.
  3. Horse is used to picking treats off the ground (not sand or open soil).
  4. Horse understands a signal to move away from the handler so we can ask him to explore markers on the ground. This clip demonstrates touch and voice signals to ask the horse to move forward away from me. Instead of a halt signal, the horse moves on to seek out the circuit of treasures. Click here.
  5. A strong WAIT with duration is helpful if we want to set up a treasure trail without having to contain the horse physically. See The Wait Game: Click here. Alternately, we can teach ground-tying to a high standard: Click here.

Videos

#227 HorseGym with Boots: TREASURE HUNT

#236 HorseGym with Boots: TREASURE HUNT GENERALIZATIONS

Materials and Environment

  • A venue where the horse is able to relax. Ideally he can see his buddies but they can’t interfere.
  • Horse is not hungry.
  • Ideally the horse is at liberty, but if that’s not possible, the horse can be on a long light lead and encouraged to do the exploring for each treasure while we tag along behind keeping the lead out of his way.
  • Targets we can place or hang around our training area, e.g. rags or plastic drink bottles if we need to teach the horse to move out ahead of us.
  • A surface from which the horse can safely pick up treats, e.g. grazed paddock, solid footing areas (not sand). If only a sand or soft soil area is available, we can lay out mats or similar to put under each marker.
  • Markers to put over each treat. The purpose of the markers is to have the horse use his initiative to move the marker to find the treat. In the video clips I use small plastic plant pots. Any small pot or pottle will do – margarine containers, even something as large as one-liter ice cream containers or cut down milk containers. Make sure that it is safe and easy for the horse to move the container aside with his nose to reach the treat, especially when first introducing the task.
  • Treats to put with each marker. These can be carrot/apple strips, pieces of celery, an unshelled peanut, horse pellets.
  • Halter and long, light lead if you can’t have the horse at liberty.
  • Halter and short lead if you want to ask the horse to wait while ground-tied.
  • Mat, pedestal, or balance beam if you want to use a WAIT spot while you set out the treasure trail.
  • For generalization, stones or pieces of wood to set out as marking points.

Notes

  1. At first, use single obvious treats such as a large strip of carrot or any vegetable or fruit your horse likes. Once the horse understands the game, it is easy to switch to a few horse pellets or an unshelled peanut under each marker.
  2. Ensure the horse can easily move the marker with his nose.

Slices

  1. As a first task, we have to teach the horse (or refresh) a signal indicating to ‘seek’ by moving away from us toward a target. Begin by hanging targets at nose level around your training area and have the horse walk with you between the targets, with a click&treat for putting his nose on each one. Rags or plastic drink bottles make good targets.
  2. Once 1 above is ho-hum, stay back a little bit as you approach each target and develop a hand gesture paired with a voice signal to let the horse know you would like him to move ahead of you to ‘seek’ the target. I use a light tap behind the withers as a touch signal, as well as an arm/hand gesture. Click when he touches the target and walk forward to his head to deliver the treat. This builds up Prerequisite 4 – horse confidently moves forward away from you.
  3. Play with having the horse target the type of marker you will use on the ground, while you hold it in your hand.
  4. With the horse nearby and watching (behind a gate or tied or held by a helper), be obvious about putting a treat on the ground nearby and cover it with the marker the horse has been targeting in your hand.
  5. Encourage the horse to move forward away from you to ‘seek’ and explore the marker to discover the treat under it. Some horses may need you to ‘help’ move the marker during the first one or two trials. As the horse begins to understand the game, gradually hang back until he can do it on his own.
  6. Begin to create a trail of multiple markers. Put them close together at first, then gradually further and further apart. If your horse lives on a track, you might lay the trail around corners.

Generalizations

  1. Lay out the treasure hunt in different venues.
  2. We can use rocks or pieces of firewood to mark the site of each ‘treasure’ and occasionally move these around to change the puzzle. We may need to guide the horse from marker to marker the first few times. Start with them close together and gradually put them further apart. This system means we don’t have to pick up the markers each time.
  3. We can add complexity by using a variety of markers as long as we teach each one separately at first.
  4. We can add interest by putting a variety of treats or fresh herbs/willow twigs into a series of cardboard boxes scattered around in different places each time. These are more visible and work well if we set them up before releasing the horse(s) into the space. However, be careful not to use boxes with staples and the glue in the carboard is not safe to eat. Some boxes will also have been sprayed.
  5. When the horse finishes seeking out a line of treasures, we can add a recall back to us, which earns a click&treat celebration.
  6. When trailering a horse to a venue, have him wait in the trailer while you set out a circuit of treats with familiar markers. Then as soon as he exits the trailer, encourage him to come with you to do the treasure hunt. By having something familiar to do right away, the idea of a new/different place can be less worrying for the horse. I used to do this without markers and found it hard to remember exactly where I’d put the strips of carrot, so markers are helpful.
  7. We can ground-tie the horse or ask him to stand on a mat, pedestal, or beam for the ‘WAIT’ while we set out the treasure hunt. This gives him a definite place to be. Of course, we’d have to spend time teaching ground-tying or WAIT duration first.
  8. We can set out rails between the markers to encourage more varied movement. The horse will usually step across them if they are in direct line to reach the next marker.

The WAIT Game

Introduction

Once we have taught our horse to park on a mat, we can begin to teach WAIT. WAIT is parking with duration. Along with duration, we can teach WAIT while we go further and further away from the horse.

We can then generalize by asking the horse to:

  • Wait in unusual places including over, between or on obstacles.
  • Wait to be invited through gates, into and out of wash-bays and stalls.
  • Wait as a way to explain ‘being tied up’ to the horse.
  • Wait for mounting/dismounting or harnessing/unharnessing.
  • Wait while we go out of sight.
  • Wait to enter a trailer/truck and wait to be asked to exit a trailer/truck.
  • Wait during husbandry care – grooming, tending feet, vet procedures.
  • Wait while we adjust our camera position.
  • Wait while we move around obstacles we are using for training.
  • Wait anytime and anywhere. Maybe paired with ground-tying.
  • Wait while we talk to another person.
  • Wait for our turn at a competition.

AIM

Horse and handler agree on WAIT signals and horse is able to WAIT in a variety of situations.

PREREQUISITES

Horse understands that going to a mat yields a click&treat. https://youtu.be/xMaZWt5gK2o

Horse is keen to target feet to a variety of mats in a variety of venues. https://youtu.be/GotLjG8931I

Generalizing mats to different places.

https://youtu.be/wdptBQ0EtK4

VIDEOS

Park and Wait: https://youtu.be/UvjKr9_U0ys

The horse can’t be wrong when he is learning something new. We have simply not YET explained what we want clearly enough in a way that he can understand. Never make him feel wrong if he needs to move.

Wait: https://youtu.be/ktwTUGvXNwM

Once it is solid with halter and lead, it is fun to generalize to liberty.
An older clip from when Boots was first learning this.

Parking out of Sight: https://youtu.be/X4rmbVvE6nw

You can see that Boots is not yet comfortable with me staying out of sight for long. We are in her paddock, not somewhere strange and new.

Movement Routine 12 – Rags as Focus

INTRODUCTION

For this routine we lay the rags out in a line. Only the horse weaves the rags while the handler walks parallel to the rags. Each request for sidestepping is followed by walking a circle, to give variety and vary the flexion throughout the routine.

AIM

To link weaving, standing together quietly, walking circles together and sidestepping.

PREREQUISITES

  1. We have stepping on a mat strongly ‘on cue’ or ‘on signal’ or ‘under stimulus control’. #9 HorseGym with Boots: Putting Targets ‘On Cue’: Click here. More info about putting targets ‘on cue’: #5 HorseGym with Boots: Putting Nose Targeting ‘On Cue’. Click here.
  2. Smooth transitions staying shoulder-to-shoulder. Smooth ‘Walk On’ and ‘Halt’ Transitions. Click here.
  3. While walking shoulder-to-shoulder, the horse changes direction in response to handler moving his/her body axis toward the horse or away from the horse. #170 HorseGym with Boots: Body Axis Orientation Signals. Click here.
  4. Weaving. #70 HorseGym with Boots: Only Horse Weaves. Click here.
  5. Horse understands a signal for sidestepping. Sidestepping. Click here.
  6. Handler has developed a clear ‘Zero Intent’ signal so the horse knows when standing quietly is what is wanted. ‘Zero Intent’ and ‘Intent’. Click here.

ENVIRONMENT AND MATERIALS

  • A work area where the horse is relaxed and confident.
  • Ideally, the horse can see his buddies, but they can’t interfere.
  • The horse is not hungry.
  • Halter and relatively short lead (~8′) when not working at liberty.
  • Six rags (or any even number) laid out in a straight line with enough space between them so the horse can easily weave the rags.

VIDEO CLIP

NOTES

  1. Only the horse weaves the rags. The handler walks a line parallel to the rags.
  2. Click&treat as often as appropriate to keep the horse continually successful.
  3. This is concentrated work, so after doing the routine on one side of the horse, it’s best to do something relaxing before working on the other side.
  4. For the sidestepping tasks, you could be in front of the horse as I am in the video clip, or on the side asking the horse to either move away from you or toward you.

TASKS

  1. On the left side of the horse, weave the rags in both directions. Put in a halt and a few seconds of ‘wait together’ at each end of the weave.
  2. Walk a circle to line the horse up with his belly beside the first rag.
  3. Ask the horse to sidestep so the first two rags pass under his belly.
  4. Walk a circle to line up the horse’s belly with the third rag.
  5. Repeat the sidestepping across two rags followed by a circle to line up for the next two rags until you reach the end of the rags.
  6. Use a jackpot or Triple Treat to indicate the end of the routine on the left side of the horse.
  7. Repeat on the horse’s right side.

GENERALIZATIONS

  • If you can run with your horse, trot the weaves.
  • If the horse understands sidestepping with various signals, mix up the way you ask for it.
  • Work on a slope if you have one handy.
  • Do the routine with imaginary rags. I do this often and if I’m careful to keep my signals consistent, it’s amazing how well it works once the horse knows the routine.

Movement Routine 7 – Fence as Focus

Photo: Parking for up to 10 seconds with the handler standing behind. This is the seventh task of the routine.

INTRODUCTION

This routine refines 90-degree turns, stepping sideways, parking, and backing up with the handler in two different positions.

AIMS

  1. To improve the precision of handler/horse communication by linking a series of tasks into a sequence.
  2. To do a series of gentle gymnastic moves to engage the horse’s mind and muscles.

PREREQUISITES

  1. Smooth ‘walk on’ and ‘halt’ transitions staying shoulder-to-shoulder. Smooth Walk and Halt transitions: https://wp.me/p4VYHH-5TT
  2. Smooth 90-degree Turns: https://wp.me/p4VYHH-5VM
  3. Horse understands a signal for sidestepping. Sidestepping: https://wp.me/p4VYHH-5RL
  4. Backing up with handler shoulder beside withers and beside hindquarters. https://youtu.be/501PSnAA-po and https://youtu.be/MWAH_Csr960
  5. Horse understands a ‘wait’ signal to stay parked until further notice. Mats: Parking or Stationing and Much More: https://wp.me/p4VYHH-5S9
  6. Handler has developed a clear ‘Zero Intent’ signal so the horse knows when standing quietly is what is wanted. ‘Zero Intent’ and ‘Intent’: https://wp.me/p4VYHH-5RO

ENVIRONMENT AND MATERIALS

  • A work area where the horse is relaxed and confident.
  • Ideally, the horse can see his buddies, but they can’t interfere.
  • The horse is not hungry.
  • Halter and a lead long enough so you can keep a nice drape in it but not so long it gets in the way. Or work at liberty.
  • Safe fence line or similar.

VIDEO CLIP

#201 HorseGym with Boots: Routine 7 – Fence as Focus. https://youtu.be/548G5Ektt4c


NOTES

  1. I find it easier to memorize the sequence of tasks like this by walking the pattern without the horse and then visualizing the sequence often. If you have a human friend, take turns being the horse or the handler. Usually, as handler precision improves, horse precision improves.
  2. The aim is to keep the rope with a nice drape or loop as much as possible, so the horse is getting his signals from our body language and signals rather than pressure on the halter. Then it will be easy to morph into working at liberty.
  3. Click&treat at a rate that keeps your horse being successful. As the horse learns a pattern through frequent short repetitions, we can gradually ask for a bit more before each click&treat. For this routine I began with click&treat at each halt, then gradually did a bit more before a click&treat.

TASKS

  1. Handler closest to fence, walk along shoulder-to-shoulder and make a U-turn, staying on the same side of the horse, which will put the horse closest to the fence. Walk to your starting point; halt.
  2. Standing shoulder-to-shoulder with the horse, beside or just behind his withers, ask the horse to back up several steps; halt.
  3. From halt, with the handler on the inside of the turn, make a 90-degree turn and walk 4 or 5 steps, halt. Repeat three more times so that you have walked an entire square with a halt at each corner, ending up where you started.
  4. From halt, walk the first two sides of the square as you did in 3 above, but with no halt at the corner. Halt at the end of the second side. The horse is now parallel to the fence.
  5. Move to face the horse and ask for sidesteps to the fence; halt.
  6. Ask the horse to stay parked with your ‘wait’ signal. Walk up to a couple of meters behind the horse and take up your ‘no intent’ position. Start with only a couple of seconds of ‘wait’ but try to gradually build up to ten seconds. Over multiple sessions gradually increase the distance you move away.
  7. Walk to stand beside the horse’s butt (facing the same way as the horse) and ask for several steps of back-up.
  8. Jackpot on completion of the sequence.

GENERALIZATIONS

  • Ask for a few more steps during the back-ups (tasks 2 and 7).
  • Walk a larger square (task 3).
  • Ask the horse to wait longer when he is parked (task 6).
  • Walk further away after asking the horse to ‘wait’ (task 6).
  • Start the exercise with a trot along the fence (task 1).
  • Ask for the second back-up (task 7) from further and further behind the horse.
  • Work at liberty or add halter and lead if you started at liberty.
  • Work on a slope if you have one handy.
  • Change the order of the tasks.


GROUND-TYING

INTRODUCTION

Having a horse stop and wait when his lead rope is dropped onto the ground is useful for management around home as well as out on the trail. It pops up occasionally as a challenge in Horse Agility competitions.

SAFETY

When first teaching this I prefer to use a wide webbing or leather halter. If the horse moves he may step on his rope and react by jerking his head up. With a wide halter there is less chance of spinal trauma. Alternately, we can attach the rope to the halter with a bit of wool that will break in such a situation.

I also suggest using a soft, thick rope not longer than 12 feet. If something causes the horse to move, it’s better if there isn’t a long, thin rope chasing him.

First we must of course make sure that the horse is totally relaxed with ropes dragging all around his body and legs. He must be cool with ropes moving in front of him, behind him and dragging alongside while attached to his halter.

PREREQUISITES

  • Rope relaxation and rope calmness in various situations. (See ‘Additional Resources’ 5, 6, and 7 at the end of this post.)
  • Able to stand still in relaxed mode while things are happening around him. (See ‘Additional Resources’ 8, 9 and 10 at the end of this post.)
  • Stop willingly to target his front feet to a mat. (See ‘Additional Resources’ 1 at the end of this post.)
  • Smooth ‘walk-on’ and ‘halt’ transitions staying beside the handler on a draped lead rope. (See ‘Additional Resources’ 2 at the end of this post.)
  • Willing response to a “Whoa” voice signal. (See ‘Additional Resources’ 3 at the end of this post.)
  • Smooth ‘back-up’ with the handler beside the horse or in front facing the horse. (See ‘Additional Resources’ 4 at the end of this post.)

ENVIRONMENT & MATERIALS

  • A work area where the horse is relaxed and confident.
  • Ideally, the horse can see his buddies, but they can’t interfere.
  • The horse is not hungry; he’s had ample time to graze or eat hay right before the training session.
  • Halter and lead kept loose (draped) as much as possible, because as much as possible, we want to use body language for communication, not rope pressure.
  • Two or more familiar mats.
  • A second rope.

AIM

When we drop the lead rope and give our horse a ‘wait’ hand signal, we would like him to stay parked in that spot until we return.

VIDEO CLIPS

#72 HorseGym with Boots: Ground-tie Clip 1 GETTING STARTED:


#73 HorseGym with Boots: Ground-tie Clip 2 ANOTHER VENUE:

NOTES

  1. Boots’ demonstration on the video clips is the sum of many short sessions over a long time. When teaching something new, we stay with each slice of the task over as many short sessions as necessary until it feels ho-hum (easy and smooth). Then we link in the next slice.
  2. Teach the whole process from the horse’s left side, then teach it again walking on his right side. Alternatively, teach each slice on both sides before adding in the next slice.

SLICES

  1. Walk on the horse’s left side with a loose lead toward a mat. Hold the horse’s lead rope in the hand nearest the horse. Carry a second rope in your other hand.
  • Halt with the horse at the mat using your halt voice signal and body language.
  • Drop your second rope on the ground under the horse’s nose.
  • Allow him to satisfy his curiosity about it (sniff it, put a foot on it, and so on); relax (click&treat.)
  • Keep a drape or ‘smile’ in your actual lead rope.

Pick up the dropped rope and walk together to another mat, or walk a large loop that returns you to the same mat.

Looking for: Horse halts with front feet on the mat and remains relaxed when the second rope is dropped and picked up again.

If you set up a circuit of several mats, you can move from mat to mat.

Remember to do something easy the horse already knows and build in ‘down time’ in between bursts of activity with this new task.

If you have a circuit of several mats, do the circuit once. Then do something else that’s easy and come back to the circuit again if it feels right to do more.

  1. As 1, but without using mats. Everything stays the same except that we have removed the prop of the mat or mats. It may help the horse at first if you walk the same circuit as you walked when you were using the mat(s). Halt and drop the second rope where the mats were during the previous lessons.

Once the horse seems to recognize the dropped rope as a place to stop and stand, gradually generalize to dropping the second rope in new places.

  1. As 2, but now drop the lead rope itself: relax as the horse halts; pause for a second or two, with neutral (no intent) body language. We want to begin building duration into the time the horse stands quietly after the lead rope is dropped. Be sure to click&treat well before the horse shows any tendency to move.

Looking for: Horse halts when you use body language and voice signal plus drop the lead rope and relax (click&treat). Horse relaxes too.

  1. It’s helpful if we can ground-tie the horse after we’ve asked him to back up. Ask the horse to back up and while he is backing drop the lead rope and at the same time use your halt voice signal, relax (click&treat) when the horse halts. Intersperse these requests with walking forward.

Looking for: Horse backs up on request and halts with the handler’s voice halt signal plus the dropped rope.

  1. Experiment to see what happens when:
  • Walking along you slow to a halt and gently drop the lead rope without using your voice signal as well.
  • If you have developed clear body language to communicate that you are going to stop, the horse will respond to just your body language and the dropped rope.
  • Relax (click&treat) at the first sign of a halt.

If the horse finds this difficult, leave it out for now and maybe return to it as part of your generalization when he knows the ground-tying task better.

Looking for: Horse brings himself to a halt when the handler halts and the rope is gently dropped in even in the absence of a voice signal.

  1. Bring back the mats and the second rope. Ask the horse to jog (or trot) with you and halt with you when you halt beside the mat. Use your voice signal plus drop the second lead rope from the jog. When it feels smooth, phase out the second rope and drop the horse’s lead rope.

Looking for: Horse willingly halts at the mat from jog/trot when the handler halts, gives the voice halt signal and drops the lead rope.

  1. Slices 1-6 above have the handler stopping with the horse. Now we want to generalize the skill so the horse stops when rope is dropped plus stays parked while handler keeps walking. Ask the horse to halt at a mat, drop the lead rope, and use your ‘wait’ signal to let the horse know you want him to remain parked while you walk away from him. For the ‘wait’ I use a gesture and voice signal at the same time.

For the early lessons with this generalization, it’s good to use a circuit of mats again, until you see that the horse understands the new nuances of the task consistently over several sessions.

Walk with a loose lead toward a mat. Halt with horse at the mat using:

  • Halt voice signal
  • Dropped lead rope
  • Give your voice and gesture ‘wait’ signals Then walk forward a few steps away from the horse.
  • Turn to face the horse and take up a neutral (no intent) body language position – place both hands flat over your belly button, drop your shoulders and have a soft focus not looking at the horse.
  • Wait a second or two, be sure to return before the horse even thinks about moving. Count the seconds. Start with one second and don’t wait longer until one second is completely okay with the horse.
  • If the horse moves, gently return to him, pick up the lead rope, walk together in a relaxed manner and start again. This is a re-set. Don’t make the horse feel wrong. He can’t be wrong because he doesn’t yet know what you want. Next time don’t go as far away and return to him sooner rather than waiting that extra moment.
  • Pick up the lead rope and walk on to the next mat to repeat, or walk a loop to return to the same mat.

Looking for: Horse halts at mat and remains there confidently while the handler walks on a few steps, turns, pauses, and walks back to the horse.

  1. Gradually walk a few more steps away from the horse and increase how long you wait before returning to the horse; relax (click&treat). Click&treat after you return to the horse.

If he loses confidence, immediately return to the distance and time he can cope with. Add distance and duration very slowly – one second and/or half a step at a time over many, many short sessions.

Looking for: Horse stays with the mat and the dropped rope until the handler returns.

  1. This slice asks the horse to halt at the mat while you keep on walking without stopping first. You drop the lead rope and use  your voice & gesture ‘stay’ signals but you don’t halt yourself – you keep on walking.

If the horse has been mainly watching your body language as his signal to halt, it could be hard for him at first until he realizes that,

  • the mat
  • dropped lead rope
  • voice signal

all mean he still should halt, even if you keep moving.

The Task: Walk toward a mat with a loose lead. When you reach the mat, simultaneously:

  • use your halt voice signal
  • drop the lead rope
  • give your ‘wait’ signal without stopping your feet when the horse stops
  • walk on a few steps.

Turn and face the horse, then:

  • wait a second or two
  • return to the horse
  • relax (click&treat).

Pick up the lead rope and walk on to the next mat.

Looking for: Horse stays halted on the mat while the handler walks on, halts, turns, pauses and walks back to the horse.

Play with this by gradually moving further away from the horse.

  1. Still using a mat, play with 9 above at the trot. Handler keeps jogging forward while the horse halts on the mat.
  2. Repeat 9 above without the mat, at walking pace.
  3. Repeat 9 above without the mat at jog or trot.
  4. Make sure the horse is comfortable when you leave from his left eye and from his right eye. Spend a bit more time with the harder side, if there is one.

Further Generalization

Generalize ground-tying to new venues and around new distractions, as long as it’s safe. Include mats initially if it helps the horse, then phase them out.

Additional Resources

  1. Blog: Using Mats: https://wp.me/p4VYHH-5S9
  2. Blog: Smooth ‘Walk On’ and ‘Halt’ Transitions: https://wp.me/p4VYHH-5TT
  3. Blog: Willing Response to a Voice Halt Signal: https://wp.me/p4VYHH-5R9
  4. Video Clip: #27 HorseGym with Boots: Good Backing = Good Leading: https://youtu.be/M6gxa2iriQ8
  5. Video Clip: #121 HorseGym with Boots; Stick and Rope Confidence: https://youtu.be/WIpsT4PPiXo
  6. Video Clip: #22 HorseGym with Boots; Rope Relaxation: https://youtu.be/6Y34VlUk0Iw
  7. Video Clip: #60 HorseGym with Boots; Rope Calmness: https://youtu.be/9WC_7d8M6lQ
  8. Video Clip: #22 HorseGym with Boots: The Art of Standing Still: https://youtu.be/F4Rn9kIc7FQ
  9. Video Clip: October 2017 Challenge: Park and Wait: https://youtu.be/UvjKr9_U0ys
  10. Video Clip: #22 HorseGym with Boots: Parking with Commotion: https://youtu.be/M6p5w8QZaIA


Target Chin to Hand: Begin Targeting of Body Parts

Targeting body parts is fun to do when we are short on time or it’s too hot, wet, cold, or muddy to be out and about, which is often the case in January.

I’ve started with targeting chin to hand, because it is probably the easiest one to establish the IDEA of targeting a body part to our hand. It gives us a simple task to practice good timing of the click, plus consistent treat-delivery that keeps or returns the horse’s head to facing forward.

PREREQUISITES:

  1. Horse confidently touches his nose to a variety of different targets held in a variety of positions. In other words, he seeks out the target.
  2. Horse confidently touches his nose to our outstretched fist in a variety of positions and with us standing beside him or in front of him.
  3. Handler has developed a clear ‘zero intent’ body language stance. (See Related Resources 1.)
  4. Horse understands the handler’s ‘zero intent’ position, by remaining calmly facing forward for several seconds, rather than turning toward the treat pouch or pocket when the handler stands beside the horse’s neck. There are training plans for these prerequisite skills in my book: “How to Begin Equine Clicker Training” (See the link to BOOKS at the top of the screen).

I have to presume that everyone is already familiar with the basics of clicker training, since the new shaping plans I share here build on those basics. If you are not familiar, the information in the book is a great place to start.

ENVIRONMENT:

  • Horse is not hungry, so he can focus on what we are teaching, rather than the treats.
  • Horse at liberty in an area he finds comfortable.
  • Ideally, herd mates in view but not able to interfere.

AIMS:

  • The horse willingly moves his chin to touch our hand held toward his chest from his chin.
  • The handler becomes more confident with slipping into and out of a ‘zero intent’ posture. (See Related Resources 1 at the end of this post.)

NOTES:

  1. Play with this in very short sessions. Stop when it feels good. Sessions can be before or between other things that you are doing.
  2. Have the short sessions as frequent as possible. Every day is good, twice a day is even better.
  3. Stick with one body part until you and horse are totally ho-hum with it.
  4. When you are ready to introduce a second body part, the PROCESS is exactly the same as the one outlined below for the chin.
  5. To introduce another body part, begin each session with the one(s) you have already taught, then suggest the new spot by touching it: click&treat, and progress through the same thin-sliced process.

VIDEO CLIP:

SLICES:

  1. Touch the flat palm of your hand to the horse’s chin; click&treat.
  2. Repeat several times so the horse can make the connection between the ‘touch’ and the click&treat.
  3. Hold your hand a tiny distance back from the chin (toward the horse’s chest) and wait for the horse to close the distance so he touches your hand: click the instant you feel the touch & treat plus celebrate largely (happy praise and a triple treat or jackpot).
  4. If you do slice 3 above, and the horse does not make the connection, resume with slice 2.
  5. Once the horse is making the connection over a tiny distance, gradually increase the distance one millimeter at a time.
  6. Early on in your teaching program, start each new session with a touch to the chin, to remind the horse about which task you are doing.
  7. Once the horse clearly understands the task, take up the ‘zero intent’ position between repeats, to build a bit of ‘wait duration’ between your requests. Build up the ‘wait time’ in one second increments.
  8. Some horses will develop a little signal to tell you when they have finished chewing and are ready for a repeat. (See Related Resource 6.) Watch out for these and value them by doing a repeat. Boots illustrates this in the video clip.

GENERALIZATION:

We can use how the chin (lower lip) feels to our touch to estimate the horse’s relaxation level. It’s easier to feel the chin (lower lip) tension than to see it when we are actively doing things with the horse.

While interacting with the horse, occasionally pause and feel his chin (lower lip). A soft, floppy lower lip suggests a horse relaxed about what is going on.

With increasing anxiety, the lip tightens, so it might be:

  • Very Loose
  • Moderately loose
  • A little bit tight
  • Quite tight
  • Very hard indeed.

Likewise, as anxiety reduces and relaxation returns, a tight lip will loosen up.

Add Pics of chin

A very relaxed, loose chin/lower lip.

A tighter chin/lower lip. When with the horse, it is easier to feel the difference than to see it.

RELATED RESOURCES:

  1. Blog: ‘Zero Intent’ and ‘Intent’: https://wp.me/p4VYHH-5RO
  2. Blog: Target Shoulder to Hand: https://wp.me/p4VYHH-5SH
  3. Blog: Target Hindquarters to our Hand: https://wp.me/p4VYHH-5Tk
  4. Blog: Target Flexions: https://wp.me/p4VYHH-5Ty
  5. Blog: Seeking the Horse’s Consent Signals: https://wp.me/p4VYHH-5RV


RAINY DAY and STALL REST ACTIVITIES

INTRODUCTION:

These activities are all based on equine clicker training. Please see my book, How to Begin Equine Clicker Training: Improve Horse-Human Communication if you would like to investigate clicker training with horses. Details of my books are on the ‘BOOKS’ page link above. The books are all available via Amazon.com. Topics in the books contain free links to relevant YouTube video clips.

I keep the clips short – most are under five minutes. Each relates to a specific skill. Keeping them short makes them easier to find and review.

Each of the activities listed below has one or more accompanying video clips. Depending on the reason a horse is on stall rest, some  tasks may be a more useful than others.

  1. Nose to Target

This is fully discussed and explained in the book mentioned above. It is usually one of the first tasks when we introduce clicker training with horses.

Once the horse understands that touching his nose to a target held out by the handler earns him a click&treat, and he has a strong history of reinforcement for the task, we can use it to gradually develop flexion.

This clip shows a way to introduce the ‘nose to target’ task with the handler in protected contact (i.e. on the other side of a barrier). It’s good to use protected contact until we know how the horse responds to food being part of the training process. https://youtu.be/Rat3P1pGKjU

  1. Head Lowering (and Head Up)

This illustrates the process of free-shaping a behavior. Free-shaping means that we wait for the horse to do something it naturally does (e.g. lower the head) and ‘mark’ that behavior with a click&treat. It’s important to accurately ‘mark’ and treat each little approximation toward the final behavior we want, so timing of the click and smooth treat delivery are necessary. It’s helpful to work on these away from the horse by asking another person to stand in for the horse.

Clip One: https://youtu.be/AoqtJj2X1bU

Clip Two: https://youtu.be/Ol-BHB1QCnw

Clip Three: https://youtu.be/CYhgwlmrfps

  1. Okay to Repeat Signals and Grooming with ‘Okay to Repeat’ Signals

This post contains the background and video clip links.  https://wp.me/p4VYHH-5RV

  1. “Intent and Zero Intent”

This post contains the background and video clip links. https://wp.me/p4VYHH-5RO

  1. Target Feet to Mat and Duration on the Mat

This post with clips introduces the idea of mats. https://wp.me/p4VYHH-5S9

  1. Target Flexions

This post contains the background and video clip. https://wp.me/p4VYHH-5Ty

  1. Target Chin to Hand

Clip: https://youtu.be/Fsigp8wB0LU

  1. Target Shoulder to Hand

This post contains the background and video clip. https://wp.me/p4VYHH-5SH

  1. Targeting Body Parts Overview

This clip shows an overview. Each body part would be taught separately following the outline for targeting chin or shoulder to our hand, as in items 7 and 8 above. https://youtu.be/tFGvmRRYdHQ

  1. Bell Ringing

Clip: a thin-slicing technique to teach bell ringing: https://youtu.be/wBdJMgtHU6A

Clip: bell and horn playing: https://youtu.be/pHvgJxJsmc4

  1. Picking Things Up

This clip looks at a first lesson: https://youtu.be/EDGRpM2yLBo

This clip is with a horse a bit further into the process. https://youtu.be/FCQrlMc01RE

This clip shows the skill generalized to picking up and carrying a feed bucket. https://youtu.be/zRM8kO992EY

The two clips below demonstrate the final slices of our process for learning to retrieve a cap tossed away.

Clip 1: https://youtu.be/bvRkCk___3M

Clip 2: https://youtu.be/hMIB5mlx65E

  1. Willing Haltering

Clip showing ‘halter prep’ using a hoop.  https://youtu.be/WKeLxfpBFAo

This post contains the background and video clip. https://wp.me/p4VYHH-5Sw

  1. Relaxation with Body Extensions

Clip: https://youtu.be/nkwxYwtCP_Y

Clip: Stick and Rope Confidence: https://youtu.be/WIpsT4PPiXo

  1. Balance on Three Legs

Clip: https://youtu.be/x1WKppV3N_0

  1. Clean all Feet from One Side

Clip: https://youtu.be/UMyApCj9wBQ

  1. Hoof Stand Confidence

Clip: https://youtu.be/khsEm1YBtLs

  1. Head Rocking

Clip: https://youtu.be/-2VjmbfkfS4

  1. One Step at a Time

Clip: https://youtu.be/wStHxqNs7nk

  1. Soft Response to Rope Pressure

This post contains the background and video clips. https://wp.me/p4VYHH-5Sq

  1. In-Hand Back-Up

Clip: https://youtu.be/6YYwoGgd_0Y

  1. Step Aerobics

This post contains the background and video clip. https://wp.me/p4VYHH-5Sf

  1. Foot Awareness (Proprioception)

Some of the little tasks in this clip can be done in a restricted space. https://youtu.be/7bEkFk0w_gk

  1. Counting

This clip looks at the beginning of teaching ‘counting’: https://youtu.be/2os0DTE2SoE

  1. Kill the Tiger

This clip shows the final task. It was thin-sliced to first teach it. Be aware that some horses might generalize this bit of fun to pulling off their saddle pads unless you put it on cue or ‘on signal’. https://youtu.be/M8vzn1JsR_k

  1. Bursting Balloons

This clip shows Smoky after a few sessions when he is just beginning to get the hang of it. https://youtu.be/Md7ui1DejaI

  1. Target Hindquarters to our Hand

https://wp.me/p4VYHH-5Tk


Targeting Hindquarters to our Hand

INTRODUCTION:

Once the horse understands targeting his shoulder to our hand, we might like to teach targeting his hindquarters to our hand. If we can ask for ‘shoulder to hand’ and ‘hip to hand’ we have a way of asking the horse to bring his whole body toward us.

It’s a useful maneuver when we would like him to line up at a mounting block, fence or bank and he’s not quite close enough. It is also a gymnastic exercise and one that encourages handlers to develop their timing plus clear, consistent body language.

PREREQUISITES:

  • Horse and handler are clicker savvy.
  • Horse is comfortable standing ‘parked’ with the handler standing alongside facing behind the horse.
  • Handler has developed his/her ‘zero intent’ and ‘intent’ body language. To review, see the clip or blog link at the end of this post.
  • Signals for moving the hip away from the handler are well established. There are various ways to teaching this. A clip demonstrating one way is also added at the end of this post.

ENVIRONMENT & MATERIALS:

  • A work area where the horse is relaxed and confident.
  • Ideally, the horse can see his buddies, but they can’t interfere.
  • The horse is not hungry.
  • A safe, enclosed area for working at liberty, if possible. Otherwise, halter and lead (kept loose or the rope safely draped over the horse’s neck).
  • A hand-held target on a long stick, a mid-length target and a short target.
  • For generalizations, pedestal, mounting block or similar, hoop.

My current collection of targets. In the video below, I used the three on the right-hand side of the photo. The others come in handy in various contexts.

AIM:

Horse confidently moves his hindquarters toward the handler’s ‘outstretched hand’ signal.

Video Clip: #164 HorseGym with Boots: TARGET HIPS TO HAND  https://youtu.be/aYlILbkwsBA


Note: When we request the horse to yield his hip away from us, we project energy toward the horse’s hindquarters from our body’s core at the belly-button, which causes our posture to be upright.

When we request the horse to move toward us, it’s important to pull our belly-button back so that we shrink back and create a ‘draw toward me’ energy with our whole body.

Horses are so sensitive to advancing and receding energy from another body, that they easily read the intent of our posture as long as we are consistent and not sloppy.

SLICES:

Stay with each slice until it feels ho-hum and smooth for both of you.

Make each session extremely short, a few minutes. The magic is not in the final result as much as it is in the process of helping the horse figure it out.

  1. Choose a spot where you can easily stand the horse alongside a safe fence, wall, or similar with the barrier on the horse’s far side. The barrier discourages the option of moving the hindquarters away, which is something you have hopefully taught previously.
  2. Ask the horse to stand squarely beside the fence; click&treat.
  3. Take up a ‘zero intent’ position standing beside the horse’s neck, facing behind the horse, holding the target down by your side ‘out of play’ and relax; click&treat. Work up to standing together quietly like this for three or four seconds before the click&treat, on either side of the horse. Have the space between you and the horse’s neck at a distance comfortable for both of you. Close is usually safer than standing away, but it depends.
  4. Stretch your arm to gently touch the long-handled target to the side of the horse’s hindquarters. Click just as the target makes contact; deliver the treat.
  5. Move the target down behind your leg to take it ‘out of play’ and resume the ‘zero intent’ body position. Observe to see if the horse is okay for you to carry on. If he continues to stand in a relaxed manner, he is probably okay to carry on, or you may have sorted out one or more ‘okay to proceed’ signals. A link to information about these is at the end of this post.
  6. Repeat 4 and 5 above, watching for any weight shift the horse might make toward the target as you move it toward his hindquarters. If he does, celebrate hugely with happy words and a jackpot or triple treat. Maybe ask for one or two repeats, then wait until your next session to do more.
  7. When you feel the time is right, hold the target a tiny distance away from touching the hindquarters and WAIT for the horse to shift his weight to make the contact; click&treat. Some horses may step over to make the contact right away. For either a weight shift or a whole step toward the target, celebrate hugely again. Maybe repeat the request once or twice more to consolidate the idea. If you have waited 3-4 seconds and nothing happens, simply return to slices 4, 5, 6 above.
  8. It took Boots a good number of daily mini-sessions before she a) consistently leaned toward the target and  b) consistently moved a tiny distance toward the target to make the contact. Then it took more days before she confidently stepped toward the target when I held it further away.
  9. Decide whether you want to continue teaching on the side you started with, or if you want to teach slices 1-7 on the other side of the horse before proceeding.
  10. When 7 is ho-hum, gradually hold your target a little bit further away so the horse must take a full step to contact the target; click&treat.
  11. Whenever the response seems slow or unsure (or is missing), go back to touch the target to the hindquarters; click&treat. Then work forward again at a rate that keeps the horse being continually successful as much as possible.
  12. This willingness to back up in the teaching is sometimes hard, but we always must go where the horse tell us he is, not where we want him to be.
  13. When starting a new session, always introduce the task with a touch of the target (and eventually your hand) to the hindquarters; click&treat, to let the horse know which game you are playing.
  14. Work to having the response equally smooth on either side of the horse.
  15. You may want to introduce a voice signal to go along with your body language and orientation signals.
  16. When all is smooth using your long-handled hand-held target, repeat the slices using a shorter target. The one I use in the clip is a soft plastic toy sword.
  17. When all is smooth with the mid-length target, reach out with an even shorter target. You may have to move from beside his neck to beside his shoulder or ribs, depending on the size of the horse.
  18. When 16 and 17 are smooth on either side of the horse, ask for the hindquarters over using just your arm lifted up in the same way you did when holding a target. Most horses will respond readily to the arm movement. I personally hold my hand open with my palm facing the horse. Handler body position is upright. By pulling back our belly-button area we create a ‘draw toward me’ energy.

When we ask for hindquarters to yield away, we send energy toward the horse and look down and gesture toward his hocks, so it is a very different body orientation and energy. Plus, we may have added distinct and different voice signals for each one.

It’s good to frequently practice ‘hip away’ and ‘hip toward’ as a little sequence to make sure our signals stay true and the horse easily responds to either one without confusion.

Left photo: ‘hip toward me’ signal and body language. Right photo: ‘hip away please’ signal and body language.

GENERALIZATIONS:

Clip: #165 HorseGym with Boots TARGET BUTT TO HAND:


Generalizations:

  1. Stand the horse so his shoulder is near a mounting block, but his hindquarters are angled away. Ask him to bring his butt (hip) toward your hand. If he gets confused, return to using your long, medium and short targets, fading out each one as his confidence returns, until your outstretched arm and hand are sufficient.
  2. Generalize the ‘bring your hip over’ skill to different venues and different mounting situations, e.g. fences, gates, stumps, banks – especially if you ride out in wider and varied environments. Before my hips gave up riding, I would often have been totally grounded after dismounting if Boots wasn’t 100% confident about lining up quietly alongside a gate or any other raised surface in the vicinity.
  3. If you have a pedestal on which the horse puts his front feet, you can ask him to bring his hindquarters toward you in a circle while his front feet stay on the pedestal.
  4. Alternately, if you have a soft rubber tub, ask the horse to put his front feet into the tub and repeat 3 above.
  5. To increase the expertise required (by horse and handler) ask the horse to place his front feet into a hoop and keep them in the hoop while moving his butt to target the handler’s arm (or a target) moving in a circular pattern, both clockwise and anti-clockwise. Start with one step and a high rate of reinforcement.
  6. Be careful not to ask too much at first. A frequent minute or two of exercises such as these is enough to have a worthwhile gymnastic effect.
  7. Whenever you do ‘hip toward me’, balance it with ‘hip away please’.

BACKGROUND CLIPS FOR QUICK REVIEW:

Clip: #153 HorseGym with Boots: ZERO INTENT AND INTENT

https://youtu.be/3ATsdPvld4Q

Clip: May 2018 Challenge: YIELD HINDQUARTERS: https://youtu.be/AkjIT8Tjxw0

Clip: #154 HorseGym with Boots: OKAY TO REPEAT SIGNALS

https://youtu.be/W3-Pw6d-Gic

BLOG LINKS FOR MORE DETAILED REVIEW:

Blog: No Intent and Intent

https://herthamuddyhorse.com/2018/11/30/dec-2018-challenge-no-intent-and-intent/

Blog: Seeking the Horse’s Consent Signals.

https://herthamuddyhorse.com/2018/12/22/seeking-the-horses-consent-signals/)


Step Aerobics


INTRODUCTION:

This exercise developed from something my horse offered when I was in the tack room where there is a wooden platform in front of the door. While I was in the tack room getting organized, Boots would step up onto the wooden platform to see what I was doing.

I recognized the beneficial gymnastic effect when I asked her to back off the platform and step up again in a rhythmic pattern. It became one of her favorite things to do. Interestingly, she never seems to have enough of it, and I have to be the one to suggest that we should do something else.

This Step Aerobics task has become our go-too exercise when time is limited but we want a bit of a warm-up before cleaning her feet or doing other tasks. When it’s too wet or hot or windy for much else, it’s a fun way to build some movement into our time together.

Step Aerobics, just like the human version, is an exercise that requires whole-body movement and flexion of all the joints, so it is an ideal task to do often in short bursts.

Items with an asterisk (*) are training plans covered in detail in my book, Precision Horse Training with Positive Reinforcement: 12 Thin-Sliced Groundwork Plans, available as e-book or paperback via Amazon.

PREREQUISITES:

  • Horse and handler are clicker savvy.
  • Horse has a strong history of positive reinforcement for placing his front feet on a mat, so he is keen to stand on a mat whenever we put one out. #124 HorseGym with Boots: Free-Shaping Mat Targets* illustrates: https://youtu.be/xMaZWt5gK2o
  • Handler has developed his/her ‘zero intent’ and ‘intent’ body language. #153 HorseGym with Boots: Zero Intent and Intent* illustrates: https://youtu.be/3ATsdPvld4Q
  • The ‘Finesse Back-Up’ exercise is ideal to teach a reliable back-up while we are facing the horse. The description and two clips below show how we evolved it.
  1. Working across a barrier, using a hand-held target for stepping forward, and using body language, breathing, intent and voice signals for backing up.
  2. Adding a halter and rope signal to the back-up so we can use it anywhere. Once the horse knows the task, the rope pressure signal usually isn’t needed because the horse responds to the breathing, body language, voice and distinct orientation signals.
  3. Once voice, body language, intent and orientation signals are well established, we have a reliable back up at liberty while we are facing the horse.
  4. To the signals in 3 above, we add a clear ‘raised fingers’ gesture signal to the back-up while we are facing the horse, allowing us to communicate clearly from further away.

Back-Up Part 1*:  https://youtu.be/6YYwoGgd_0Y

Back-Up Part 2*:  https://youtu.be/safxxu90lkA

  • The other part of Step Aerobics is a recall signal. Teaching and consolidating a recall signal are outlined in these video clips.

Recall Clip 1: https://youtu.be/XuBo07q8g24

Recall Clip 2: https://youtu.be/5BQCB2Fe5RE

My ‘recall’ gesture signal in this context is a movement where I shrink backwards and drop my energy and make a circle with my arms.

ENVIRONMENT & MATERIALS:

  • A work area where the horse is relaxed and confident.
  • Ideally, the horse can see his buddies, but they can’t interfere.
  • The horse is not hungry.
  • Halter and lead (as minimal pressure as possible on the lead, but enough to be effective) and a safe, enclosed area for working at liberty.
  • Materials to build a simple lane (one side can be a safe fence) and to block off one end of it.
  • Different mats familiar to the horse.
  • A pedestal or a step-up situation safe for the horse. A step-up trailer is an option, or setting up the trailer ramp as a step.

AIM:

Boots has taken herself to stand on a tire-pedestal while I organize the camera.

Horse steps up onto a pedestal (or step), then steps backwards down again, in a rhythmic pattern repeated several times.

SLICES:

A simple lane made with two rails, blocked off at one end with two tall cones, and a mat in the lane, demonstrating Slice 4 of the training plan.

Video Clip: #159 HorseGym with Boots: STEP AEROBICS

  1. Set up a simple lane. My lane in the video is two ground rails. You may want to begin with a higher-sided lane to make the behavior option we want as clear as possible for the horse. One side can be a safe fence.
  2. Ensure that the horse can walk right through the lane confidently; click&treat each time he calmly passes right through the lane. Handler walks on the outside of the lane. Walk a loop with the horse to repeat.
  3. Set a target mat near the end of the lane. Walk the horse into the lane and ask him to halt with his feet on the mat; click&treat. Walk him out of the lane forward, making a circuit to repeat targeting the mat.
  4. When 3 is done reliably with confidence, block off the lane at the end nearest the mat. Ask the horse to walk into the lane and target the mat; click&treat. Position yourself facing the horse, a bit to one side.
  5. Review the ‘Finesse Back-Up procedure as outline in the prerequisites. Click&treat for one or two steps back on request.
  6. When you no longer need to run your hand up the rope because the horse responds to your body language, inward breath, intent, and voice signals, begin holding your hands up higher until eventually your gesture signal morphs into your fingers held up beside your ears waggling to suggest backward movement; click&treat and celebrate hugely when he does (triple treat or jackpot or special treat). Keep a non-influencing loop in the rope or lay the rope over the horse’s neck out of the way.
  7. We want the raised fingers to become a main ‘back up please’ gesture. But at this point we still emphasize our inward breath, posture expressing intent and voice along with the gesture.
  8. If the horse comes forward to target the mat again right away, accept this with a click&treat the first time, but ideally, we want him to wait to be asked to move forward. You may, at first, need to invite him forward again very quickly after delivering the treat for backing up. If you have taught him a ‘wait’ signal, you can use it here. The October 2017 Challenge: Park and Wait* illustrates creating duration with the ‘wait’;
  9. Use your recall signal to ask the horse to come forward onto the mat again; click&treat. My recall signal as shown in the clips is a movement where I shrink backwards and drop my energy and make a circle with my arms. I learned it from Sharon Wilsie’s book, HorseSpeak.
  10. Alternate the back-up (click&treat) with the recall (click&treat). The aim is to smoothly get a series of these one after the other.
  11. Eventually, when 10 is really solid, you can ask for a back-up and a recall before the click&treat. Or ask for a recall followed by a back-up before the click&treat, moving toward the horse to deliver the treat.
  12. Once 10 is smooth, practice with a barrier on only one side of the horse.
  13. When 12 is smooth, practice with no barriers.
  14. When 13 is smooth, practice with a variety of mats and in a variety of different places.
  15. When 14 is smooth, introduce a pedestal or step. If the ‘step up’ idea is new to your horse, it can be helpful if you place a familiar mat on the pedestal the first time you ask.
  16. For some horses, it may help to begin with a relatively low ‘step up’ situation, such as a plank or thick board before asking for a higher step.
  17. At first be careful about asking for too many repeats. For some horses it will be an unaccustomed way of using their joints. Three repeats at one time is plenty to start with. Doing a little bit often is ideal. Once you are doing it at liberty the horse will probably let you know if he’s done enough.

GENERALIZATIONS:

We can use the back or sides of a trailer ramps as our ‘step’. I have used a solid piece of timber under the end of the ramp to create a step-up situation.

  • If you’re able to move your pedestal, move it to different locations. I have three ‘tire-pedestals’ set up in different parts of our training areas.
  • A step-up trailer is another option.
  • If you have a trailer with a ramp, and there are no jagged bits on the sides of the ramp, use the sides of the ramp as a ‘step-up’ spot.
  • If you ride or walk with your horse out in the countryside, look for spots that create a natural safe step. I’ve used our concrete front door step in the past.
  • Some people fill different-sized tires giving different heights for a step or build a series of pedestals.
  • If your pedestal is large enough, or you have a spot like the one in the photo below, ask the whole horse to step up and step down again.

I’ve asked Boots to step up with all four feet, then step back down again. The wooden lip and uneven ground make it more challenging.

I look forward to hearing and seeing  how you get on if you take up this challenge.

Using Mats: Parking or ‘Stationing’ and Much More

INTRODUCTION:

An easy way to teach parking with duration is to use mats as foot targets. Mats can be anything safe for the horse to put his feet on. My horses were especially fond of a small piece of foam mattress.

The series of video clips in this post begin with introducing a horse to mats, and go on to explore building duration on the mat and using mats as destinations.

PREREQUISITES:

  • Horse understands the basics of clicker work.
  • Handler can consistently time the click/marker sound to the desired action.

ENVIRONMENT & MATERIALS:

  • A work area where the horse is relaxed and confident.
  • Horse is not hungry.
  • Ideally, the horse can see his buddies, but they can’t interfere.
  • Halter and lead (with no pressure on lead) if you don’t have a space where the horse can be at liberty.
  • One mat to begin with, then a variety of different mats.

AIMS:

  • To encourage the horse to explore an object and make up his own mind that it is harmless.
  • To encourage the horse to see a mat as a desirable spot because standing on it always results in a click&treat.
  • To build duration stayed relaxed standing on a mat.

SLICES:

  1. Lay out a mat well away from the horse while the horse is watching.
  2. Stand back and observe the horse’s responses.
  3. Click & walk to the horse to deliver the treat if:   a) he looks at the mat.   b) he steps toward the mat.   c) he sniffs the mat.   d) he touches the mat with a foot.   e) he paws at the mat, click the moment he stops pawing OR at the moment he first touches the mat, them ask him to move forward or back from the mat to avoid pawing becoming part of what he things he has to do. (See the first video clip below.)
  4. Once he has put a foot on the mat, move the horse or pick up the mat and toss it away, and go back to observing, repeating 3 above.
  5. If the horse shows little interest in the mat, put a treat he really likes on it and show him it is there.
  6. If you are working alone, it may be easier to have two mats and as he eats the treat on one mat, you can be putting another treat on the other mat.
  7. #6 HorseGym with Boots below demonstrates introducing the mat target after a quick revision about nose targets.

Video Clips

Once the horse confidently heads over to put his feet on a mat as soon as we set one out, we can begin to build duration staying on the mat. #8 HorseGym with Boots looks at building duration.

Once the horse loves going to mats due to a strong history of reward reinforcement, we can use mats as parking spots for things like waiting tied up, grooming, foot care, vet care.

I’ve found that carpet stores are happy to give away their old carpet sample books. They are amused when I tell them what I want them for.

#14 HorseGym with Boots is the very first introduction of a young horse to the idea of stepping on something and it was also new for the young handler. 

The following videos look at generalizing mats to a variety of situations.

#9 HorseGym with Boots looks at putting mats ‘on cue’ or ‘on signal’.


#10 HorseGym with Boots looks at mats in different places and using different kinds of mats.


#11 HorseGym with Boots looks at more generalization with a ‘Mat-a-thon’.


#15 HorseGym with Boots looks at the horse staying parked at a distance.


#18 HorseGym with Boots looks at the horse staying parked while the handler goes out of sight.


Related Resources:

Smooth ‘Walk On’ and ‘Halt’ Signals:  https://wp.me/p4VYHH-5TT