Q1 MUDDYHORSE STUDIO
Good analysis of tasks leads to better Training Plans.
Gate Safety: Spot the Prerequisites
What are the individual tasks that make up this little behavior chain?

Gate Safety: Spot the Prerequisites
What are the individual tasks that make up this little behavior chain?
It’s natural to want to ‘practice’ to get better. It’s especially challenging when it’s the handler that needs/wants the practice in order to improve:
The temptation is to get the horse to ‘do it again’ so we can practice. However, if a horse had carried out a complex task to a good standard, does it make sense to him to have to do it again right away?
Probably not. He may instead think that he didn’t get it right the first time. He may try a different variation in good faith and become confused if it does not result in a click&treat.
We acquire a complex task by teaching it via thin-slicing. The ACQUISITION STAGE is finished when our signals are relatively consistent, and the horse’s response is accurate about 90% of the time. Then we enter the STAGE OF BUILDING FLUIDITY with the task. (There is a link at the end of this post about ‘The Four Stages of Learning’.)
Gaining fluidity, with new thought processes or with new movements, means building up nerve connections. The only way to build up nerve connections is to apply our full attention to repeating the learning process.
Once we have a general idea about what we are learning, we focus our attention on the detail by reviewing the new skills often enough to put them into our long-term mental memory and our muscle memory.
This involves repetition. How we do the repetition can vary.
Not recommended – DRILLING:
Drilling involves repeating something over and over. Good point: it will become habitual. Bad point: it can kill enthusiasm for both that task and learning anything else by drilling.
For example, horses who are routinely made to move endless circles in a round pen, or constantly repeat dressage movements, often form an aversion to going into a round pen or arena.
Recommended – CHERISHING EACH MINI-OBJECTIVE:
To put a behavior into the horse’s long- term memory and have it ‘on signal’ or ‘on cue’ seems to be best done with 1-3 repeats each session over the number of days, weeks, or months that it might take, depending on the complexity of the final objective.
If the horse does a behavior to a pleasing standard the first time we ask, it is often a good idea to wait until the next session or later in the same session before asking for it again.
Helpful – Visualizing:
There is evidence (human studies) to suggest that if we focus on clearly visualizing the muscular movements needed to achieve an outcome, the brain views this as almost as good as actually doing it.
We can’t know whether horses visualize things, but my experience with teaching horses in mini-sessions (1-3 repeats) suggests that they do seem to ‘mull over’ new learning and bring a brighter response the next time we do it.
This is especially noticeable if we can have a short repeat most days. Once the horse shows a good knowledge of a task, a break of 2-3 days between requests often brings even more keenness to have ‘another go’ to earn a special high-value treat.
My horse, Boots, has a distinct little smug expression when she nails something especially well, earning approbation, applause, and a triple treat, jackpot, or special treat like a peppermint.
Helpful – SIMULATION:
To improve our expertise with the task, we can ask another person to stand in for our horse so we can practice developing clear signals and build up our mental and muscle memory for our part of the equation. The horse can only be as smooth in his responses as we are smooth and clear (fluid) with our signals.
If we are lucky enough to have an older, more experienced horse available, we can practice with him so we can be more coherent for a young or new horse.
To have a way of steadily improving the fluidity of challenging tasks, I decide on what mini-objectives I want to play with today, before we begin a session.
I pocket the exact number of higher-value treats to cover those objectives; usually one peppermint for a spot-on effort. In addition, I have unshelled peanuts or carrot strips for good attempts. This stops me from being tempted to ‘do it again’ once we have a peppermint-worthy response.
I also carry (horse pellets) for getting organized with resets and for when we do more relaxing things between the main mini-objective for that day.
In a way, it’s an example of getting more by doing less.
The video clip below shows three examples. They are either fun tricks to keep us amused, moving and supple, or they are Horse Agility tasks that are getting rather tricky because we have reached the higher-level ‘walk only’ class. Instead of increasing task difficulty with trot or canter, the tasks get more convoluted.
I’ve chosen relatively complex tasks. To reach the point shown in the video, the prerequisites for each task were taught with thin-slicing over a long time.
Example One
One peppermint for a 180-degree turn and back through a gate. Previously she learned a 360-degree turn by following the feel of a rope, then learned hand and voice signals and willingly did it at liberty during a recall. Some people teach this using a target. Boots also has had lots of practice backing up when I stand behind her, including months of long-reining training.
Example Two
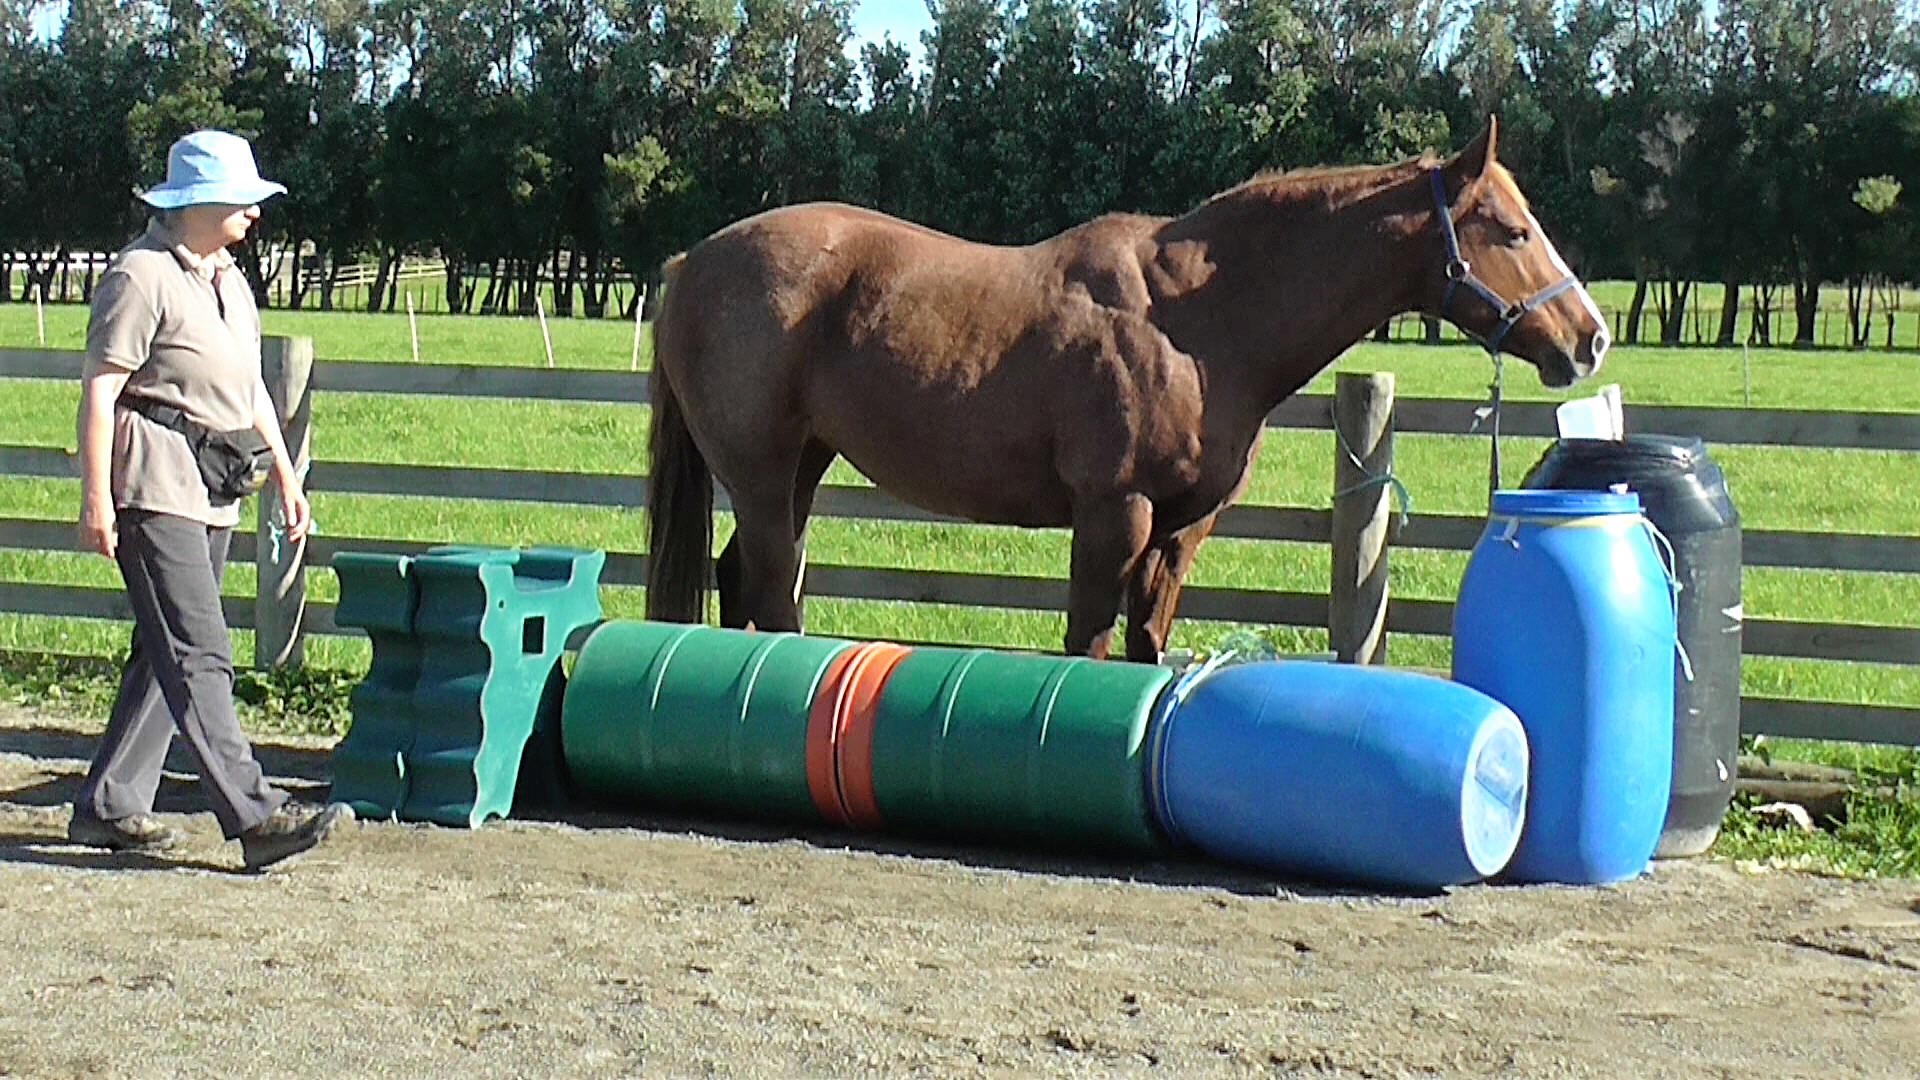
A jackpot of five rapid treats for backing 8 steps in a straight line to end up in a 2.5-foot space between a barrel and me on a mounting block or between two barrels. In one session I did this once in each direction, so she could earn two peppermints. She knows ‘park and wait’ thoroughly, as well as backing up with me behind her. She also has a strong history of backing out of narrow dead-end lanes as part of trailer loading preparation, which is how we started training this task. I simply added the barrel on one side and me on a mounting block on the other side.
Example Three
Boots earns an unshelled peanut for our line-dancing move while I’m on the right side of the horse and another while I’m on her left side. We’ve been doing this for only a few months. She already understood yielding the shoulder to touch or gesture as well as targeting her shoulder to my hand before we started. She had also learned to target her knee to my hand, so I had to be careful about developing a distinctly different hand signal. For a long time, I asked for only one repeat before the click&treat. We are now gradually building in more repeats before the click&treat.
Video Clip:
#163 HorseGym with Boots: Gaining Fluidity without Drilling.
In Addition:
If our first attempt at a task is a bit sketchy, we do a quiet reset and try again, looking for improvement, click&treat for the improvement and usually we don’t repeat it again until later in the session or next day.
Instead, we go on to one of the other things we are working on, or just do activities that are well-established.
It seems that after a few weeks of repeating a complex task once daily, the horse often begins to look forward to doing it, knowing that a higher-value treat follows.
Cherishing each mini-objective set for the day’s session and rewarding it with a higher-value treat keeps alive the fresh desire to do it again tomorrow.
Extra:
If you are really keen, you can watch the whole filmed video series from which I took example two in the clip above, showing Boots backing eight steps to end up between a barrel and me on a mounting block. This is what we did for the first 30 days. During days 31-38 we practiced Boots backing up to stand between two barrels when I stood in front, facing her.
I filmed each of the first 30 training sessions. Over 38 days we trained an average of 5 minute on this task per day, so the total training time was 3 hours, 10 minutes.
She already knew about backing up when I stood behind her, so we were adding more detail to the task. She had to learn to stay straight and to target her withers to my hand.
The clips clearly show how we were both learning stuff each day. I was learning how to be clearer in my teaching and she was figuring out exactly what she had to do to earn the click&treat. Before and after each short session we did other things.
This is the first clip in the series. They all follow in a playlist called Backing Up to a Mounting Block. Each clip is quite short.
The Four Stages of Learning: https://wp.me/p4VYHH-5SO

In the photo above Boots is leaning her weight toward me to connect with my hand which I held a small distance away from her shoulder.
Teaching the horse a signal to target his shoulder to our hand fits in nicely after we have taught him a signal to yield his shoulder away from us.
Horse confidently moves his left or right shoulder toward the handler’s ‘outstretched hand’ gesture signal.
Note:
When we request the shoulder to yield away, we project energy at the horse’s shoulder from our body’s core at the belly-button which causes our posture to be upright.
When we request the shoulder to move toward us, it is important to pull our belly-button back so that we create a ‘draw toward me’ energy with our whole body. Horses are so sensitive to advancing and receding energy from another body, that they easily read the intent of our posture as long as we are totally consistent and not sloppy.
Stay with each slice until it feels ho-hum and smooth for both of you.
Make each session extremely short, 2-3 minutes. The magic is not in the final result as much as it is in the process of helping the horse figure it out.
ZERO or ‘NO’ INTENT POSITION

Acquisition includes getting our head around how we will ask for a unique behavior and then explaining what we want to the horse.
The way we first present new material to the horse is crucial. As much as possible, we want the horse to be continuously successful.
It’s helpful to practice our ideas and techniques first on a person standing in for the horse. If you are lucky enough to have an experienced horse, it also helps to work out techniques with him before moving on to a novice horse.
Even a well-educated, experienced horse appreciates learning new things in small slices. This allows him to build confidence and expertise with each step toward being able to carry out the whole task smoothly with one click&treat at the end.
We always begin with low-key experimentation to see what the horse can already offer. We may find that some of the basic elements in our Individual Education Program are missing or not quite good enough. We might find some major training holes that need to be addressed.
For example, before we can teach our horse to weave a series of objects, have we taught him to confidently walk with us on a loose lead rope? Does he easily stay beside us, stepping off when we step off, halting when we halt and turning when we turn?
Gentle experimentation may also lead us to discover that the horse already has a solid foundation on which we can easily build a new task.

How we first present the halter to a horse and the way we handle the rope will have a huge influence on how confident the horse will be about joining in with activities that include the halter and lead.
Once we have created an Individual Education Program and carefully taken the horse through it, we have acquired the ability to carry out a specific behavior together.
If the task is part of daily general care and recreation, such as safety around gates, the horse will have ample opportunity to use the new behavior often and receive reinforcement for it. His response to the signal will become more fluent as long as the handler’s signals are consistent.
If, on the other hand, the new behavior is for a specific purpose, such as loading onto a trailer or trotting through a tunnel for Horse Agility, we have to set up special training opportunities to allow the horse to become fluent.
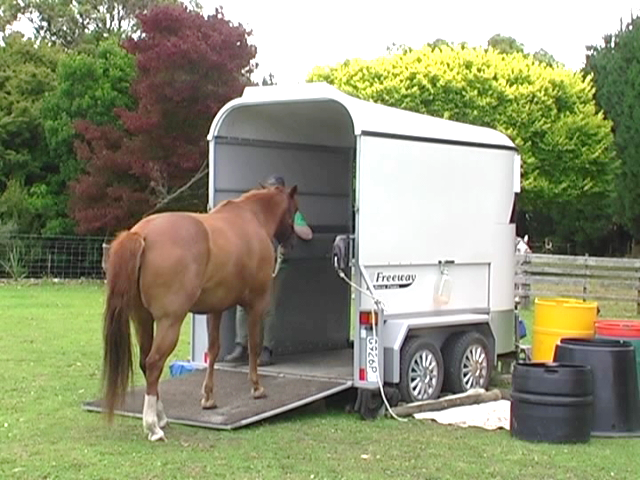
Thin-slicing the many skills required for trailer-loading leads to fluency. Here we are using a trailer simulation to build duration while standing in a closed-off spot.
In my experience, if we train a new behavior to the point of fluency, the horse tends to remember it forever.
If a behavior is unreliable, it was not originally taught to the point of fluency and was not adequately generalized or maintained.
Once the horse understands a new task or a new skill, it is important to take it out into the world. Through generalization, the horse gains further fluency with a task.
Generalization includes:
Generalization helps the horse put the new learning into his long-term memory. Each time we quietly repeat the task, we help build the horse’s confidence. If the horse is unable to do the task in a specific situation or context, it gives us vital information about where we are in our Education Program* with this horse for this task.

Once the horse confidently jumps simple obstacles, we generalize the skill to different-looking obstacles and obstacles in different venues.
As already mentioned under Fluency, some behaviors become and remain fluent because we use them a lot, for example, putting on and taking off a halter or cleaning out the feet every day.
Other behaviors are specialized, and we have to create a plan to refresh and use them occasionally so that they stay in our repertoire. Vet procedures usually come into this category.
If we teach our horse to flex toward the prick of a toothpick, so his muscles are loose rather than taut, we need to do such needle simulations on a regular basis. Likewise, if we want the horse to be confident with a worming tube, we can practice with applesauce as frequently as we like.
Hoof trimming, whether we do it ourselves or hire someone, can cause anxiety for a horse if it suddenly happens out of the blue. It’s much easier for us and the horse if we pick up feet regularly and move the feet into trimming positions to make it a normal request. We can also introduce the horse to a variety of different people who are allowed to touch him and handle his legs and feet.

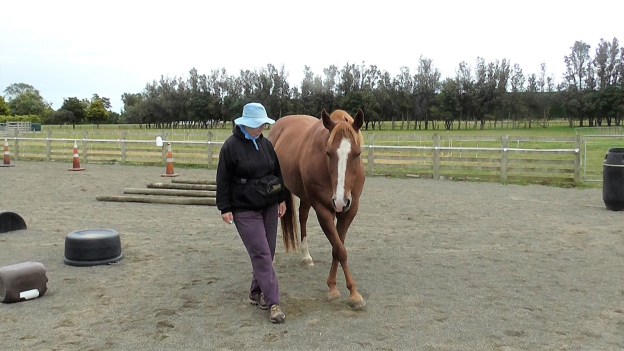
My friend Bridget helping Boots get used to other people handling her feet.

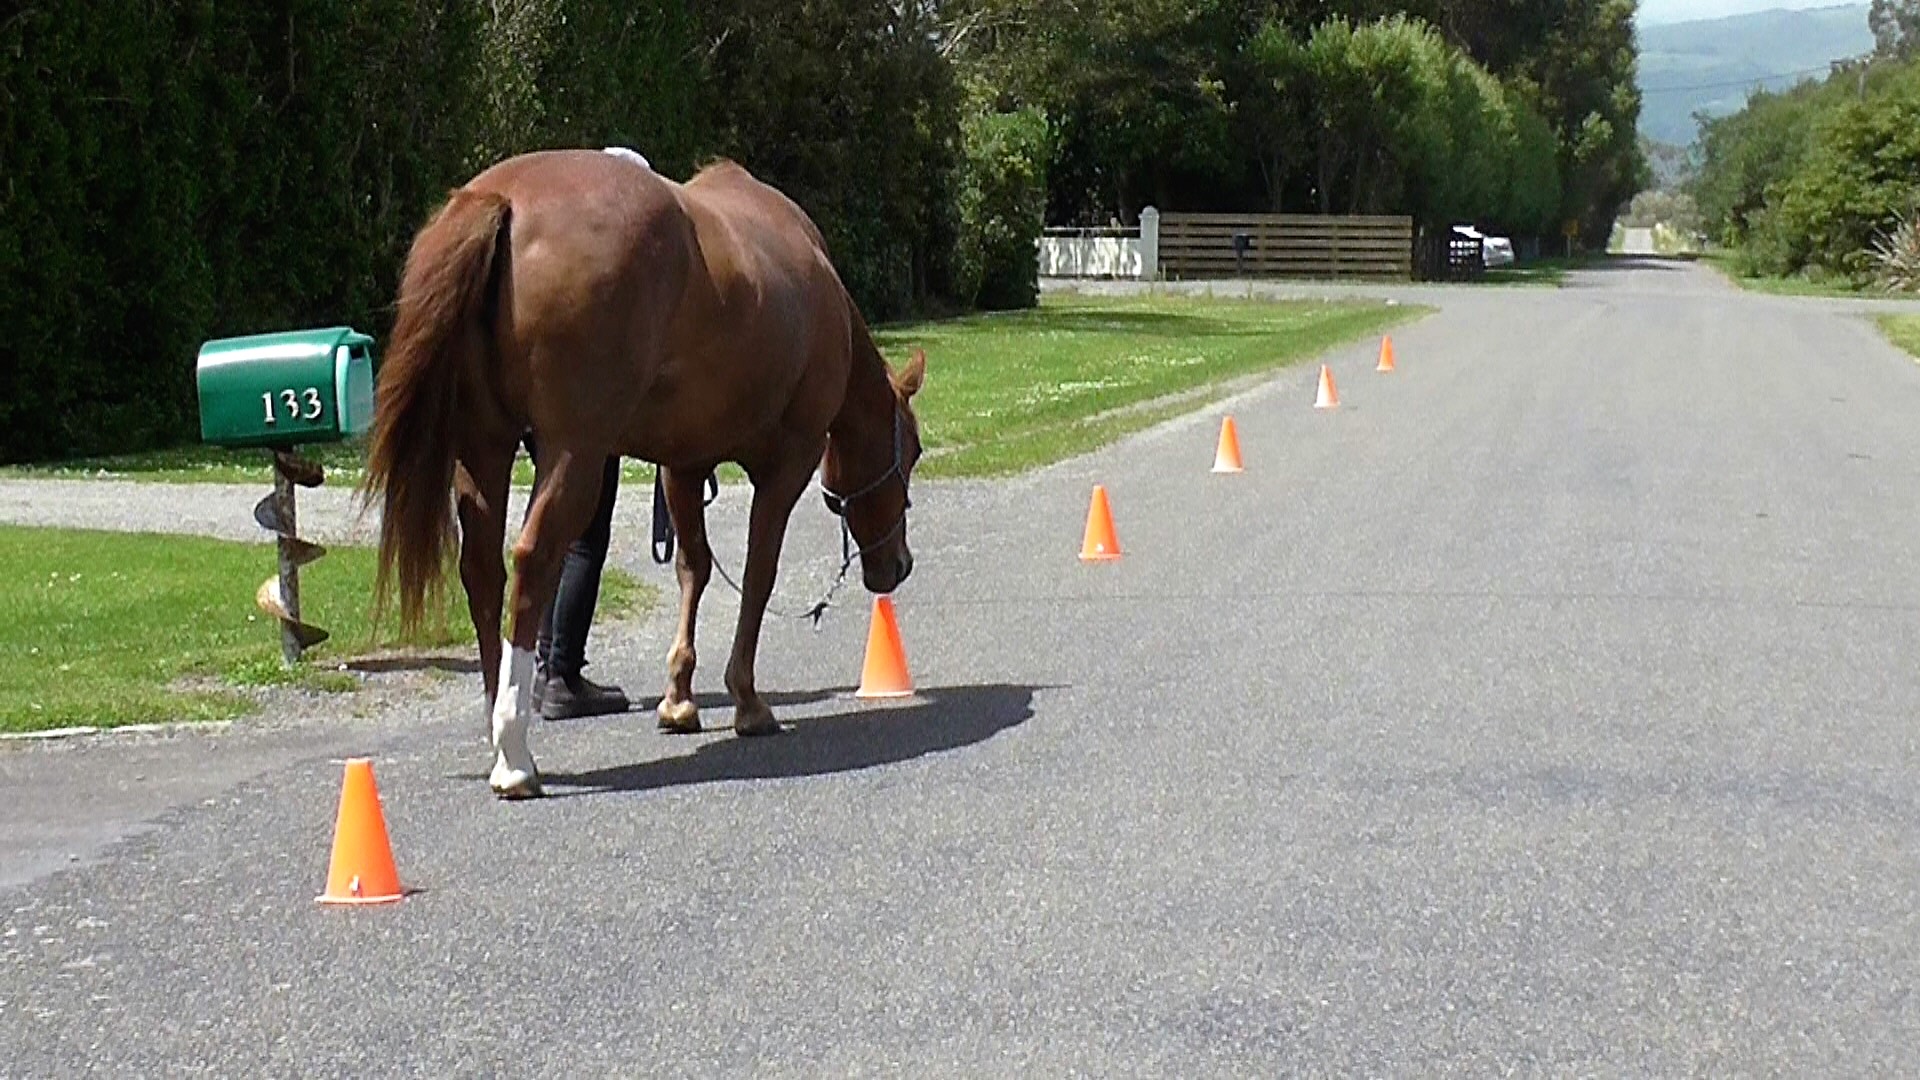
Chaining behaviors refers to linking together individual tasks into a flow of activity. The photo above shows how we chained repetitions of the task, “Go touch the cone” in order to build confidence walking down the road away from home. Once the horse understands this game, the cones can be put further apart, less in number and eventually phased out and replaced with items naturally found along the route to use as click&treat spots.
We might aim for one click&treat at the end of a series of behaviors. Alternatively, we might click for each specific behavior in the chain, or for two or three behaviors within the chain that easily link into each other.
We can also back-chain, where we begin with the last behavior in the series, and gradually link in each previous behavior. If we specifically want the horse to do a series of behaviors with only one click&treat at the end, this method can work well.
People who have spent more time studying ‘chaining’ in detail prefer to start with a concept called ‘sequencing’. They then describe different kinds of sequences.
Tandem Units – when each part of the sequence is exactly the same. Examples are the ‘cone-to -cone’ exercise in the photo above and the 20 Steps Exercise outlined below.
Conjunctive Units – when there is a sequence to be done, but they could be done in any order. For example, if we have a selection of obstacles set out to do gymnastic exercises with our horse, we can do them in any order.
Chained Units – step one of the sequence must occur before step, 2, step 2 before step 3, and so on. For example, saddling or harnessing a horse. Another example might be walking into the pasture, haltering the horse, walking back to the gate with the horse, opening the gate, asking the horse to walk through the gate, closing the gate, which is outlined in one of the clips below.
When we train by splitting a goal behavior into its smallest teachable units (slices), we link the slices together as the horse becomes competent with each bit of new learning. In most cases, the sequence is important, so each slice is part of a chained unit. The example below about Head Rocking illustrates.
Something like a dressage test, horse agility course, jumping course or western equitation course is made up of discrete units or behavior (conjunctive) but the competition requires them to be done in a strict order, so they become ‘chained’. We can train each unit in a ‘conjunctive’ context, then present them in the required chain for the competition.
This clip clearly shows how we can create a chain of ‘duration’ of the same behavior (tandem units). 20 Steps Exercise
This clip is the same as the one above but done with halter and lead and a handler new to the exercise. #30 HorseGym with Boots: Leading Position Three Duration Exercise. Increasing duration of a behavior is basically increasing the number or duration of ‘tandem units’ before we click&treat. The units might be steps, as in this exercise, or they might be increasing time staying parked or they might be the number of times your horse lifts his foot if you are teaching him to count.
This clip shows how we first train, then chain, tiny components of a task (slices). As the horse understands each slice, we ask for a bit more or a new variation before the next click&treat. This clip is an introduction to building confidence with pushing through pairs of horizontally set pool noodles. We start with the simplest unit and gradually work up to more complexity, so this is an example of mostly chained units
This clip is an introduction to head rocking. The slices are quite tiny and are steadily chained together to accomplish the final task. Since the order of units matters, it is a true chained sequence.
This clip looks at how we chain a series of tasks when we do something like bringing our horse in from a paddock. Usually I would do the whole process with one click&treat after putting on the halter, and another when I take off the halter. The horse has previously (separately) learned each of the tasks that make up this chain of events.
The clip below looks at using a mat to help chain a series of tasks. #12 HorseGym with Boots: CHAINING TASKS. This could be seen as an ‘artificial’ chain because we have decided on the order of the tasks. They could be done in any order, making it a conjunctive chain.
The clip below shows a series of more difficult tasks. Each task is individually taught to a high standard. Then I forward chain or back-chain them according to the requirement of that month’s competition. The order of the tasks has been arbitrarily set for the competition, so this too is an ‘artificial’ chain made up of a series of unrelated tasks.
Back-chaining simply means that we begin with the final behavior in a series and work backward toward the eventual starting point.
The horse moves willingly on the outside of a circle of objects, firs to mat destination, later listening for a ‘whoa’ signal.
Back-Chaining Circle Work with a Mat (see video below)
If we want to teach a horse to move in a circle around the outside of a round pen, we can use a mat as the horse’s destination and back-chain a whole circle at walk and a whole circle at trot (energetic horses may offer a canter).
The set-up requires a round pen of ground or raised rails or tape on uprights or a collection of items to outline the circle. The horse walks around the outside of the barrier and the handler walks on the inside of the barrier.
Note: Keep the sessions very short – just a few minutes. We never want to turn anything into a drill. Five minutes a day over a few weeks will give a lot of results.
Stay with each slice until both you and the horse are totally comfortable with it.
With halter and lead:
This is back-chaining because you have shown the horse the final result which will earn the click&treat (targeting the mat) and then added in the previous requirements, which in this case were increasing distances from the mat. In the final behavior, the mat is both the starting point and the end point.
If you are wondering about how we can get multiple circles this way, we can eventually use our ‘halt’ signal to replace the mat and ask the horse to do more than one circle (in gradual increments) before asking him to halt for his click&treat.
Example 2: Back-chaining a 10-task Horse Agility Course (based on the clip before the one immediately above). Each of the tasks has already been taught to a high degree of proficiency.
Back-chaining works well when we want/need to consolidate the place and time for the click&treat at the very end of a sequence of events.

One horse may learn to sniff his halter (click&treat) and put his head in the halter (click&treat) in less than two minutes. Another horse may take weeks of short sessions to just approach a halter lying on the ground or hanging on a fence. An Individual Education Program (IEP) for such a horse might be sliced to include click&treat for each of the slices outlined below.
We stay with each slice until the horse is ho-hum with it. The two videos below illustrate the process.
One main element of teaching like this is that the handler maintains a relaxed attitude and observes the horse closely to see when he’s had enough for one session. The sessions are usually very short – maybe three minutes. Ideally three sets of two-three minutes among other things being done with or around the horse during any one visit.
A second main element is for the handler to keep a relaxed, consistent body position, orientation and way of presenting the halter (or hoop) during the teaching/learning stage. Our focus is on what the horse CAN do (click&treat), not on what he can’t do YET.
We start with teaching the most basic prerequisite behavior. When the horse clearly understands our request for that behavior (which could take a couple of minutes or up to many, many sessions), we add in the next ‘slice’ of behavior that will lead to our ultimate goal.
We can and should move on when:
If the situation becomes confused, it is usually because we have not cut the whole task into thin enough slices. Although we have an ultimate goal, the ultimate goal is not where we put our attention. Our attention is directed at each ‘slice’ or mini-skill.
Mastering these one by one and linking them together, as the horse is ready, will seamlessly bring us to our ultimate goal – the whole task that we thin-sliced at the beginning is performed smoothly with one click&treat at the end.
When confusion arises (in either the horse or the handler or both), it is essential to return to previous work until we find the ‘slice’ at which both the horse and the handler can regain their confidence. Then we simply work forward again from that point. This is Mastery Learning. Each small part is mastered before moving on to the next part.
By slicing the overall goal small enough, we can gradually create a positive association with a halter.
We want to teach the horse to be proactive about putting his nose into the halter/hoop. Something like a small hula hoop is easier to hold into position to teach the idea of dropping the nose into the hoop/halter.
#168 HorseGym with Boots illustrates an early lesson using a hoop to introduce the idea of something moving around the head, across the eyes and over the ears.
#65 HorseGym with Boots illustrates starting with a hoop and moving on to a halter. In this clip I cut out the chewing and waiting time between trials to make the clip shorter, but didn’t really like the result as much as if I had left them all in, which would give a better overview of the pace of the session.
It’s easier to hold a small hoop when we first teach the horse to drop his head into an opening. This will eventually be the nose-piece of a halter. I also have to build confidence about having my right arm lying across the horse’s neck.
SLICES
If the horse is wary about the look of a halter, for whatever reason, use a small hula hoop or similar made with a piece of hose.
Stay with each slice of the task until your body language and orientation are consistent and the horse is ho-hum with what you are doing.
Eventually we can click&treat the following slices.

It’s not uncommon for a horse to have bad feelings or mixed emotions about halters and ropes. My book, WALKING WITH HORSES has a detailed section about developing a horse’s willingness to put his nose into a halter. For more details, click on the BOOKS section above. Also, see ‘Willing Haltering‘ in the Further Resources section at the end of this post.
To help horses deal well with captivity, confidence with halter and lead rope needs careful attention. Essentially, putting a halter and rope on our horse is similar to putting on our ‘work clothes’, which will be an outfit or uniform suitable for the type of work we do. When we work for an organization or with other people, we adjust our behavior to what is appropriate at our job.
In the same way, a horse carefully educated about halters and ropes will recognize that he is wearing his ‘uniform’ and relate it to certain ways of behaving. Mainly, it limits his behavior choices. Ideally it also encourages him to pay careful attention to requests made via messages sent along the rope.
We can use the rope to send text messages. But, obviously, we must first carefully teach the horse what the ‘letters’ of our text mean. The lighter the pressure of our ‘texting’, the lighter the horse’s responses can be. In other words, the horse can only be as light in his responses to rope messages as we are light in sending them.
A rope is a way of ‘holding hands’ with our horse, not a tether kept tight to stop the horse escaping our influence. There is nothing so heartbreaking as see a gasping dog at the end of a tight leash or a horse struggling to understand why the tightness of the rope won’t go away, no matter what he does.
The key to lead rope handling is that the rope is always slack except for the brief moments it is sending a message to the horse. The instant the horse complies with our request, the slack is returned to the rope. It is the instant release of rope pressure plus the simultaneous click (and the accompanying treat) that enables the horse to understand which task we are requesting.
A: STANDING COMFORTABLY IN A CORNER
Introduce the horse to each corner in small, easy steps. Thin-slice the process to what your horse needs. Use a familiar mat to indicate where you would like his front feet to be . Three kinds of corners are shown in the videos clips.
B: TEACH AN ANCHOR TASK
Clip 1:
Clip 2:
In the same way that music is made up of notes and the pauses between the notes, we must have pauses between asking the horse to repeat the same task. Because the horse is at halt for this challenge, the anchor task creates the pauses between our requests.
We begin teaching the anchor task once the horse is comfortable standing in a corner, on a mat, with reasonable duration.
An anchor task is what we do to ‘set the stage’ for what we will do next. For example, when I play with targeting body parts to my hand with Boots, our anchor task is lifting a front knee to my hand. It tells her what game we are about to play.
Another example of a ‘stand quietly waiting’ anchor task might be to hang a special nose target in the spot you would like the horse to stand (park) while you tack up. Used like this, the foot or nose targets become a way that the horse can tell us that he is okay with us to proceed with what we are doing. There is a link to more about this in the Further Resources section at the end of the post.
As an anchor task for this behavior, I’ve chosen to rest my nearest hand lightly on Boots’ withers while she keeps her head forward. It is the position my hand would be if I were resting my reins while not giving a rein signal while riding. You might prefer a different anchor task.
In our case, this is a bit tricky because I use the same anchor position I use when we do belly crunches while standing beside the horse. The handler’s body orientation is often a large part of an anchor task.
I decided that Boots is far enough along in her training to learn to pause in this anchor position and wait for the next signal to find out whether a crunch or head flexion is the hot topic of the moment. You’ll see that we have a couple of conversations about this.
C: LATERAL FLEXION TO A TARGET and D. THE VOICE SIGNAL
VIDEO CLIPS 1 & 2 (Left side)
E. RESPONSE TO ROPE or REINS SIGNALS
Clip 3:
Clip 4:
Some of these are shown in clip 4:
Blog: Willing Haltering: https://wp.me/p4VYHH-5Sw
Clip: Park & Wait: https://youtu.be/UvjKr9_U0ys
Blog: Okay to proceed or ‘Seeking the Horse’s Consent‘: https://wp.me/p4VYHH-5RV
First clip (of six) in the Playlist: Developing Soft Rein Response: https://youtu.be/6nP2XU2urak

INTRODUCTION:
This exercise developed from something my horse offered when I was in the tack room where there is a wooden platform in front of the door. While I was in the tack room getting organized, Boots would step up onto the wooden platform to see what I was doing.
I recognized the beneficial gymnastic effect when I asked her to back off the platform and step up again in a rhythmic pattern. It became one of her favorite things to do. Interestingly, she never seems to have enough of it, and I have to be the one to suggest that we should do something else.
This Step Aerobics task has become our go-too exercise when time is limited but we want a bit of a warm-up before cleaning her feet or doing other tasks. When it’s too wet or hot or windy for much else, it’s a fun way to build some movement into our time together.
Step Aerobics, just like the human version, is an exercise that requires whole-body movement and flexion of all the joints, so it is an ideal task to do often in short bursts.
Items with an asterisk (*) are training plans covered in detail in my book, Precision Horse Training with Positive Reinforcement: 12 Thin-Sliced Groundwork Plans, available as e-book or paperback via Amazon.
PREREQUISITES:
Back-Up Part 1*: https://youtu.be/6YYwoGgd_0Y
Back-Up Part 2*: https://youtu.be/safxxu90lkA
Recall Clip 1: https://youtu.be/XuBo07q8g24
Recall Clip 2: https://youtu.be/5BQCB2Fe5RE

My ‘recall’ gesture signal in this context is a movement where I shrink backwards and drop my energy and make a circle with my arms.
ENVIRONMENT & MATERIALS:
AIM:

Boots has taken herself to stand on a tire-pedestal while I organize the camera.
Horse steps up onto a pedestal (or step), then steps backwards down again, in a rhythmic pattern repeated several times.
SLICES:
A simple lane made with two rails, blocked off at one end with two tall cones, and a mat in the lane, demonstrating Slice 4 of the training plan.
Video Clip: #159 HorseGym with Boots: STEP AEROBICS
GENERALIZATIONS:
We can use the back or sides of a trailer ramps as our ‘step’. I have used a solid piece of timber under the end of the ramp to create a step-up situation.

I’ve asked Boots to step up with all four feet, then step back down again. The wooden lip and uneven ground make it more challenging.
I look forward to hearing and seeing how you get on if you take up this challenge.

An easy way to teach parking with duration is to use mats as foot targets. Mats can be anything safe for the horse to put his feet on. My horses were especially fond of a small piece of foam mattress.
The series of video clips in this post begin with introducing a horse to mats, and go on to explore building duration on the mat and using mats as destinations.
Once the horse confidently heads over to put his feet on a mat as soon as we set one out, we can begin to build duration staying on the mat. #8 HorseGym with Boots looks at building duration.
Once the horse loves going to mats due to a strong history of reward reinforcement, we can use mats as parking spots for things like waiting tied up, grooming, foot care, vet care.
I’ve found that carpet stores are happy to give away their old carpet sample books. They are amused when I tell them what I want them for.
#14 HorseGym with Boots is the very first introduction of a young horse to the idea of stepping on something and it was also new for the young handler.
The following videos look at generalizing mats to a variety of situations.
#9 HorseGym with Boots looks at putting mats ‘on cue’ or ‘on signal’.
#10 HorseGym with Boots looks at mats in different places and using different kinds of mats.
#11 HorseGym with Boots looks at more generalization with a ‘Mat-a-thon’.
#15 HorseGym with Boots looks at the horse staying parked at a distance.
#18 HorseGym with Boots looks at the horse staying parked while the handler goes out of sight.
Smooth ‘Walk On’ and ‘Halt’ Signals: https://wp.me/p4VYHH-5TT
Most of horse training is to teach the horse our signals that he needs to know to keep ourselves and the horse as safe as possible in different situations. If we check human health insurance claims, a fair number are horse-related.
New Zealand, with a population in 2017 of 4.79 million people saw 7873 people with horse-related injuries. Of these, 2852 fell off a horse. Horse accident insurance claims for 2017 came to $9,669,964.00.
No one knows how many horses have a short life because they don’t fit in with the demands of their constrained domestic existence which is, in many cases, completely foreign to a horse’s natural lifestyle.
The health insurance figures above suggest that there is room for improvement in human-horse and horse-human communication.
Fortunately, more and more people are becoming aware that the best training fosters two-way communication between person and horse.
Writers such as Sharon Wilsie (HorseSpeak) and Rachaël Draasima (Language Signs & Calming Signals of Horses) and my book, Conversations with Horses (see my Books section), are helping horse people to appreciate just how much information horses impart to us with their body language.
A horse’s world view is dictated by the way he senses the environment. His vision, hearing, smell and sense of proximity are different and mostly superior to ours. He has evolved adaptations that allow him to survive in open grassland rife with predators and profound seasonal changes.
Humans have a different history with different selection pressures. We sense our environment differently. With us, verbal language has, on the surface, supplanted body language.
Horses use distinct body language. Sadly, many people are blind to this language or choose to ignore it. The magic is that once we begin to observe and pay attention to what horses are saying, we start to pick up the nuances and get better at tailoring our training to the sensitivities of individual horses.
While there are differences, there are also similarities. Both humans and horses are gregarious*. They live in groups with extensive social interaction between group members. Living in a group means that there is always a balance between competition for the same resources and the need to maintain peaceful relations.
When resources are plentiful, there is minimum competition and maximum peacefulness. When resources are scarce, peacefulness is interrupted by competition as the more assertive group members jockey for the best resources.
Although people don’t consider body language as important as spoken language, we still display it clearly. We also react to it subconsciously. Between spouses and close friends, it speaks volumes. People like scam artists, who prey on other people’s susceptibilities, are astute readers of body language, using it to single out their victims. Horses can definitely read our body language, despite the species barrier.
As well as reading each other’s body language, horses read the body language of their predators. They know when they are in hunting mode, just passing by, or resting in the vicinity.
Horses are also aware that their own body language sends messages to predators, who look for signs of weakness or lameness. That is why it is often so hard to know if our horse is in pain. They will hide pain and infirmity as much as they possibly can.
‘Okay Signals’ are initiated by the horse to let us know that they feel okay for us to repeat what we are doing or to carry on with a procedure that involves a variety of things.
When I’m walking on the road with Boots, I’ve become aware of her need to stop and assess things such as cows moving in the distance, a vehicle in an unusual place or something that has changed in the environment since we last passed by.
If I stop with her and wait, paying attention to what has caught her attention, we are ‘on the same page’. I breathe out loudly to show that I’m okay with this thing that has caught our attention and relax into ‘zero intent*’. Eventually Boots will lower her head and bring her attention back to me, which tells me that she has satisfied her need to notice and is ready to walk on. This is the most basic ‘okay’ signal for us to watch out for.
Once we learn to pause with zero intent* (items with an asterisk are defined on the GLOSSARY page – link at top of page) long enough to allow the horse to communicate with us, we can discover ways that individual horses will let us know when they are ready to repeat whatever we are asking, so they can earn another click&treat.
I think many good trainers are already unconsciously aware of these signals, without having given the concept a name. I think that isolating and focusing on this type of horse-initiated signal can open a new vista of training.
It is not hard to recognize horses communicating loudly when they don’t want to do something. It is not always easy, however, to know whether not wanting to do something stems from:
We have to observe carefully if we want to learn to recognize horses communicating when they are not shouting loudly with their body language. Unless we train ourselves to understand the finer points of their signaling, we miss most of what they are trying to tell us.
Most horse communication is visual. Horses in an established group seem harmonious because a flick of an ear, the tilt of the neck, a single swish of the tail, a certain posture of the body, are all highly meaningful to another horse.
People are usually, understandably, so focused on their own agenda that they miss most of these signals. But we can do better. Since we remove horses from their natural life and make them captive to us, the least we can do is try hard to learn their language and use it to aid two-way communication.
The concept of waiting for a horse to give permission or consent for us to carry on with a task may be a novel idea for some people.
As mentioned earlier, good trainers probably do this subconsciously. They continuously observe the horse’s body language to gauge whether the horse is comfortable about proceeding with the training or repeating a specific task. Is it best to pause for a while, do something easy or finish for the day?
Our fondest personal memories are often of things we have successfully initiated and controlled. In the same way, horses respond positively to having control and ownership of what is going to happen next in their lives.
In other words, a sense of control is as reinforcing to horses as it is to people. We steal a great deal of their personal control when we bring them into captivity.
When it becomes the horse’s idea to initiate their handler’s next action, the horse begins to share ‘ownership’ of the behavior we are working with. Such a feeling of ownership alleviates the anxiety and tension that arise if the horse is constrained and forced to accept what is being done to him.
Much of what we do with a horse requires him to stand still. Standing still when unusual things are happening is not what evolution found useful for horse survival. lt is very much a skill that must be taught and developed.
For many activities, we’ll still have to read the horse’s overall body language to know if he is okay to proceed with what we are doing. But for some specific tasks, we can incorporate an ‘okay to repeat’ or an ‘okay to proceed’ signal from the horse. There are several ways of doing this.
If a horse has a strong history of positive reinforcement* for staying parked in a relaxed manner with his nose on or near a nose target, we can use his willingness to stay, and touch the target again, as his ‘okay to repeat’ signal.
#156 HorseGym with Boots: OKAY TO REPEAT SIGNALS.
If the horse is wary about the object, walk away backwards (or have another person walk away backwards holding it while you follow with the horse at the horse’s pace) and have the horse follow; click&treat any sign of willingness to approach the object more closely until he is able to put his nose on it to earn a click&treat.
Horses tend to follow things moving away from them and move away from things coming toward them. Yet most horse handlers expect a horse to stand still while they approach with an unusual object.
If we allow the horse the time to make up his own mind that an object is harmless, he will accept it as so. Horses naturally use approach and retreat whenever they come across something new. Life is much easier if we use their world view to facilitate our training, rather than restrict their movement and force them to accept something.
Done quietly and carefully with many mini-sessions that don’t push the horse beyond his comfort zone, the horse can usually relax into the new game which consists of the new things he has to allow if he wants to elicit more treats from the environment (his handler).
The horse’s comfort zone will gradually expand to include the new task we are doing with him. At that point, the acquisition stage is over, and we start to focus on fluidity, generalization and maintenance.
This is a video clip from a while ago which demonstrates the same idea. #4 HorseGym with Boots: Parking at a Nose Target.
Another way to ensure consent or ‘permission to proceed’ is to ask the horse to park his feet on a mat. The horse’s willingness to stay parked lets us know that he is okay for us to proceed.
‘Okay to Proceed’ is a little different from ‘Okay to Repeat’. I use it for foot care which is a series of tasks rather than a repetition of the same task. Changing bandages and dealing with riding boots on and off, blankets on and off are also more in the line of ‘procedures’.
A procedure like putting on riding or driving tack could also be thought of in the same way, although I found a nose target also worked well for tacking up.
Once we have taught standing on a mat with some duration, we can use the horse’s willingness to stay there as a sign that he is probably okay for us to proceed with whatever we are doing.
#157 HorseGym with Boots: ‘OKAY TO PROCEED’ WITH A MAT
If we use a mat with frequent short sessions for teaching vet procedures or foot care, the horse will soon realize that the mat coming out means clicks&treats are on the way.
If the horse feels the need to move off the mat it is critical that we don’t restrict or punish him in any way. We quietly walk a circuit together to return to the mat and halt on it: click&treat for the halt on the mat. We must ensure that the mat always remains a desirable place in the horse’s mind.
After returning to the mat, we can return to earlier slices with the task we are working on to find where the horse can still be continually successful, then end on a good note. Or we can use the mat to do something easy that the horse already knows to re-establish the mat as a good place to be.
Ideally, the handler will be able to read the horse’s increasing body tension before the horse moves off the mat and take one of the two options above or initiate a relaxation break before resuming the training.
To explore this concept with your horse, choose a simple task that the horse will probably find pleasant. Once the horse buys into the concept of giving us an ‘okay to repeat’ signal, we can expand to other physical care and vet procedures.
If you can choose one that is new to the horse it may be easier because it won’t have the baggage of past experiences. But we can also add this new dimension to a task the horse already knows.
Once I became more consciously aware of these signals, I realized that Boots had been using them in a variety of contexts and I had been taking note of them. Once I began observing more closely, I soon realized that she had several signals for letting me know when it was ‘okay to repeat’.
#154 HorseGym with Boots OKAY to REPEAT shows Boots’ signal for rubbing the inside of her ear, which we had never done purposefully before. It also has an interlude of belly-scratching with a new tool.
#155 HorseGym with Boots OKAY to REPEAT for TOOTH INSPECTION: shows Boots’ signals for allowing me to lift her lips to inspect her teeth. This is a very early session.
Some other possibilities are:
The procedure is basically the same with any task.
We have to be mindful that some horses have never been given a say in what is going to happen once they are haltered or confined in a small space, so it could take a long time for them to try something brand new to their experience.
If you have played with your horse at liberty in the past, and allowed expression of opinion, it may all happen quickly.
It could be that ear-rubbing is intrinsically pleasant for a horse already relaxed in human company. Even if it is, I want the horse to eventually relate offering of an ‘okay to repeat’ signal to any task that will earn a click&treat.
Tasks like eye care and checking teeth and allowing skin pinching and toothpick pricking to prepare for inoculations will not be intrinsically pleasant.
All horses are different, both innately and due to their life experiences. Therefore, each horse and handler will together create a unique ‘okay to repeat’ signal language that works for them.
The video clips are best at demonstrating the flow of the training. So far, Boots’ body language ‘okay to repeat’ signals include:
Blogs:


Left Photo: ‘Zero Intent’ posture for staying parked: energy drained from my body, hands lying on my bellybutton, hips relaxed, one knee cocked, shoulders down, looking nowhere.
Right Photo: ‘Intent’: I’ve lifted my torso, breathed in and am activating my fingers into our signal for Boots to move her shoulder over.
INTRODUCTION:
A key way to make it easier for our horse to understand what we would like him to do, is to refine our own body language. The horse can only be as precise in his responses as we are precise with our body language.
We want to be as clear as possible when we ask the horse to do something, and equally clear when we want him to stand quietly or walk with us in a relaxed manner. In other words, we are teaching active inaction.
If we reliably assume a distinct stance and put our hands in a certain position to indicate that we don’t need anything to happen, the horse soon realizes that our posture is meaningful for him.
It is a bit like the computer binary system of zero and one. Either we want the horse to stand (or walk with us) in a relaxed manner or we want him to begin moving part of his body or his whole body in a particular way.
‘Zero Intent’ (sometimes called ‘neutral’) means that we want the horse to keep on doing what he is doing. On the ground, this might include:
VIDEO CLIP: #153 HorseGym with Boots: Zero Intent and Intent illustrates. On the video clip I use ‘No Intent’ to mean the same as ‘zero Intent’. The clip demonstrates a variety of tasks that begin with the ‘parked’ position.
Viewing the video clip makes it easier to get an overall picture. It can be helpful to practice visualizing changes from ‘zero intent’ to ‘intent’ during our day’s general activity away from the horse.
We express ‘Intent’ with signals we have taught the horse. When we first teach a new task, we can make our intent clearer if we arrange the horse’s environment to make the behavior we want more likely to happen. Once the horse does the desired behavior reliably, we can add voice and gesture signals.
For example. If our intent is to have the horse confidently walk onto a tarp, we can put a favorite treat on the tarp, so it becomes the horse’s idea to put his feet on the tarp in order to reach the treat. We are still free-shaping the behavior of walking onto a tarp, but we are helping it along by setting up an environment that increases the chances of it happening.
Behaviors that start and end with the horse standing parked with us in a relaxed manner are ideal for improving our ‘Zero Intent’ and ‘Intent’ body language. For example:
We begin with zero intent, signal the horse with intent, click&treat when the horse carries out our intent, then return to zero intent for X number of seconds.
When we practice this consciously, we remove much of the ‘noise’ and unnecessary energy or tension we hold in our bodies, which confuses horses because they are so much more sensitive to body language than we are. To survive in the wild they have to to be continuously aware of the body language of their herd-mates, other animals around, and local predators.
If there is no consistency in our body language, horses tend to regard all of it as meaningless and tune it out.
PREREQUISITES:
ENVIRONMENT & MATERIALS:
AIMS:
SLICES:
Before you begin, visualize what tasks you will ask the horse to do with your ‘intent’ signals.
Here are some possibilities:
GENERALIZATION:

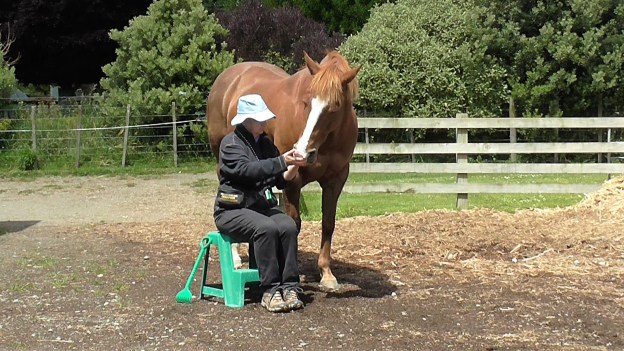
The ‘no intent’ position sitting down.

INTRODUCTION
To teach sidestepping, we carefully and quietly add the forequarter yield and the hindquarter yield together until the horse is able to move sideways in a straight line.
Teaching willing hindquarter yields on request is one of the essentials for safety around horses. Anything unexpected can cause serious harm around the most benign horse. A willing hindquarter yield eases daily care and husbandry, especially around gates, stables, or any tight space.
Teaching the forequarter yield makes it easy to ask our horse to stand in the best position for foot care, grooming or saddling. Teaching these yields on both sides of the horse aids in strengthening proprioception.
Proprioception is an animal’s clear perception about where various body parts are, what they are doing, and the amount of energy needed to carry out a specific activity.
Sportspeople tend to have much better proprioception than people who spend most of their times sitting. Horses raised in flat paddocks and stables lack the proprioception evident in horses who grew up moving extensively in rugged, hilly country.
When our horse can co-ordinate the front-end and hind-end yields to smoothly sidestep on one plane, his proprioception will have improved considerably. Some horses almost fall over when first asked to step across sideways with a front foot, so we have to be gentle and take the time it takes with short, frequent sidestepping sessions.
In horse language, yielding the quarters seems to be an appeasement action. The horse is willing to shift his personal space away from you. Horses with a relatively timid or anxious nature are usually quick to grant you this space.
Horses with a bold or exuberant nature may be less willing (or extremely resistant) when this task is first introduced. They are more prepared to ‘stand their ground’. Who moves whose feet is highly significant in the horse word. Much the same is true for people.
How readily a horse sidesteps on request depends on his innate nature, his opinion of the handler and how he is being (or has been) taught the tasks.
PREREQUISITES:
Forequarter Yield: April 2018 Challenge: https://youtu.be/eSlin8ZYcRA
Hindquarter Yield: May 2018 Challenge: https://youtu.be/AkjIT8Tjxw0
ENVIRONMENT & MATERIALS:
AIM:
To have the horse willingly yield six to eight steps sideways away from the handler, in a variety of contexts.
GETTING STARTED WITH A BARRIER IN FRONT:
SLICES (Illustrated in Clip 1)
GENERALIZATIONS
Clips 2, 3 and 4 look at generalizations
Generalizations on the video clips include:

Photo: This is the moment I will ask for ‘whoa’ if I want her to stop with just front feet over the barrels.
This month’s challenge is to refine a voice “Whoa” signal so that it works in a variety of situations. If we want to work on the halt, we will obviously also need our ‘walk on’ signals to be solid. These two tasks are the foundation of pretty much everything we want a horse to do with us. Even teaching ‘parking’ starts with a solid, confident ‘halt’.
Teaching the basic ‘walk on’ and ‘halt’ is easiest done in position beside the horse’s neck or shoulder. I like to teach these with a ‘multi-signal’ or ‘signal bundle’. Using the multi-signals consistently at the beginning means that once the horse knows them well, I can use any one of them, or any combination of them, depending on what best suits the situation. The horse will also recognize the signals if I am walking beside his ribs or behind him.
These two clips look at the signal bundles I like to use.
‘Walk On’ multi-signals: Click here.
‘Halt’ or ‘Whoa’ multi-signals: Click Here.
To have the horse halt promptly in a variety of situations when he hears a voice ‘whoa’ signal.
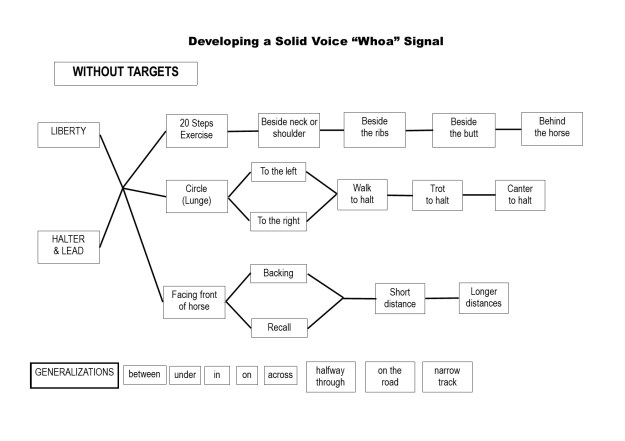
The flow charts at the end of the post outline all the options we could use. To find a good starting point, do low-key experimentation with the horse to find out what he can offer already.
To use the flow charts at the end of the post, track a single route from left to right. When one sequence becomes ho-hum, chose another sequence and design a thin-sliced plan for it.
For example, in the first video clip I choose: STATIONARY TARGETS — LIBERTY – TUBS – BESIDE NECK/SHOULDER – TARGETS RELATIVELY CLOSE TOGETHER. I modified it during the clip to walking beside Boots’ ribs or butt, mainly because I can’t yet walk very fast (I have two new knees) and she was keen to get to the next tub 😊.
Clip 1:
Clip 2: Click Here.
Clip 3: Click Here.
The second video clip illustrates some of the generalizations. As with everything we train, once a task has been acquired and become fluid, we want to generalize it to as many situations as we can find and set up. Plus, we want to ask for it frequently, so it settles into the horse’s long-term memory.
One of my favorite generalization examples is from when I was long-reining Boots everywhere to establish long-reining firmly as part of our repertoire.
During an outing on a large farm with huge paddocks, we had to cross a stream. Usually the water was low enough to allow me to jump over without getting my feet wet. But on this day, I underestimated the depth of the water.
Boots willingly long-reined through the water in front of me. As I tried to leap over, I hit the water, lost my balance and dropped the reins. Boots kept on walking straight ahead. By the time I had pulled myself upright and out of the water, she was a good twenty meters away dragging the reins. I called out, “Whoooaaa”, and she immediately stopped and waited for me to catch up with her.
It was a great outcome compared to a fright about dragging reins and a panic run through hilly terrain with open gates connecting several fields.

Clicker training is also called Positive Reinforcement Training. It is a way of establishing 2-way communication with a horse.
When the horse presents a behavior that we want to encourage, we use a special sound followed right away with a small food treat that the horse really likes. Like all of us, horses will seek to re-create a behavior that gives them a positive result.
The special sound can be made mechanically with a ‘clicker’ or it can be a ‘tongue click’ or a special sound/word that we never use any other time. Often a mechanical clicker is useful to first teach a new behavior. Then it is easy to change to a tongue click or our chosen sound/word. This makes it easier because working with horses we usually need our hands free to use ropes and body extensions.
Since horses are designed to eat much of the time, a food treat is usually appreciated as long as we make sure it is something they really like. It’s important to keep each treat very small and to include the treats in the horse’s daily calorie intake.
A good way to learn clicker training skills is to start with the Target Game. Before communication can start, the horse has to understand the connection between the marker sound and the treat that will follow. Some people call this ‘charging the clicker’. It just means that the horse has learned that if he hears that particular sound, a treat will always follow.
Target Game:
It’s a good idea to first practice the mechanics of this with another person standing in as the horse. Well-timed food delivery is a key to success with this way of training. It is easier for the horse if the handler had muddled through the learning of the mechanics of treat delivery. At the beginning it can feel a bit like tapping ones head and rubbing ones belly at the same time.
Ideally have the horse in view of his friends, but separated from them. He will learn best if he is not hungry or thirsty and if he is in a relaxed frame of mind. I always ensure that the horse has been grazing or had access to hay before I train.
We’d like the horse to put his nose on a ‘target’ that we present near his nose.
The handler’s task is to:
If we keep each targeting session short (3-4 minutes) and are able to repeat them 2 or 3 times in a day, the horse will learn quickly and look forward to each session.
The Target Game is a good one to start with because when you finish you simply put the target away. Using the Target Game will let you decide whether Clicker Training (Training with Positive Reinforcement) is something you’d like to carry on with. It can be done alongside anything else you do with your horse.
The little clip below shows the beginnings and how it might develop over time. The horses in the clip are already clicker-savvy. Be aware that at first we should always present the target in the same place. When the horse consistently gets 10/10 for that, we can change to holding it higher up. Then eventually lower down and to the side and requiring the horse to move to reach it. But it’s important to get 10/10 for each of these, before we make a change.
Clip: Starting Equine Clicker Training
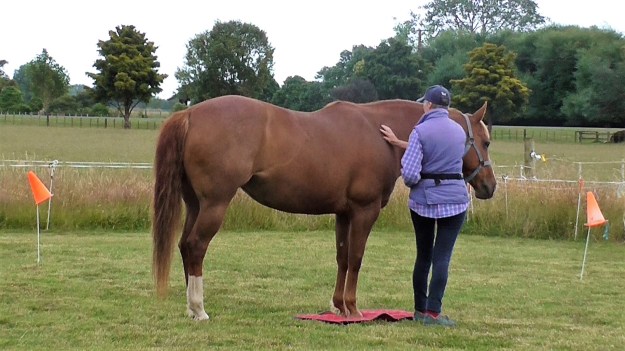
Photo: Using targets as ‘destinations’ makes it much easier to give meaning to our request in a way that the horse easily understands. Reaching the target, whether it is putting the front feet on a mat or touching the nose on a stationary object, earns the horse a click&treat. We can then move between targets to encourage the horse to come with us willingly because there is always something for him to look forward to – the next click&treat when we reach the next destination.
Training with the click&treat dynamic is a skill worth learning well, but it is not the only thing we have to learn well.
Some people handle/condition a horse’s behavior in a way that encourages the horse to always look to the handler – a form of ‘learned helplessness’. The horse is asked to subjugate his own observations, feelings and natural responses in favor of what the handler requires him to do.
Other people set themselves the interesting challenge of doing everything with their horses using only positive reinforcement training (often called ‘clicker training’). They pair each desired response with a marker signal (click) followed immediately by a food treat. They feel that this is the only way to keep a horse’s ‘sparkle’ alive.
Somewhere between these two extremes, fall the people who teach many things with the click&treat dynamic, but they also understand, respect, learn and use universal horse language. In their view, any horse education system that fails to acknowledge group social order, different horse character types and how horses succinctly communicate with body language, will have limited success.
From our human standpoint, we could define ‘success‘ as having a horse that is safe and fun to be with and that we can take places for exercise to maintain blood circulation health, overall fitness and mental stimulation.
Success could mean that the horse:
Once we have all that, we can endlessly refine the basics and teach new patterns and tricks.
Teaching with the click&treat dynamic is hugely helpful to horse handlers for two main reasons:
Developing the two skills above will greatly increase the ‘feel‘ of the handler. That ‘feel‘ will translate to the times when a good choice is use of ‘release reinforcement’ by itself. Feeling what the horse is doing — understanding what his body language is saying and knowing how to respond to that with our feel and body language, is the key to training with signal pressure and release of signal pressure (‘release reinforcement’).
What horses gain from positive reinforcement Horses trained with the click&treat dynamic discover that they can have a voice. Once they learn that a certain behavior will earn them a click&treat, they can become pro-active in offering that behavior. For many horses this is huge because in the past things have only been done to them or demanded of them — they could only be re-active.
When a task is thin-sliced so they understand each part of the training process, the horse’s learning can progress in leaps and bounds. We’d all rather work for a boss who praises what he likes rather than one who only criticizes what he doesn’t like.
Horses are not blank pages on which we write what we want. They already have a perfectly good language. It seems logical to learn it and use it as best as we can with our non horse-shaped bodies. Horses are very generous with their interpretation of what we mean. No doubt we have a very funny accent, but unless they have been traumatized by humans, they are happy to learn new things and accept us as part of their personal herd.
Social Group Once the horse accepts us as part of her personal ‘ in-group’, we have a position in the group social order. The two things go together. We can’t form a bond of understanding with a horse unless he or she lets us into their social group. Once we are part of the social group, we have a ranking within it. If the horse can move our feet at will, she or he stands above us in the social order. If we can ask move the horse’s feet, we rank above him her in the social grouping recognized by the horse. When people don’t understand this dynamic, or chose to deny/ignore it, things might not go well.
Horse Character Types Like us, horses can be innately anxious or innately confident and imaginative. They come as extroverts who like to/need to move their feet a lot and they come as introverts who prefer the quiet life. A careful look at how our horse perceives and reacts to things can give us insight into how we can best proceed with an individualized training program. What works perfectly with one horse can be quite problematic with another.
Universal Horse Language Horses have a complex communication system using their body language and a few vocalizations. They ‘message’ other horses with body tension, body orientation, neck position/movement, ear position, tail activity, posturing, striking out, kicking, biting, nibbling. How they use each of these depends on their intent at the time. An ‘alarm snort’ will instantly have the whole herd on alert. Quietly turning the head away as another horse (or a person) approaches is an appeasement signal.
With the aid of body extensions which make us as tall and long as a horse, and simulate a horse’s expressive tail, we can more clearly emulating universal horse language. If we are good at it and use our movements consistently, any horse will understand our intent without us ever needing to touch the horse or use a rope. We can establish our position in the social order by ensuring we can move the horse’s feet in a variety of situations while the horse is at liberty to move away, as it would be in a natural herd situation.
Once we have established our social position, we maintain it by the way we behave. Anxious type horses may rarely challenge our position. Confident, imaginative type horses may well challenge our position regularly. In a natural herd situation, they have the drive and sparkle to work their way up the group’s social order.
With an understanding of, horse character types, equine body language, and how the social order works, we can flow with the information the horse gives us via his behavior and body language. Skills of observation, timing and ‘feel’ allow us to decide how we will use clicker training to make his life in his strange human-dominated world a little bit more interesting and understandable.
With equine clicker training, we experiment to find out what the horse can already do, then build his skills in a way that has him being continually successful.
The link below contains a bit more information about horse character types.
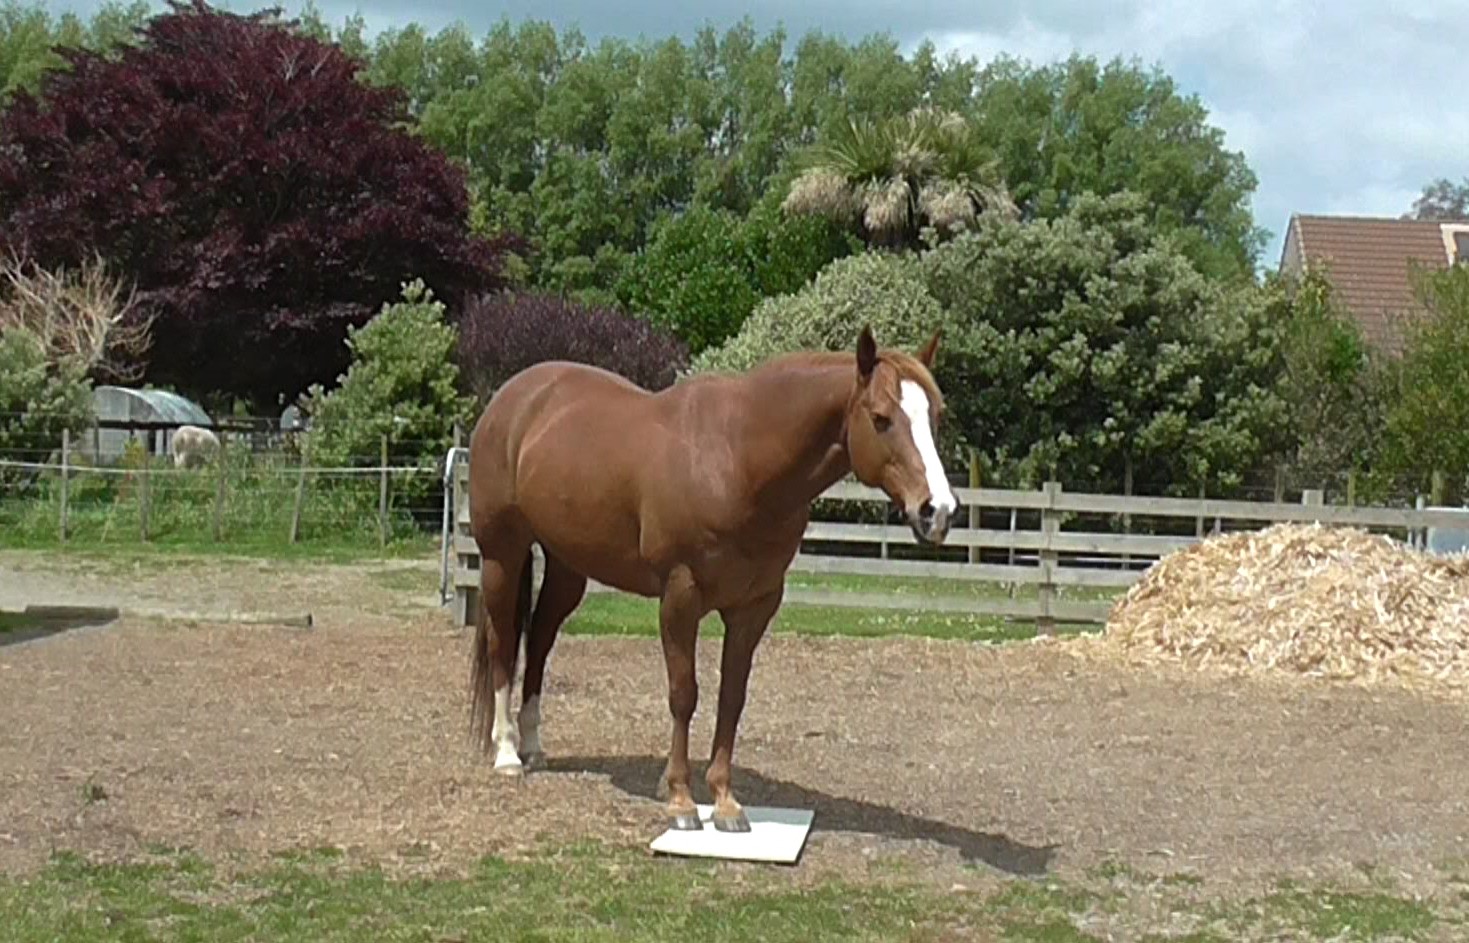
Photo: Mats laid out in our training area make good destinations to encourage willing movement to the next destination to earn a click&treat. First we can have them close together, then further apart. Once the horse understands the game, we can use small ‘mat’ targets like plastic lids.
Destination training adds an important dimension to a horse’s ability to understand what we would like him to do. We have to remember that the horse is captive to an alien species. Unless we take him through a careful, thin-sliced training program to teach him what we would like him to do, he has no way of knowing what we want.
While we are trying to figure out how to communicate with our horse, he is trying even harder to figure us out, and work out what we want him to do.
Giving the horse destinations helps him to make sense of many of our signals, because he sees a purpose to what we are asking him to do. He is not forever locked into a mystery tour. Like us, to remain confident, horses like to know what is going to happen before it happens.
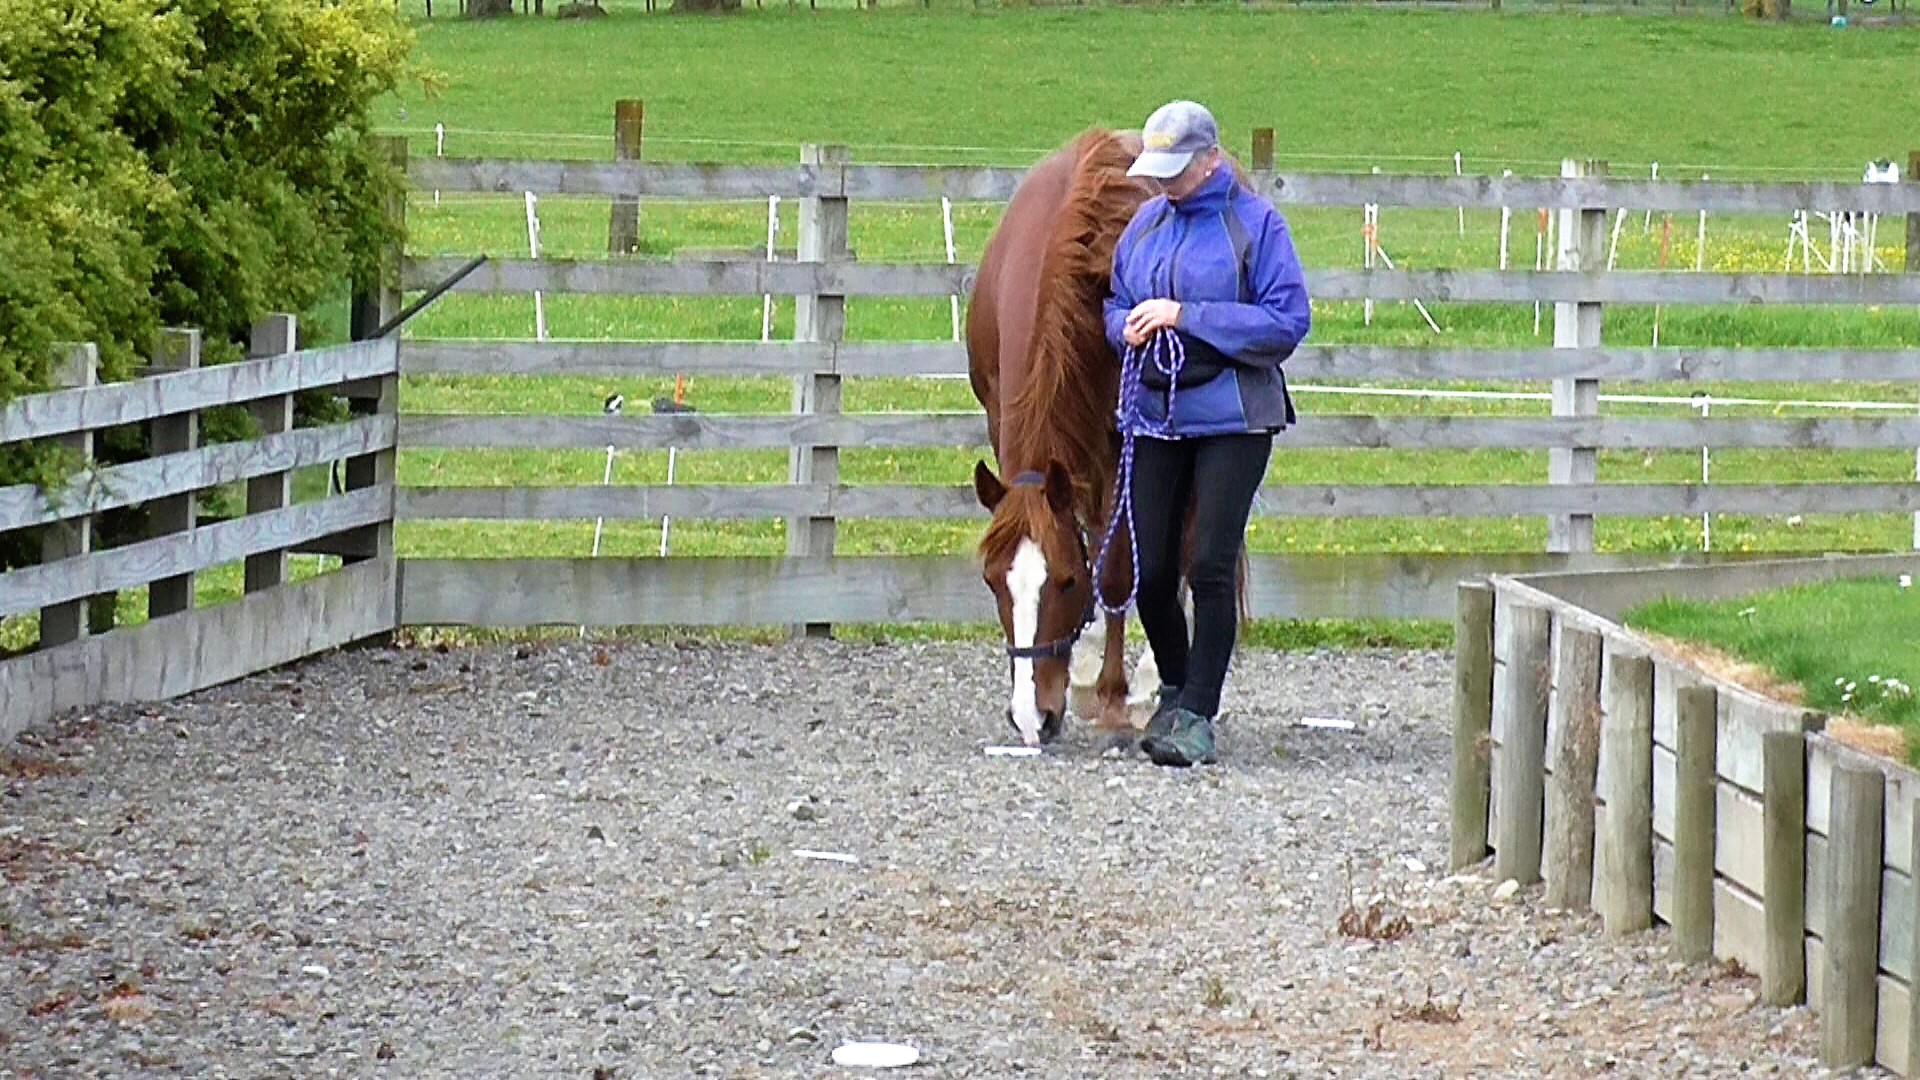
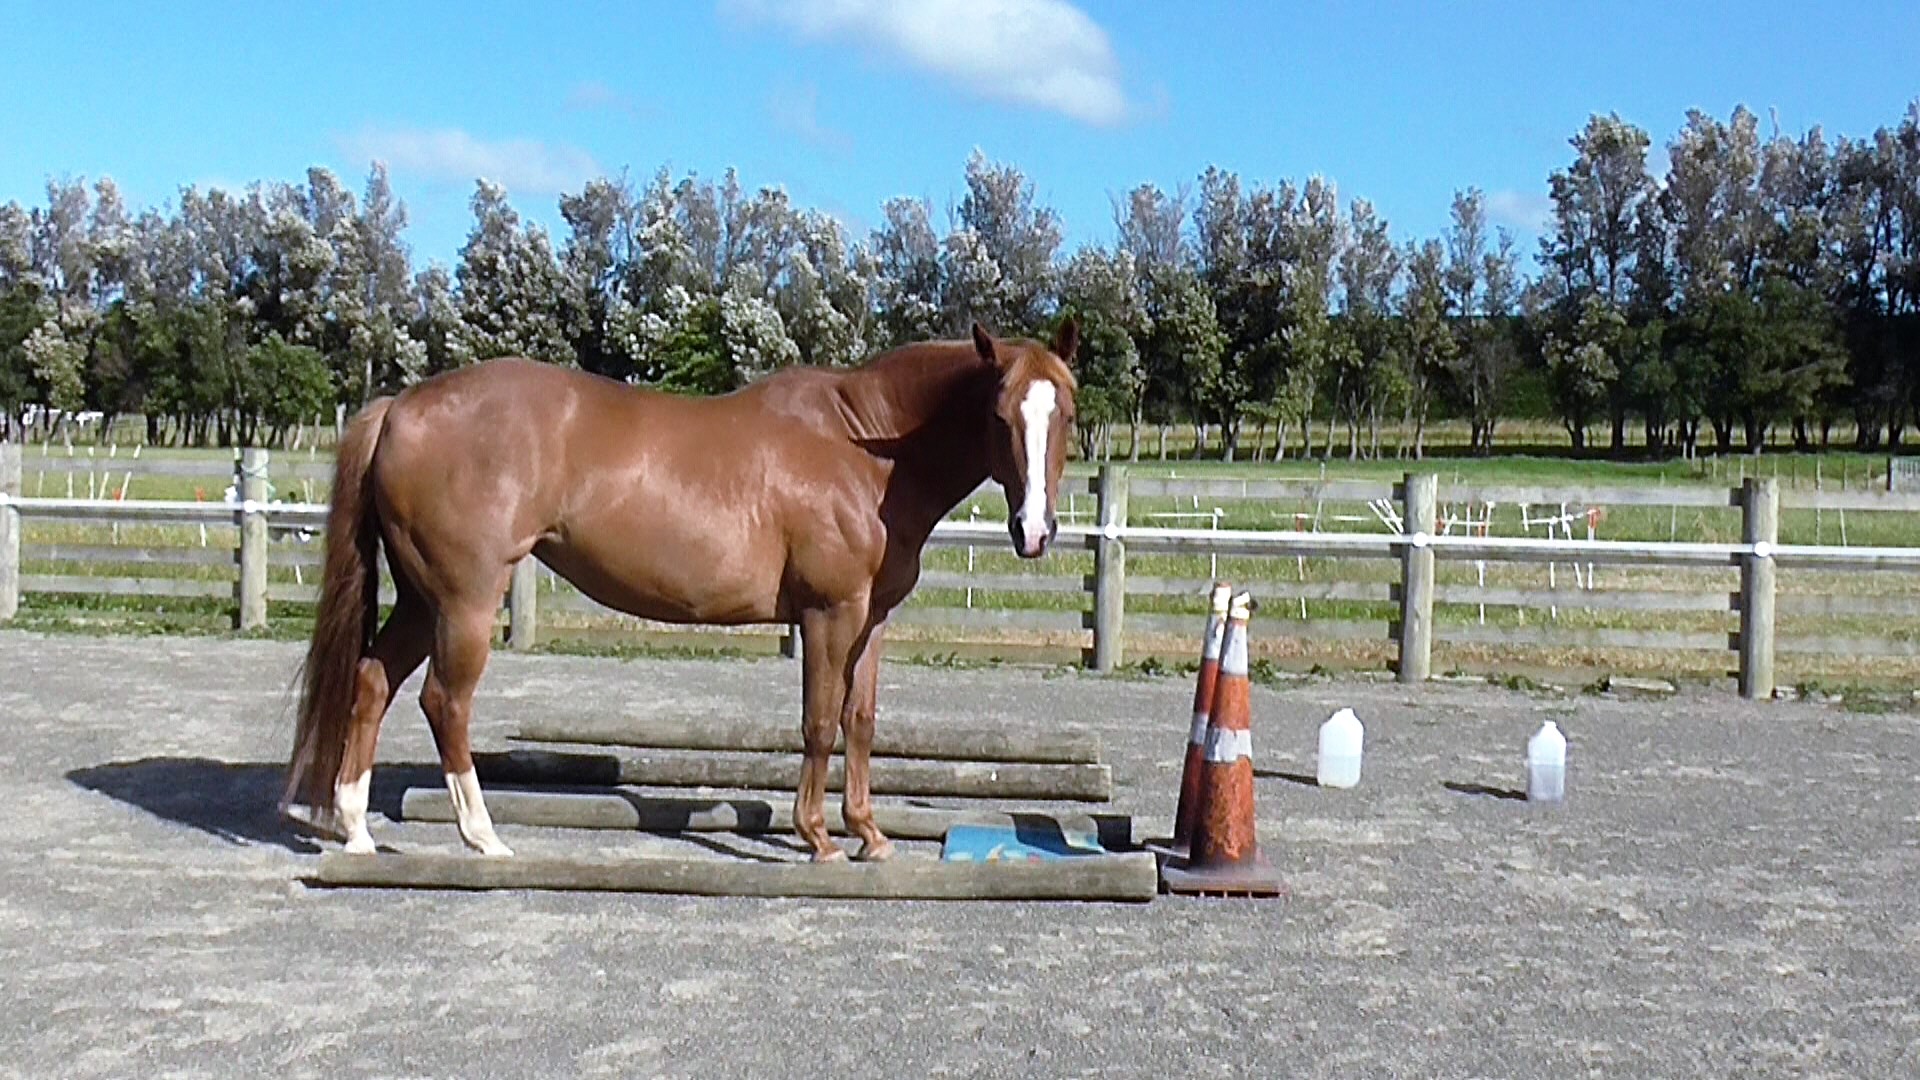
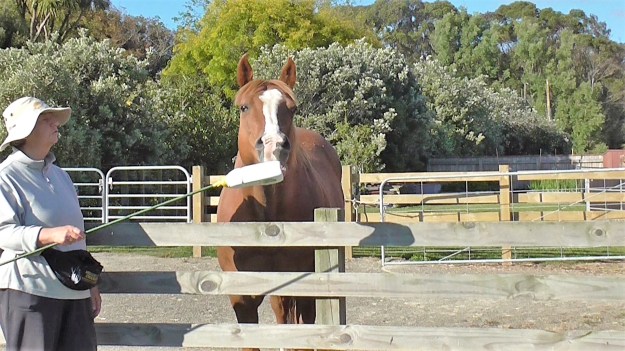
Photo: Here we have set up a series of white target disks along a track. Boots earns a click&treat for targeting each one with her nose (or foot). Gradually we would spread them out further and further, eventually attach them in appropriate places along a longer walk or ride on a road or trail.
Once the horse eagerly targets hand-held targets, we can tie similar targets around our training area and ask the horse to walk with us from target to target. This gives us many opportunities to seamlessly show the horse that walking with us (being led) is a fun thing because we are always reach a destination that results in a click&treat.
We can ‘stretch the value of each click&treat’ by gradually putting the targets further and further apart and/or in more challenging places. Doing this, we continue to build the horse’s willingness to come along with us because he knows that we know where these magic ‘click&treat spots’ are.
For horses that are barn/buddy sweet (they are not confident about leaving home) we can set out targets in a curve that gently goes away from home and then returns home. As the horse becomes more confident with the game, we can make the curve further and further away from home.
Once the horse is keen to hunt out the next target to earn a click&treat, we can set the targets in a straight line leaving home, being careful to stay within a distance that allows the horse to remain comfortable. We click&treat at each target going away from home and again on the way home. Eventually the targets can be a long way apart.
Once the horse is keen to walk forward to target a familiar object, we can use something like a Frisbee to toss ahead of us, walk to it, target it to earn a click&treat. Then toss it forward again, and so on.

When we introduce mats as foot target destinations, we open up further possibilities for seamless teaching/learning. Once the horse is eager to approach his mats because he knows he will earn a click&treat, the mats can serve the same purpose as the nose targets — desirable destinations.
But that’s not all. When a horse learns to line up his front feet tidily on a mat, he will generalize this to a tidy approach to the mat so he can step on it elegantly. We have given him a reason to line up his body and use it with more precision.
An energy conserving horse will be motivated to speed up to reach the mat. A rushing horse will be motivated to calm and collect himself to reach the mat.
For teaching the leading positions, the mat helps sustain the horse’s attention and focus. We can also use a mat as a positive destination or ‘relaxation spot’ to visit periodically while we work on more complex tasks.
Once the horse has established the habit of moving on with us to find the next target, we can introduce targeting of natural objects like trees or rocks, bushes, particular fence posts. We can also teach ‘target places’ like corners of paddocks or favorite grazing spots.
My video clips are available on YouTube by searching for HorseGym with Boots or Herthamuddyhorse on the YouTube search engine.
In this clip the targets are close together for ease of filming. I eventually tied rags to fences and hedges far apart so we did a lot of walking between a click&treat upon reaching each target.
Clips #3 – #14 of HorseGym with Boots go through the detail of using destinations to give the horse a sense of purpose when we are asking him to walk along with us.
Number 16 in my Blog Contents List (link at the top of this page) will take you the blog that has details about teaching smooth WALK ON and HALT signals.

Photo: I’m teaching my horse, Boots, to back up to a mounting block. My parameters include backing straight (hence the guide rails for this early lesson), backing for 6-8 steps (she started at the fence on the right) and halting with her withers just in front of the two tubs. This time she moved back an extra step, but it was a very good response for early in the training of this task. I’ve stepped off the black tub so I could deliver the treat while she stayed in the position I wanted.
Because of their role in the web of life — to be a meal for predators — horses are so much more observant than we are. They read our mood the moment we appear. They read our body language with exquisite care. When something in the environment is different from last time, they notice instantly.
If we want to become good at communicating with our horse, it helps to become more aware of what our mood, our body orientation and our body energy may be saying to the horse. Horses get confused and worried when our body language does not agree with what we are asking them to do. Or if we use a similar message to mean two different things.
As horsemen often say, “Nothing means nothing to a horse”. So if everything means something, it is good to be aware of the parameters we are setting when we interact with a horse. Here is a bit more detail about what parameters are, and things to remember to become better teachers for our horse.
A parameter is something we decide to keep the same or constant.
For example:
Whenever we change a parameter, it is important that we increase the rate of reinforcement (i.e. click&treat more often) and work our way forward again until we and the horse are both confident in the new situation, with one click&treat at the end of a task or a series of tasks. For example, relating to the photo above, once Boots confidently backed up in a straight line to stand between the two tubs, I removes the rails (one at a time) and ask her to back up for just a step or two, then work forward again to get 6-8 steps straight back.
Horses are super observant of all changes, large or small, and can often be ‘thrown’ by them if we proceed too fast or ask for too much too soon. They also immediately pick up if we are unsure about what we are doing.
This is why it’s important to have a written Individual Education Program suited to this horse in this environment before we delve into teaching our horse something new. If we are clear in our mind about what we are working on, that confidence will be picked up by the horse.
If you want to look at 20+ training sessions to achieve the objective outlined in the photo above, done at liberty with no extra props, here is the link to the very first session (lessons were mostly one a day, weather willing and lasted about three minutes each day). I can’t ride any more (dodgy hips & knees) so we did this as a just an interesting training project. The second video clip below takes you to the last clip in the series, in case you don’t want to see all the others in between!

Photo: Sitting with the horse in a roomy, enclosed area, asking nothing of him except politeness. This is a superb way to build a new relationship with a new horse or to to build an improved relationship with a horse we have already.
It’s only when we feel safe with our horse and our horse feels safe with us that real teaching and learning can go on. If our horse makes us feel worried or afraid, we need to take heed of the feeling and organize our environment so that we can be with the horse in a way that allows us to regain our safe, calm, centered core. Maybe we need to sit in our chair just outside the horse’s enclosure to start with.
It will be difficult for a horse to remain in his calm, centered core in our presence if we are sending out vibes that tell him we are uneasy and nervous. A good first step is to spend undemanding time with the horse, in his home if we feel safe there, or on the other side of a fence or gate if we don’t. We need to carry a swishy type body extension so that we can enlarge our bubble without offending the horse by striking out toward him. Horses are very sensitive to the air movement of two swishy twigs or dressage whips, or the swishing of a string rotated like a helicopter blade.
Horses easily understand when we are merely enlarging our bubble of personal space. If we strike out toward their personal bubble rather than just protect our own space, the horse will realize it instantly. It is important to be aware of the difference between acting in an assertive way and acting in an aggressive way, and to be mindful of which one we are doing.
As we sit with our horse, we can read, meditate or just enjoy the quiet of being in the moment, looking and listening and breathing. It’s nice if the horse can be in a roomy area where he is comfortable, able to see his companions but not where they can interfere with your special time together.
It works well to set a time limit. It doesn’t matter what the horse does. We are there as a companion, a paddock mate for the time we have set. We expect nothing of the horse except politeness. If he becomes overbearing, we move away with our chair or ask him to back off by swishing the air toward his feet to protect our personal bubble.
The PDF attached has a look at ways to ensure our safety.

Photo: Teaching the horse to target a pool noodle with his hind foot to help his confidence with standing on three legs is one half of the task.

Photo: The other half of the task is to teach relaxation while being rubbed all over with a pool noodle, keeping all feet on the ground.
For everything we teach our horse, we have to be mindful of also teaching the opposite. If we teach a very good ‘whoa’, it is also important to teach an excellent ‘walk on’ signal.
For most things we teach, we have to also teach a counter-balancing task.
If we don’t do these things, the horse will become fixated on one way of doing a task. He’ll be determined that he’ll always do it this way. In some situations, the power of the click&treat dynamic can work against us rather than for us.
So, for everything we teach, we need to counterbalance it with another task. How much time we spend balancing out these sorts of tasks depends on many factors. As we get better at understanding our horse, it will get easier to know when we’ve done too much of one dimension and need to consider the other dimension. We’ll find it easier and easier to keep a better balance.
The clip below looks at how we can generalize working with mats to balance the expectation of landing front feet on a mat to earn a click&treat, which we teach first. Once the horse heads straight to a mat as soon as he sees it, we can use tasks like this to balance out his eagerness.


This article gives a brief overview about what is involved with using markers and treats to make it easier for a horse to understand what we would like it to do.
‘Clicker training’ or ‘reward reinforcement’ is also called ‘positive reinforcement’ because we add something (usually a small morsel of food the horse likes) to the situation. ‘Release reinforcement’ is also called ‘negative reinforcement’ because we put signal pressure on the horse to do something. When we ‘release’ the pressure we remove something from the situation.
The terms ‘positive’ and ‘negative’, in the field of animal behavior, are used in
a mathematical sense, not in the sense of being ‘good’ and ‘bad’.
Clicker training can work with ‘reward reinforcement’ only. You can observe and wait for the horse to do something, and click him for it. For example, you can click and treat each time he itches himself. Once he’s made the connection, you can put a signal (either a gesture or a word or both) on that action, and then you can ask him to do it whenever you like.
The ‘click’ is the ‘bridge’ between what the horse has done and the treat he will get for it right after the click. It allows us to ‘mark’ the exact behavior we would like the horse to do, or at least a first approximation of the behavior we would eventually like him to carry out.
This is called ‘free shaping’. Once he responds correctly to your signal most of the time, you have created a ‘conditioned response’. If your horse comes to you every day at feeding time, you have created a ‘conditioned response’. If he sees you with a halter or bridle and moves away so you can’t catch him, you have a ‘conditioned response’.
They key is to set up the environment to make what we want the horse to do as easy for him as possible. Most often, we introduce a ‘target’ object. The natural curiosity of the horse causes him to put his nose on the target, we click and deliver a treat. Once nose targeting is firmly established in the horse’s mind as a way to earn click&treat, we can use targets for all kinds of things’
The click/treat system causes the horse to be strongly focused on finding out what earns the click and treat. He’ll start to offer behaviors to ‘earn’ the treat. It gives him a way to communicate with us. It also allows him a stronger ownership of the new learning. Soon after starting to learn things with click&treat, the horse will begin to offer the behaviors we have taught this way, hoping to motivate us to ‘pay’ for his effort with a click&treat.
At this point, it is important to put a new task ‘on signal’. A signal can be a gesture, a touch or verbal. Often it’s nice to use touch or gesture and voice together. Signals usually arise naturally out of the nature of the task we are teaching. For picking things up, I ask Boots to, “Pick!” and point to the object. At the end of a session, she likes to come around with me to pick up all the cones and rags we were using as arena markers.
Once the horse knows the task and the signal, it is important to only click/treat when you have asked for it by giving the signal. Otherwise it might be hard to use cones as arena markers while riding or doing ground work exercises!
Using the click&treat only when we’ve asked for the behavior, will slowly tone down the horse’s desire to ‘throw the new move at you’ as soon as he sees you (much like a child dying to show you his new painting). When I taught Boots to ‘spin’, it was quite startling when she wanted to show it to me and visitors all the time, while standing right beside us!
There is more information in the GLOSSARY which you can access with a link at the top of the page.
Over the last few years I have created a series of clicker training activities posted as clips on YouTube. They can be reached by putting HorseGym with Boots or HerthaMuddyHorse into the YouTube search engine.
If you click on the HorseGym with Boots playlist in my channel, they should line up in number order as I’ve created them through the years.
There are a number of other playlists devoted to specific topics. Clips are kept short, usually under five minutes long, to make them easy to find and review. New clips are added each month. Many are being incorporated into my blog posts.
See the Books section for books available from Amazon as e-books or paperbacks. On Amazon you can ‘Look Inside’ each one. The notes mentioned at the end of the clips have been superseded by my books.
If you would like more information, email me at: hertha.james@xtra.co.nz
Below is one of the “HorseGym with Boots” series. “Boots” is my horse’s name – ‘Nirvana Puss ‘n Boots‘. She is 3/4 Quarter Horse, born in 2002.

Bursting a balloon is not an every-day thing a horse does. Teaching it requires a careful plan of ‘thin slices’ that allows the horse to master the task being continually successful and so remaining motivated to try again.
What is Thin-Slicing?
When we want to teach our horse something, the first thing we need is a PLAN. A plan written down has the advantage that we can look back on it. As we get feedback from the horse and our own actions, we can go back and tweak our original plan. Or we can throw it out and start again.
One way to create a plan is to:
My book, How to Create Good Horse Training Plans covers this topic in great detail. (See the BOOKS link at the top.)
The video clip link below is a bit long (9 min) but it demonstrates all the parts of a PLAN and it uses various teaching methods to get to the final successful outcome.
Clip: Thin-slicing the Water Obstacle
